background image

15

WPS-750-DOM-AH Installation Manual

 © 2013 Wirepath Surveillance

OSD MENU SETTINGS

The camera menu allows for  
the adjustment of settings to  
obtain optimal image clarity  
and color realism.

Note : If there is a “    ” symbol  
after the option, enter into the  
subdirectory to adjust more settings.

CAMERA NAME SETTING

The CAM NAME provides the ability to  
set a camera title to appear on-screen.
  • To display the camera name  
      on-screen, set the CAM NAME 
      to ON.
  • Select a camera name by selecting one letter/number at a time  


      using the menu at the bottom of the screen.  Consider assigning  


      a camera name that highlights the location of the camera such  


      as Lobby, Main Hall, Entrance 1, etc.  
  • Select CLR to clear all letters. Select POS to choose the position  


    of CAM NAME on the screen. Select END to exit the menu.

LENS

  • Select DC IRIS (Auto-IRIS),  
      or MANUAL mode.  
  • In DC mode, the camera adjusts the  
      aperture of the lens automatically  
      based on the lighting conditions of  
      the environment.  DC mode is the  
      recommended setting, especially for outdoor locations and  
      environments with varying lighting conditions. Reaction speed

determines the speed of the Auto Iris feature.  

  • In MANUAL mode, the aperture is set fully open.  This setting is only   


    recommended for an environment with consistent lighting conditions.  

<CAMERA NAME>

A B C D E F G H I J K L M

N O P Q R S T U V W X Y Z

a b c d e f g h I j k l m 

n o p q r s t v u w x y z

-- • 0 1 2 3 4 5 6 7 8 9


←   →   CLR   POS   END

---------------------------------------

<MAIN MENU>

1. CAM NAME 

OFF

2. LENS 

DC IRIS

3. EXPOSURE 

4. DAY/NIGHT 

DAY

5. WDR/BLC/ECLPS 

WDR

6. WHITE BAL 

ATW

7. 3D-DNR 

ON

8. EFFECTS 

9. SPECIAL

0. EXIT 

RET


<LENS>

BRIGHTNESS   50--------|---------- 
REACTION SPEED 8---------------|
PREVIOUS 


Содержание WPS-750-DOM-AH-BL

Страница 1: ...WPS 750 DOM AH BL WPS 750 DOM AH WH CAMERA DOME INSTALLATION MANUAL Review manual thoroughly before installation Retain for future reference ...

Страница 2: ......

Страница 3: ...ns 8 Set Up 11 1 Operating The OSD Menu 11 2 OSD Menu Structure 11 3 OSD Menu Settings 15 3 1 Camera Name Setting 15 3 2 Lens 15 3 3 Exposure 16 3 4 Day Night 17 3 5 WDR BLC ECLPS 18 3 6 White Balance 19 3 7 3D DNR 20 3 8 Effects 21 3 9 Special 22 3 10 Exit 25 RS485 System Diagram 26 Warranty 26 Troubleshooting 27 Specifications 30 Dimensions 31 3 ...

Страница 4: ...re conditions between 40 F 140 F Operates to 40 when continually powered 3 Do not mount the camera directly facing bright light sources Exposing the camera to strong light over long periods of time will damage the camera s sensor 4 Do not supply voltage other than 12 30V DC or 24V AC This camera regulates power within this range Higher voltages will damage the camera s electronic components 5 Do n...

Страница 5: ... off to ensure the camera operates within an optimum temperature range and helps to minimize condensation inside the housing at low temperatures 3D DNR and Global Movement The powerful 3D DNR function with Global Movement not only helps to reduce digital noise but also minimizes the blurring effect when an object is in motion Special Functions Automatic White Balance settings Eclipse Sense up and ...

Страница 6: ...at provide power to the cameras allow for various mounting options and make connection to the head end quick and easy WPS MNT EXT DOM Dome Camera Extension Mount Use to extend the camera away from the ceiling and to hide wires for locations where wires cannot be placed into the ceiling WPS MNT FLUSH DOM Dome Camera Flush Mount Use to mount the camera ceiling for flush clean appearance WPS MNT L DO...

Страница 7: ... www SnapAV com for a complete listing of accessories WPS BAL V PIGTAIL Mini Passive Video Balun with Pigtail and Screw Terminals WPS BAL V MINI Mini Passive Video Balun with Pigtail and Screw Terminals WPS BAL V COMBO Mini Passive Video Balun with Screw Terminals Combo Pack Contains 1 WPS BAL V PIGTAIL and 1 WPS BAL V MINI WPS BAL VP Passive Video and Power Balun with RJ45 WPS BAL VPA Passive Vid...

Страница 8: ...2 or Cat5e 6 A Open the camera by using the provided 3mm Allen key to remove the three screws on the dome cover B Pre adjust the camera s 3 axis angle so the lens points in the desired direction The lens angle should not exceed 50 off the center axis A Connect the BNC video output to the video in of a DVR or monitor B Connect the DC Power In to a power supply using the included WPS ACC PWR power a...

Страница 9: ...wall or eve A 1 Use the provided foam gasket as a template to pre mark mounting hole locations A 2 Predrill holes in the marked locations A 3 Connect the wires from the wall to the Cameras Pigtail and insert them into wall A 4 Position the Camera base over the marked holes from step 3 A 1 A 5 Secure the Camera with the provided screws B Mounting to a Single gang Junction Box If using one of the op...

Страница 10: ... The Test Port adapter power connection for this camera only uses a 12 V DC power supply Using a 24 V AC or other voltage power supply with the Test Port Adapter will result in damage to the camera and possibly the power supply C Adjust the camera s 3 axis angle so the lens points in the desired direction The lens angle should not exceed 50 off the center axis D Loosen but do not remove the zoom a...

Страница 11: ...ration OSD Menu Structure Settings have been preconfigured for optimal performance in most applications If adjusting the settings produces a poor picture factory reset the camera to restore the original settings see p 21 Bold indicates factory preset CAM NAME LENS OFF ON DC IRIS MANUAL BRIGHTNESS REACTION SPEED PREVIOUS BRIGHTNESS REACTION SPEED PREVIOUS 0 100 50 1 8 0 100 50 1 8 EXPOSURE AGC SHUT...

Страница 12: ...10 15 30 and 60SEC ON OFF ON OFF 1 100 32 SUPER HIGH MIDDLE LOW OFF ON DARK ON IR IR MODE IR DEST PREVIOUS AREA SETTING ALL AREA SET MASK COLOR ECLPS LEVEL GAIN CONTROL PREVIOUS ON OFF GRAY D GRAY BLACK 1 5 ON OFF ON OFF GRAY D GRAY BLACK 1 5 ON OFF AREA SETTING ALL AREA SET MASK COLOR ECLPS LEVEL GAIN CONTROL PREVIOUS AREA SETTING ALL AREA SET MASK COLOR ECLPS LEVEL GAIN CONTROL PREVIOUS HIGH MID...

Страница 13: ...IOUS ZOOM PAN TILT PREVIOUS OFF MIRROR V FLIP ROTATE 0 100 50 0 100 50 COLOR COLOR LEVEL COLOR HUE RED GAIN BLUE GAIN PREVIOUS ON OFF 100 200 100 100 100 0 100 100 0 100 100 0 ON OFF ON OFF X1 X6 13 100 100 100 100 WHITE BAL 3D DNR ATW COL ROLL PUSH MANUAL ON OFF DNR LEVEL DESTINATION GLOBAL MOVEMENT PREVIOUS COLOR TEMP BLUE RED INITIAL SET PREVIOUS 1 100 24 0 63 47 ON OFF INDOOR OUTDOOR 100 100 0...

Страница 14: ...AGC LICENSE PLATE PREVIOUS CONTRAST OUTPUT LEVEL TONE PREVIOUS CONTRAST OUTPUT LEVEL TONE PREVIOUS 0 100 50 64 64 0 1 64 0 0 100 50 64 64 0 1 64 0 1 1600 1 2500 1 5000 1 7000 1 10 000 1 30 000 1 50 000 1 90 000 OFF A FLK 1 160 1 250 1 500 1 700 1 1000 1 1600 1 2500 1 5000 1 7000 1 10 000 1 30 000 1 50 000 1 90 000 OFF A FLK 1 160 1 250 1 500 1 700 1 1000 OFF LOW MIDDLE HIGH OFF LOW MIDDLE HIGH EXI...

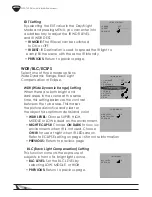
Страница 15: ...POS to choose the position of CAM NAME on the screen Select END to exit the menu LENS Select DC IRIS Auto IRIS or MANUAL mode In DC mode the camera adjusts the aperture of the lens automatically based on the lighting conditions of the environment DC mode is the recommended setting especially for outdoor locations and environments with varying lighting conditions Reaction speed determines the speed...

Страница 16: ...ower shutter speed For brighter environments with fixed lighting conditions or scenarios in which fast moving objects must be captured select a faster shutter speed such as 1 1000 seconds A FLK controls the flickering effect on the screen resulting from different video refresh rates e g PAL 50 Hz 60 Hz and NTSC 50 Hz 60 Hz In such cases set the shutter to A FLK 1 100 to accommodate the different r...

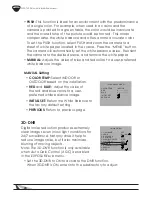
Страница 17: ...the MENU button to set the switching time and speed for AUTO mode D N LEVEL Select the sensitivity of switching between color and B W Set the value to LOW MIDDLE or HIGH mode based on the environment of where the camera is installed The HIGH level switches the camera to color or B W with less change in the lighting level than the LOW mode FILTER DLY Select the delay time before the camera switches...

Страница 18: ...is makes the picture distinctive and clear so the object has optimum detail and color WDR LEVEL Choose SUPER HIGH MIDDLE or LOW based on the environment NIGHT ECLIPSE Choose ON DARK for low lux environments when IR is not used Choose ON IR for use at night when IR LEDs are on Refer to ECLIPSE setting on page 16 for more information PREVIOUS Return to previous page BLC Back Light Compensation Setti...

Страница 19: ...ra to the light GAIN CONTROL Turns the gain ON or OFF PREVIOUS Return to previous page WHITE BALANCE White Balance is the process of balancing the color of an image so that the picture is as accurate as possible White balance adjusts the image color according to the lighting conditions of the scene Select one of following white balance modes ATW Auto Tracking White Balance ATW analyzes the color t...

Страница 20: ...UAL Setting COLOR TEMP Select INDOOR or OUTDOOR based on the installation RED and BLUE Adjust the value of the red and blue colors to a user preferred white balance image INITIAL SET Return the White Balance to the factory default setting PREVIOUS Return to previous page 3D DNR Digital noise reduction produces extremely clear images even in low light conditions for 24 7 surveillance Not only does ...

Страница 21: ...ure to move vertically IMAGE FREEZE Select ON for a still picture OFF for a moving picture D EFFECT Typically used in vehicles the image can be mirrored by enabling the Mirror Image View There are 3 modes available MIRROR V FLIP Vertical Flip and ROTATE Rotate 180 degrees CONTRAST When increasing the contrast value dark colors become darker and light colors become lighter The value ranges from 0 t...

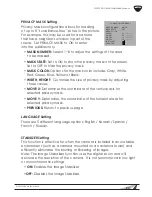
Страница 22: ...y Set MOTION DET to ON to enter into the Motion Det subdirectory for settings ZONE NUMBER Select 1 8 to adjust the settings of the area zone for motion to be detected ZONE STATE Set to ON to display the detection zone on the screen set to OFF to hide the detection zone on the screen WIDTH HEIGHT Customize the size of detection zone by adjusting the width and height MOVE X Determines the coordinate...

Страница 23: ...s MOVE X Determines the coordinate of the vertical axis for selected privacy mask MOVE Y Determines the coordinate of the horizontal axis for selected privacy mask PREVIOUS Return to previous page LANGUAGE Setting There are 5 different language options English Korean Spanish French Russian STABILIZER Setting This function is effective for when the camera is installed in an unstable environment suc...

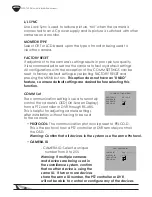
Страница 24: ...unction COMM Set The communication setting is used to remotely control the camera s OSD On Screen Display from a PTZ controller or DVR through RS 485 This is helpful for adjusting camera settings after installation without having to be next to the camera PROTOCOL The communication protocol is preset to PELCO D This is the protocol how a PTZ controller or DVR remotely controls the OSD Warning Confi...

Страница 25: ...he system use the same Baud Rate SAVE REBOOT Once changes have been made to the COMM SETTINGS Save and Reboot the camera to retain the settings These settings are stored even when the Factory Default settings are applied Select SAVE REBOOT and press the MENU button PREVIOUS Return to previous page EXIT 1 Select EXIT to exit the OSD menu 2 Attach the Dome to the Camera Note The camera is equipped w...

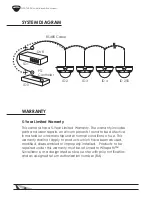
Страница 26: ... material or workmanship under normal conditions of use This warranty shall not apply to products which have been abused modified disassembled or improperly installed Products to be repaired under this warranty must be returned to Wirepath Surveillance or a designated service center with prior notification and an assigned return authorization number RA RS485 Cable ID 2 ID 0 ID 1 DVR PTZ Controller...

Страница 27: ...yeglasses cloth Nothing appears on the display Check if the power for camera and monitor is ON Check if the VIDEO cable is connected to the camera BNC video output jack Check if the VIDEO cable is connected to the monitor VIDEO input jack Image appears dim on the display Check the monitor contrast setting Check the monitor and camera brightness setting Check the camera exposure and shutter setting...

Страница 28: ...a location to make sure it is not pointing directly towards the sun or bright light source Check if the flickerless control is set correctly proper settings should reflect required refresh rates Reset the camera to factory default settings RS 485 communication failure Check whether the RS 485 polarity is connected correctly to the RS 485 port Check the Camera ID setting and make sure there is not ...

Страница 29: ...ouching or shorting on a metal box Condensation Appears on Camera Lens Cover Check the color of the beads in the Silica pack under the lens cover If the blue crystals have turned pink indicating that the pack has absorbed moisture replace the pack with the spare provided with the camera Camera Power Cycles Intermittently Check voltage at camera for proper voltage level Connect camera locally with ...

Страница 30: ... Yes WDR Super WDR DNR 3D DNR Minimum Illumination 0 03 Lux color 0 00003 Lux Sens up Sense Up Yes Highlight Compensation Yes Auto Gain Control Yes Back Light Compensation Yes White Balance Yes Privacy Mask Yes Motion Detection Yes Mirror Mode Yes Digital Zoom Yes Image Stabillizer Yes Parking Line Yes Housing Power Weather Rating IP66 Vandal Resistant Yes RS485 Yes Operating Temperature 40 F 140 ...

Страница 31: ...31 WPS 750 DOM AH Installation Manual 2013 Wirepath Surveillance DIMENSIONS Top View Side View 5 91 4 04 67 0 67 0 Maximum Camera Angle ...

Страница 32: ...130424 1555 2013 Wirepath Surveillance ...

Отзывы: