


WireCrafters
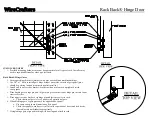
2” x 6” Horizontal Ceiling Tube
2” X 6” CEILING TUBE
1.
Note location(s) of 2” x 6” horizontal ceiling tube(s) (A).
2.
Lift ceiling tube (A) so that holes in mounting plates match holes at top of partition
wall post (D).
a.
See detail page 23 if one end of ceiling tube mounts directly to building wall.
3.
Connect ceiling tube to wall post with two 3/8” x 3” bolts and nuts, and tighten
securely.
a.
Installer: use 3/8” flat washer (not provided) on nut and bolt side see Fig.1
4.
Install slotted angle (C) on top of wall panels per instruction page 19.
5.
Use 3/8” x 3” bolts to attach ceiling panels to 2” x 6”ceiling tube.
Содержание 840
Страница 6: ...WireCrafters Hinge Door Hardware Pack ...
Страница 11: ...WireCrafters Slide Door Hardware Pack ...
Страница 13: ...WireCrafters Outside Slide Door ...
Страница 15: ...WireCrafters Inside Slide Door ...
Страница 23: ...WireCrafters Ceiling Tube Masonry Connections ...


