background image


38 

38 

EL-Series HMI User Manual 

5.1 Android Debug Bridge (ADB) Driver Installation 

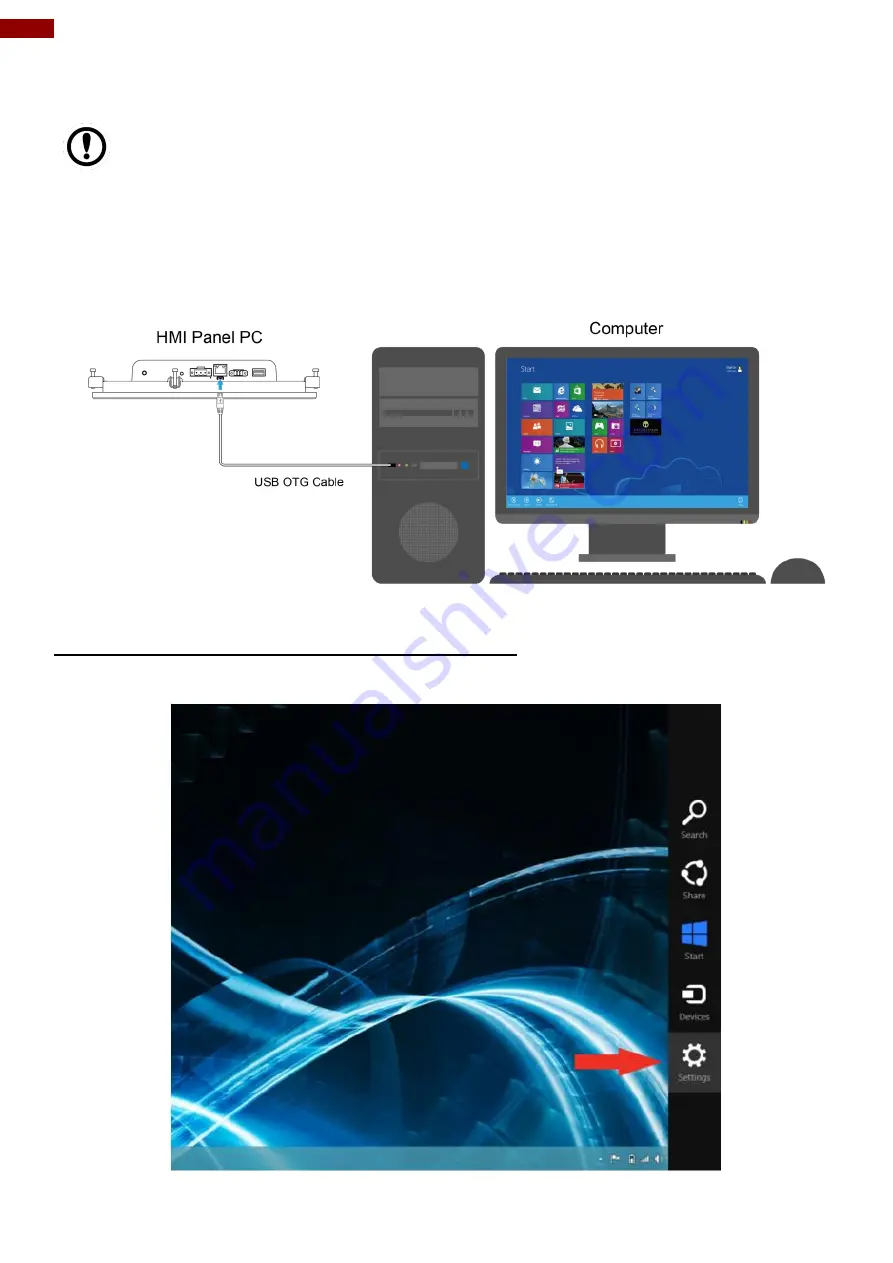
You can find USB OTG driver in the Driver CD that comes in your package. You need to connect HMI 
device to the computer with the USB OTG cable. When using a USB cable (not supplied with your HMI 
device

), verify that the cable or cable packaging bears the “Certified USB™” mark (see below) to 

guarantee USB OTG compliance. 


*I/O layout of the HMI device on the picture is for demonstration purposes only. Your I/O layout may vary 
from the picture above. 

5.1.1 Disabling Driver Signature on Windows 8 

1.  Hold down the Windows key on your keyboard and press the letter C to open the Charm menu, 

and then click the gear icon (

Settings

). 


Important: 


If your computer is running on Windows Embedded 8 Standard or Windows 8.1 Industry 
Pro OS system, you need to disable driver signature.  


For Win  XP  / Win 7  skip disabling  driver  signature  section,  and directly  proceed  to  ADB 
driver installation. 

Содержание EL Series

Страница 1: ... this product and save this manual for future use EL Series HMI Freescale Cortex A9 i MX6 Dual Core 1 GHz Android 6 0 Model No W04FA3S ELT1 W05FA3S ELT1 W07FA3S ELT1 W10FA3S ELH2 W15FA3S ELA4 User Manual Document Version 1 3 Document Part No 9152111I1134 ...

Страница 2: ...erations 20 3 2 Safety Precautions 20 3 3 Mounting Guide 20 Chapter 4 Operating the Device 25 4 1 Operating System 26 4 2 Multi Touch 26 4 3 System Settings 27 4 4 Ethernet 29 4 5 Winmate Home Manager WHM 32 Chapter 5 Software Installation 37 5 1 Android Debug Bridge ADB Driver Installation 38 5 2 Installing Android Debug Bridge ADB 46 5 3 Downloading Image Tool 47 5 4 OTA Update Guide 47 5 5 OS I...

Страница 3: ...ice date If the customer discovers a defect we will at his her option repair or replace the defective product at no charge to the customer provide it is returned during the warranty period of one year with transportation charges prepaid The returned product must be properly packaged in its original packaging to obtain warranty service If the serial number and the product shipping data differ by ov...

Страница 4: ...nced electronics personnel should open the PC chassis Toujours débrancher le cordon d alimentation du chassis lorsque vous travaillez sur celui ci Ne pas brancher de connections lorsque l alimentation est présente Des composantes électroniques sensibles peuvent être endommagées par des sauts d alimentation Seulement du personnel expérimenté devrait ouvrir ces chassis Caution Attention Always groun...

Страница 5: ... on the equipment should be noted Let service personnel to check the equipment in case any of the following problems appear o The power cord or plug is damaged o Liquid has penetrated into the equipment o The equipment has been exposed to moisture o The equipment does not work well or you cannot get it to work according to the user manual o The equipment has been dropped and damaged o The equipmen...

Страница 6: ... rules These limits are designed to provide reasonable protection against harmful interference when the equipment is operated in a commercial environment This equipment generates uses and can radiate radio frequency energy and if not installed and used in accordance with the instruction manual may cause harmful interference to radio communications Operation of this equipment in a residential area ...

Страница 7: ...es information for specific user needs and includes EL Series HMI User Manual contains detailed description on how to use the HMI device its components and features EL Series HMI Quick Start Guide describes how to get the HMI up and running Note Some pictures in this guide are samples and can differ from actual product Document Revision History Version Date Note 1 0 25 Jul 2018 Initial document re...

Страница 8: ...r 1 Introduction This chapter gives you product overview describes features and hardware specification You will find all accessories that come with the HMI in the packing list Mechanical dimensions and drawings included in this chapter ...

Страница 9: ...cale Cortex A9 i MX6 Dual Core 1 GHz Android 6 0 operating system Projected Capacitive P CAP Multi Touch Fanless cooling system and ultra low power consumption Front IP65 water and dust proof rear IP22 Mounting clips for quick Installation Light design for machine automation smart factory and IoT applications 1 3 Package Contents Carefully remove the box and unpack your device Package content may ...

Страница 10: ... Series HMI Notice that this is a simplified drawing and some components are not marked in detail Please contact our sales representative if you need further product information EL Series HMI 4 3 Unit mm Dimensions 121 5 x 82 05 x 42 2 Description Description USB 2 0 USB OTG RS485 Power Terminal Block Reset Button LED Indicator RJ45 LAN ...

Страница 11: ...11 Chapter 1 Introduction EL Series HMI 5 6 Unit mm Dimensions 158 7 x 116 3 x 51 Description Description USB 2 0 USB OTG RS485 Power Terminal Block Reset Button LED Indicator RJ45 LAN ...

Страница 12: ...12 EL Series HMI User Manual EL Series HMI 7 Unit mm Dimensions 184 94 x 127 7 x 44 9 Description Description USB 2 0 Power Terminal Block RS485 LED Indicator RJ45 LAN Reset Button USB OTG ...

Страница 13: ...13 Chapter 1 Introduction EL Series HMI 10 1 Unit mm Dimensions 267 42 x 182 14 x 57 6 Description Description USB 2 0 Power Terminal Block RS485 LED Indicator RJ45 LAN Reset Button USB OTG ...

Страница 14: ...14 EL Series HMI User Manual EL Series HMI 15 6 Unit mm Dimensions 387 6 x 257 7 x 52 5 Description Description USB 2 0 Power Terminal Block RS485 LED Indicator RJ45 LAN Reset Button USB OTG ...

Страница 15: ...15 Chapter 2 Getting Started Chapter 2 Getting Started This chapter tells you important information on power supply adapter and precautions tips Pay attention to power considerations ...

Страница 16: ...included in your package Rating Output 12 V 6 6A Using other AC adapters may damage the device Utiliser seulement le convertisseur AC inclu avec votre appareil Puissance Sortie 12 V 6 6A Utiliser d autres convertisseurs pourraient endommager l appareil AC Adapter Power Cord 2 Pin Terminal Block to DC Jack Alternating Current Mise à le terre This product must be grounded Use only a grounded AC outl...

Страница 17: ...ly 2 2 Connector Description and Pin Assignments 2 2 1 Power Input Connector The DC power source input of the panel PC is a 2 pin terminal block connector that supports 12 24V DC power input maximum current 3 3A Pin assignment and connector description of terminal block connector Note Based on the model terminal block connector may be located either on the bottom or on the rear side of the HMI dev...

Страница 18: ...B 2 0 compatible devices Pin assignment and connector description of USB 2 0 connector 2 2 5 USB OTG Connector Use USB OTG connector to connect the panel PC to other USB On The Go compliant devices such as flash drives digital cameras mice or keyboards Use USB OTG cable to install software on the panel PC Pin assignment and connector description of USB UTG connector Refer to Ch 5 of this user manu...

Страница 19: ...19 Chapter 3 Mounting Chapter 3 Mounting This chapter provides mounting guide for all available mounting options Pay attention to cautions and warning to avoid any damages ...

Страница 20: ... according to the interface Wires that share similar electrical characteristics must be bundled together Do not bundle input wiring with output wiring Keep them separate When necessary it is strongly advised that you label wiring to all devices in the system 3 3 Mounting Guide EL series HMI devices come with different mounting options suitable for most of the industrial and commercial applications...

Страница 21: ... In addition to elegant design rear mount solution is making the HMI unit easy to clean and maintain The HMI device is secured to the fixture from the rear by using the mounting brackets included in the package Size 4 3 5 6 7 10 1 15 6 Cutout dimension W x D in mm 109 6 x 71 2 145 7 x 10³ 3 174 08 x 116 9 244 x 159 371 6 x 223 5 Mounting Clips and Screws 4 pcs 6 pcs 7 pcs 7 pcs 10 pcs Mounting Ins...

Страница 22: ...t only 7 10 1 15 6 HMI devices support VESA mounting Size VESA Dimensions Screw Hole Diameter 7 10 1 15 6 75 x 75 mm VESA M4 x 3 mm Mounting Instruction Use Philips M4x5 screws to fix the desk stand to VESA holes on the back cover of the device The picture is for demonstration purposes only VESA Mounting accessories are not supplied with the HMI device ...

Страница 23: ...3 and 5 6 HMI devices support RAM mounting The pictures in this section are for demonstration purposes only RAM mount accessories are not supplied with the HMI device RAM Base Dimensions 38 1 x 30 mm Screw 4 x M5 0 8x10 mm Phillips screws RAM Mount parts may be ordered individually through RAM Mount www rammount com No Drill Solution ...

Страница 24: ...24 EL Series HMI User Manual Drill Solution ...

Страница 25: ...25 Chapter 4 Operating the Device Chapter 4 Operating the Device In this chapter you will find instructions on how to operate the HMI device ...

Страница 26: ...on the screen by touching it and not lifting your finger until it respond Touch Hold Drag Touch and hold an item for a moment and then without lifting your finger move your finger on the screen until you reach the target position i e moving the apps around the home screen Swipe or slide Quickly move the finger across the surface of the screen i e slide a lock screen to open the lock Double tap Tap...

Страница 27: ...rking in even if it was in a different app Once you back up to the Home screen you can t go back any further Home Returns to the Home screen To get suggestions based on the screen you re currently viewing touch hold this button Overview Opens a list of thumbnail images of screens you ve worked with recently To open one touch it To remove a screen from the list swipe it left or right or touch the X...

Страница 28: ...our device touch hold it slide your finger toward the top of the screen and drop the app over Remove in the top left 4 3 3 Quick Settings You can open your device s Settings app from the All Apps screen or from Quick Settings For example to change notification sounds and volume go to Settings Device Sound to change the volume Use Quick Settings to easily change frequently used settings like turnin...

Страница 29: ...29 Chapter 4 Operating the Device 4 4 Ethernet 1 Connect Ethernet Cable to the HMI 2 Touch All APPS icon and the open Ethernet application 3 Ethernet APP main menu appears ...

Страница 30: ...rnet Configure Ethernet Ethernet OFF is set by default Swipe Ethernet ON to activate Ethernet connection Connection Type Setting Description DHCP The device automatically capture IP address from the router Static IP Allows to manually set up IP address DNS Network and Gateway ...

Страница 31: ...31 Chapter 4 Operating the Device 4 4 2 Checking Ethernet Settings To check Ethernet settings Go to All Apps Ethernet Check Ethernet Ethernet settings menu appears on the top right side of the desktop ...

Страница 32: ...einstalled APP called Winmate Home Manager WHM which let the device manager to lock the launcher then the user can only use one application assigned by the device manager 4 5 1 How to Lock Applications To lock applications 1 In the main APPS window select the Home Manager APP and tap it to open ...

Страница 33: ...t which app you want to run up automatically after booting Password Manager Set the WHM password Default password is 0000 About Displays information about Home Manager 2 Go to Application Selector and choose the app which you want to run up automatically after booting ...

Страница 34: ...Home 4 Select Restrict Home and Always and then restart the computer to enable these settings The system will automatically start the application which you selected and lock it Any time user presses home key or back key the system will go back to the same application which you have selected ...

Страница 35: ...ck Applications Follow the instruction below to reset Home Manager 1 If you want to reset the home manager pull down the left side to open the status bar and open HomeManager 2 System will request the password to login Touch OK Default password is 0000 ...

Страница 36: ...ou will go back to the normal Launcher 4 5 3 How to Change Password To change the password 1 Go to Password Manager and set your own password for this APP 2 The default password is 0000 Enter a new password in New Password field and then tap Change Password ...

Страница 37: ...hapter 5 Software Installation Chapter 5 Software Installation This chapter contains software installation and updates guide All the programming guides can be found in the driver CD included in the package ...

Страница 38: ...ee USB OTG compliance I O layout of the HMI device on the picture is for demonstration purposes only Your I O layout may vary from the picture above 5 1 1 Disabling Driver Signature on Windows 8 1 Hold down the Windows key on your keyboard and press the letter C to open the Charm menu and then click the gear icon Settings Important If your computer is running on Windows Embedded 8 Standard or Wind...

Страница 39: ...apter 5 Software Installation 2 Click Change PC Settings 3 Click General 4 Under Advanced Startup click Restart Now Note In Windows 8 1 the Restart Now button has moved to PC Setting Update Recovery Recovery ...

Страница 40: ...40 40 EL Series HMI User Manual 5 After restarting click Troubleshoot 6 Click Advanced Options ...

Страница 41: ...Software Installation 7 Click Windows Startup Settings 8 Click Restart 9 After restarting your computer a second time choose Disable driver signature enforcement from the list by typing the number 7 on your keyboard ...

Страница 42: ...ver software anyway If you are unfamiliar with installing drivers check out our Installing ADB driver tutorial for a step by step guide Note The next time you restart your computer driver signature enforcement will be in effect again You will have to repeat this process for any new boards If you have multiple boards to use with the same computer we recommend installing the drivers for each one bef...

Страница 43: ...rm whether the USB device was found by the system Device Manager 120A Other devices FA34 Update Driver Software 2 In the Update Driver Software window choose Browse my computer for driver software 3 Select Let me pick from a list of device drivers on my computer Click Next ...

Страница 44: ... Manual 4 Select from your computer 5 In the Update driver software window click show All Devices and then click Next 6 The system is looking for the driver folder Click Browse 7 Select the driver for your OS system Click Open ...

Страница 45: ...age is used to confirm whether the user wants to install the driver Select Install this driver software anyway to continue 9 When the installation is successfully completed you will see Android ADB Interface driver in the Update Driver Software window Now adb debug can be carried out ...

Страница 46: ...form http developer android com tools help adb html 5 2 1 Installing Android Debug Bridge ADB 1 Decompress adb zip Open ADB terminal and move into the adb archive ADB Terminal window 2 Connect FA34 motherboard to the computer via USB FA34 will ask you to confirm USB debugging Tap OK After ADB connection established install APP or check system log via adb ...

Страница 47: ... press Ctrl C to leave logcat 5 3 Downloading Image Tool Download OS Image Tool update guide Winmate Download Center http www winmate com Support Download Center Multi touch PPC EL Series HMI OS Image 5 4 OTA Update Guide OTA is a tool which can help you to update OS image To receive Android OS image file contact our sales representatives Once you get the image file follow the guideline below 1 Co...

Страница 48: ...48 48 EL Series HMI User Manual System shows OTA firmware related information ...

Страница 49: ...49 Chapter 5 Software Installation 3 Click Auto check Update The system is checking OTA File It may take some time 4 Tap Update Image ...

Страница 50: ...50 50 EL Series HMI User Manual 5 Make sure the file founded by the system is image update file Tap OK 6 Make sure the battery level is at least 50 Tap OK ...

Страница 51: ... source Do not remove the battery 8 After update the system will automatically restart 5 5 OS Image Update Guide Download OS Image update guide from Winmate Download Center or Winmate File Share Winmate Download Center http www winmate com DownCenter DownLoadCenter asp DownType 3018 ...

Страница 52: ...apter includes the directory for technical support Free technical support is available from our engineers every business day We are always ready to give advice on application requirements or specific information on the installation and operation of any of our products ...

Страница 53: ..._______________________________________________________________________ _____________________________________________________________________________________ _____________________________________________________________________________________ _____________________________________________________________________________________ ______________________________________________________________________...

Страница 54: ...N 1 x RJ45 10 100 1000 LAN 1 x RJ45 10 100 1000 LAN 1 x RJ45 10 100 1000 LAN 1 x RJ45 1 10 100 1000 LAN USB Ports 1 x USB 2 0 1 x USB 2 0 1 x USB 2 0 1 x USB 2 0 1 x USB 2 0 USB OTG 1 x USB OTG 1 x USB OTG 1 x USB OTG 1 x USB OTG 1 x USB OTG COM Port 1 x RS 485 1 x RS 485 1 x RS 485 1 x RS 485 1 x RS 485 System Specifications Processor Freescale Cortex A9 i MX6 Dual Core 1GHz Optional Quad Core Fr...

Страница 55: ...___________________________________ ___________________________________________________________________ ___________________________________________________________________ ___________________________________________________________________ ___________________________________________________________________ ___________________________________________________________________ ________________________...

Страница 56: ...Winmate Inc 9F No 111 6 Shing De Rd San Chung District New Taipei City 24158 Taiwan R O C www winmate com Copyright Winmate Inc All rights reserved ...

Отзывы: