background image

25

Additional Information

IMPORTANT: 


This device complies with part 15 of the FCC Rules. Operation is subject to the following two conditions: (1) This device 
may not cause harmful interference, and (2) this device must accept any interference received, including interference that 
may cause undesired operation. 

This equipment has been tested and found to comply with the limits for a Class B digital device, pursuant to part 15 of 
the FCC Rules. These limits are designed to provide reasonable protection against harmful interference in a residential 
installation. This equipment generates, uses and can radiate radio frequency energy and, if not installed and used in 
accordance with the instructions, may cause harmful interference to radio communications. However, there is no guaran-
tee that interference will not occur in a particular installation. If this equipment does cause harmful interference to radio 
or television reception, which can be determined by turning the equipment off and on, the user is encouraged to try to 
correct the interference by one or more of the following measures:

•   Reorient or relocate the receiving antenna.
•    Increase the separation between the equipment and receiver.
•    Connect the equipment into an outlet on a circuit  

different from that to which the receiver is connected.

•    Consult the dealer or an experienced radio/TV  

technician for help.

Changes or modifications not expressly approved in this manual could void your authority to operate this equipment.

This product label can be found near the battery compartment.

EASY START:


(see User’s Guide for more detail)

1.  Insert batteries. IMPORTANT: Measure  

distance to target and adjust FOCUS 

RANGE accordingly. If LASER AIM is 

needed, use caution.

2.  Turn dial to SETUP and press power  

button. Set date & time. Adjust 

timelapse interval.

3.


Turn dial to AUTO. Camera will begin 

timelapse program. Close door.  

Share your pictures at wingscapes.com

Need help? Questions? Problems?

Do not return to retailer, contact Wingscapes 

directly: (888) 811-9464 or 


[email protected]

WINGSCAPES

150 Industrial Road

Alabaster, AL 35007

www.wingscapes.com

1-888-811-WING (9464)

Model Number:

WSCA04 – 00106 

Serial Number:

Sold by Wingscapes, a 

division of PRADCO Outdoor 

Brands. Manufactured by 

Global Point Products. 
No user serviceable parts 

inside. 

This device 

complies with part 

15 of the FCC 

rules. Operation 

is subject to the 

following two 

conditions: (1) 

This device may 

not cause harmful 

interference, and 

(2) this device 

must accept 

any interference 

received, including 

interference 

that may cause 

undesired 

operation. 

This product 

complies with 

applicable 

requirements of 21 

CFR 1040.10 and 

1040.11. 

PlantCam Easy Start Label

2.125” w x 2” h

PlantCam Product Label 1 

3.25” w x 0.75” h

PlantCam Product Label 2 

0.875” w x 4.25” h

EASY START:


(see User’s Guide for more detail)

1.  Insert batteries. IMPORTANT: Measure  

distance to target and adjust FOCUS 

RANGE accordingly. If LASER AIM is 

needed, use caution.

2.  Turn dial to SETUP and press power  

button. Set date & time. Adjust 

timelapse interval.

3.


Turn dial to AUTO. Camera will begin 

timelapse program. Close door.  

Share your pictures at wingscapes.com

Need help? Questions? Problems?

Do not return to retailer, contact Wingscapes 

directly: (888) 811-9464 or 


[email protected]

WINGSCAPES

150 Industrial Road

Alabaster, AL 35007

www.wingscapes.com

1-888-811-WING (9464)

Model Number:

WSCA04 – 00106 

Serial Number:

Sold by Wingscapes, a 

division of PRADCO Outdoor 

Brands. Manufactured by 

Global Point Products. 
No user serviceable parts 

inside. 

This device 

complies with part 

15 of the FCC 

rules. Operation 

is subject to the 

following two 

conditions: (1) 

This device may 

not cause harmful 

interference, and 

(2) this device 

must accept 

any interference 

received, including 

interference 

that may cause 

undesired 

operation. 

This product 

complies with 

applicable 

requirements of 21 

CFR 1040.10 and 

1040.11. 

PlantCam Easy Start Label

2.125” w x 2” h

PlantCam Product Label 1 

3.25” w x 0.75” h

PlantCam Product Label 2 

0.875” w x 4.25” h

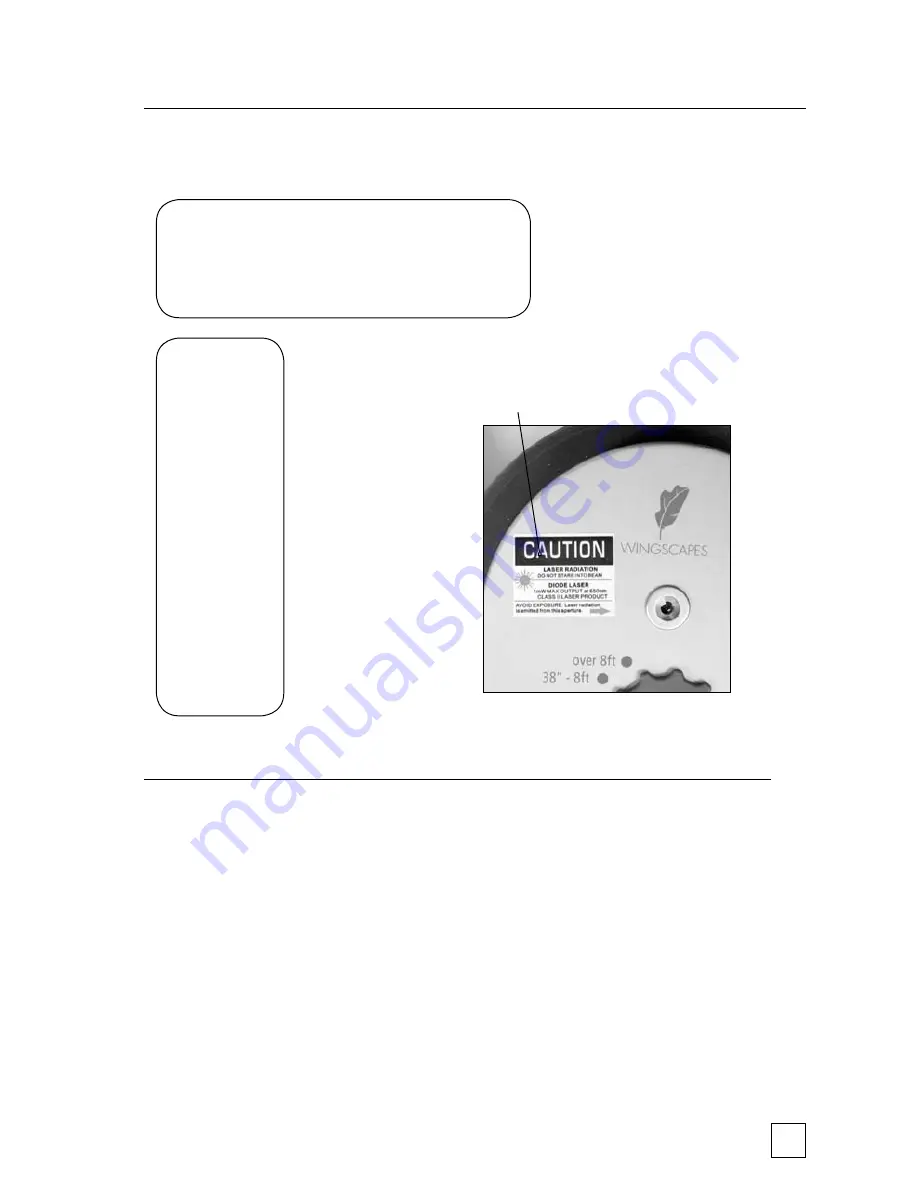
This yellow, laser-warning label 

can be found inside the door, on 

the face of the camera.

Содержание Timelapse PlantCam

Страница 1: ...Timelapse PlantCam User Guide...

Страница 2: ...2009 Ebsco Industries Inc All Rights Reserved Made in China WARNING This product may contain lead a chemical known to the state of California to cause cancer birth defects andother reproductive harm...

Страница 3: ...w wingscapes com support Address Wingscapes 150 Industrial Road Alabaster AL 35007 Photogallery wingscapes com photogallery YouTube youtube com wingscapes Blog wingscapes typepad com wingscapes Facebo...

Страница 4: ......

Страница 5: ...efinitions 6 4 Four Modes 8 5 Mounting Suggestions 12 6 Custom Settings Converting Photos to Timelapse Video 14 7 Storage and Capacity 20 8 Image Viewing by TV Out Cable or USB Out Cable 21 9 Laser Ai...

Страница 6: ...tarted Refer to the follow ing Quick Start Guide and begin experimenting with a simple setup Custom settings allow you to optimize the camera for a variety of proj ects Finding the correct combination...

Страница 7: ...distance between the camera and target 5 Set the Rotary Dial to SETUP and press the Power Status button to turn the camera ON 6 Important set the date and time before initial use 7 Turn Rotary Dial to...

Страница 8: ...ton until the LCD display goes off To see the status of the camera click the power button quickly warning if camera is within 15 seconds of taking its next photo or video pressing this button will res...

Страница 9: ...omputer 6 TV OUT port To connect to TV to review pictures or video clips 7 SD MEMORY CARD port To insert SD card to increase memory capacity Note The metal contact of your card should be facing down w...

Страница 10: ...e Rotary Mode Switch is turned to AUTO the camera status is displayed for 10 seconds then the first photo or video is captured then the camera enters STANDBY mode and the LCD display goes off and begi...

Страница 11: ...ll not affect the delay interval unless the timer is within 15 seconds of the next event If the button is pressed within 15 seconds of the end of a delay interval the status will display and the inter...

Страница 12: ...etailed instructions for television viewing later in this guide LASER AIM Use the Laser Aim function to aim the camera IMPORTANT NEVER look at the laser while it is activated and NEVER activate the la...

Страница 13: ......

Страница 14: ...wide variety of applications this camera was designed to be extremely versatile with regard to mounting TRIPOD NUTS There are two standard tripod nuts embedded into the camera case Either will attach...

Страница 15: ...ket the bracket can be mounted directly to any stable surface eg you can use wood screws to mount it to a wall You can also thread the included strap through the rear of the mounting bracket to secure...

Страница 16: ...tomatically shut off to conserve battery life SETUP MENU The setup menu will start with TIME LAPSE INTERVAL TIME LAPSE INTERVAL Press or button to choose between 11 different settings ASAP 30 SEC 1 MI...

Страница 17: ...his indicates the number of shots taken at the end of each timelapse delay interval Press the SELECT button to make selection This setting does not affect Video Press the RIGHT button to choose next s...

Страница 18: ...er than the interval camera will take images only one time eg WAKEUP 8am and SLEEP 11am so awake time is 3 hours INTERVAL is set to 3 hour 6 hour or DAILY IMPRINT INFO Press or button to choose betwee...

Страница 19: ...e last photo available to be stitched Press button to increase or button to decrease the digit Then press the SELECT button to confirm and proceed to the next digit Repeat the above steps until four d...

Страница 20: ...ard is installed the camera s internal memory will be erased Note all erased images cannot be restored make a backup if needed Press the SELECT button to make selection Press the RIGHT button to choos...

Страница 21: ...make selection Press the RIGHT button to choose next setting Default Settings TIME LAPSE INTERVAL 1 HOUR PHOTO OR VIDEO Photo PHOTO QUALITY Med 2048x1536 MULTI SHOTS 1 Shot DAILY WAKEUP Midnight DAIL...

Страница 22: ...1 133 Maximum pictures stored is 7600 IMPORTANT NOTES ABOUT SD MEMORY CARDS a Always turn the unit off when inserting or removing an SD card to avoid damage and ensure that the camera properly updates...

Страница 23: ...return back to the previous screen Press the SELECT button again to make selection USB VIEWING To connect the camera to a computer the camera must be ON and the rotary dial in the SETUP position Conn...

Страница 24: ...the laser open the camera door Turn the rotary dial to the LASER AIM position The laser is now activated There will not be a LCD readout after the laser is turned ON A red beam will appear The red dot...

Страница 25: ...480 10 seconds AVI clips Picture Resolution LOW 640 x 480 MEDIUM 2048 x 1536 HIGH 2560 x 1920 see MEMORY CHART on page 20 Built in Memory 16MB Format JPEG Still pictures AVI Video clips External SD M...

Страница 26: ...ardous to the eyes Do not stare into the beam or direct it toward other people Caution Use of controls or adjustments or performance of procedures other than those specified herein may result in hazar...

Страница 27: ...s equipment This product label can be found near the battery compartment WINGSCAPES 150 Industrial Road Alabaster AL 35007 www wingscapes com 1 888 811 WING 9464 Model Number WSCA04 00106 Serial Numbe...

Страница 28: ...wingscapes com 888 811 WING Rev 09 09 2009 EBSCO Industries Inc All Rights Reserved...

Отзывы: