


WZDS9100 #2
17
Attach Wires to Thermostat Wall plate
1.
Select the terminal designations that correspond to the system type. Follow the table below:
Warning: Disconnect power before beginning installation.
Caution: Copper wire only. Insulate or wire-nut all unused
leads.
Use care to avoid electrostatic discharge to thermostat.
Note 1: Do not connect wire to A if a humidifier is not installed.
Note 2: Do not connect wire to Y2 or W1 if a duct heater is not
installed.
2.
Using a small flathead screwdriver, loosen the screws on the terminal
blocks that correspond to the system type.
3.
Strip the insulation of each wire at a proper length (about 1/4”)
4.
On the wallplate, insert wires into the terminal blocks that correspond to the system type, then re-tighten
each screw for each terminal.
Note: Do not over-tighten or use excessive force.
5. Assure that no uninsulated wires are exposed: Cap off and place a wire nut on any unused wires. Assure
that the attached wires fit into the cavity on the back of the thermostat.
Connect Power to the Thermostat Wallplate
Power Options
The T12000 Series thermostat will operate on 24 VAC power and/or two AA batteries (both are recommended).
Using 24 VAC with AA battery backup is highly recommended.
Wiring 24 VAC Common
Single-Transformer system. Connect the common side of the transformer to the “C” screw terminal of the
thermostat wallplate. Assure that the metal jumper connects “RC” and “RH.” Connect power side to the RC/RH
and assure that the jumper remains in place
Install Batteries and Remove Tab
1.
Insert two AA batteries (included) into the back compartment of the thermostat.
2.
Remove the plastic insulator tab from the back side of the thermostat. IMPORTANT: The insulator tab
must be removed before setting the real-time clock.
Set the Clock, Month, Day
When power is first applied to the thermostat, it will activate the clock display. It is recommended that the time and
day are entered before performing advanced configuration. On the touchscreen area, press the Clock key and use
the up and down arrows to set the hour mode, clock hour, minutes, year, month, and numerical date. Press Done to
finish.
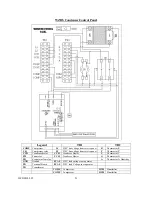
Conventional Terminal Letters
C
Unswitched side, 24 VAC
W1
Not used
W2
Not used
G
Fan
A
Humidity
E
Not used
Y1
Stage 1 Cool
Y2
Not used
RH
Power for Heating
Switched Side, 24 VAC
RC
Power for Cooling,
Switched Side 24 VAC
SC
Sensor Common, if used
S1
Not used
S2
Not used
S3
Not used