
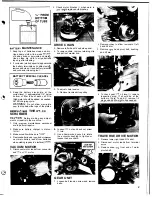
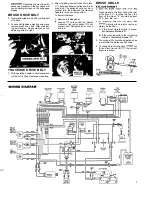


MAINTENANCE
1.
Keep tops of batteries clean and dry.
Use a damp cloth with a weak
of baking soda or ammonia and water.
Use a clean dry cloth to wipe battery
tops dry after cleaning.
2.
If corrosion (white deposits) appears on
the battery terminals and cable clamps,
remove and clean. Use a battery terminal
and connector cleaning tool.
BATTERY TERM
I
N
AL CLEAN E
2.
Check motor brushes
-
when worn to
length replace both brushes.
3.
Keep the battery electrolyte at the
correct level
-
approximately 114" below
bottom of filler tube of each cell. Dis-
tilled
water should be added, as needed,
AFTER
charging cycle.
WARNING:
Do not allow electrolyte
to drop below the tops of the plates.
THE
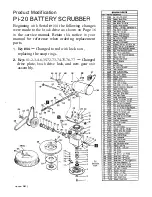
SCRUBBER
Before making any adjust-
ments or repairs to the machine..
.
1.
Only
maintenance personnel
are to perform repairs.
2.
Make sure battery charger is dlscon-
3.
Make sure all switches are
"OFF"
4.
Remove batteries as required or
nect main battery leads from batteries
when making repairs to electrical
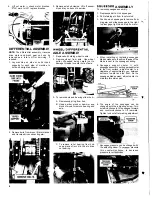
VACUUM MOTOR
1.
Disconnect motor leads from connector
and
out
motor.
DRIVE CHAIN
1.
Remove left side skirt and side panel.
2. To remove chain, remove retaining clip
and pull out master link.
3.
To
adjust chain tension
. . .
A. Remove traverse drive pulley.
2.
Remove
to allow removal of left
3.
Remove
hand pivot bolt, bushing
hand lift arm.
and lift arm.
4.
To check gear
oil level
-
remove
Inspection plug;
should be at the
bottom of hole.
To add
remove fill
plug and add
90 welght oil as needed.
B.
Loosen
nut and back out screw
turn.
C.
Use a hammer and punch to rotate
the eccentric bushing to tighten or
loosen the drive chain.
TRAVERSE DRIVE MOTOR
1.
Remove lower right hand
skirt.
2.
Disconnect motor leads from terminal
3.
Remove snap
from end of motor
pivot shaft.
QEAR
UNIT
1. Loosen belt tension screw and remove
belts.
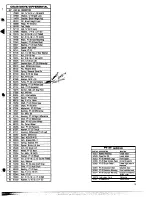
5
Содержание PowerTec20
Страница 1: ......
Страница 9: ...1 7 AI 1 6 9...
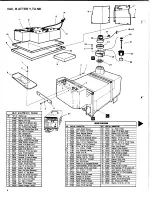
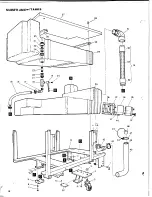
Страница 10: ...MAINFRAMEWITANKS 38 I 34 37 36 35 39 41 i o 1 3 14 1 46...
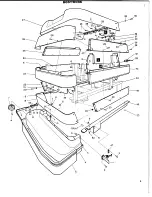
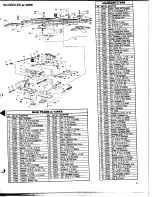
Страница 11: ...SQUEEGEE w ARM 59 69 21 1 I __ 11...
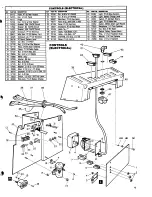
Страница 13: ...48 4 9 50...
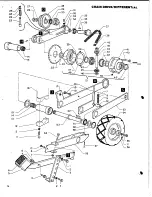
Страница 14: ...14 2 1 IAL 39...


