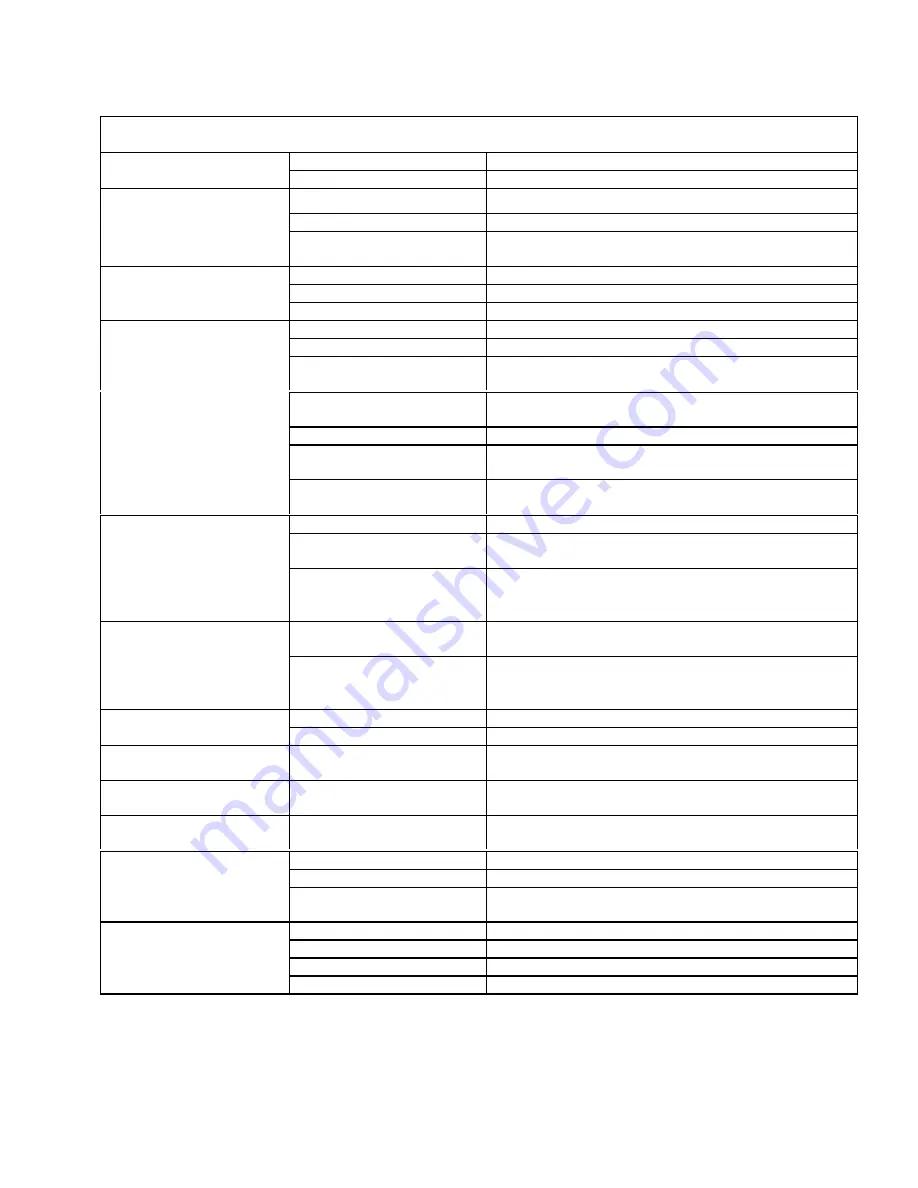
background image

TROUBLESHOOTING

 ENSIGN 98635 03/26/04

4-4

PROBLEM

CAUSE

SOLUTION

Dead electrical circuit

Check building circuit breaker or fuse box.

Loss of Power

Faulty power cord

Replace

Equipment not grounding

Follow grounding instructions exactly

Receptacle not grounded

Contact an electrician to check building’s wiring

Electrical shock

Internal wiring problem

Have a trained service technician check machine’s
wiring

Worn motor brushes

Replace

Motor worn out

Replace

Vac motor speed varies
or doesn’t run

Faulty switch

Replace

Loose vacuum dome

Center and seal dome over tank

Crack in dome of poor joint

Replace or repair using acrylic plastic cement only

Lint or dirt clogging
vacuum screen

With power off clean screen

Loose cuffs on vacuum
hose

Tighten cuffs turning counterclockwise

Vac motor seals leaking

Replace

Floor tool vac chamber
clogged

Wash out with hose.  Pick lint out with a wire

Loss of vacuum

Vac motor, hose, or dome
gasket

Replace

Pump inlet screen plugged

Clean inlet screen

Pump air locked

Press trigger to open valve on cleaning wand to
relieve air

Pump runs no solution

Internal or external
solution line damaged and
leaking

Replace

Internal pump components
wearing out

Replace, see pump kit components (pg 4-3)

Pump runs, loss of
pressure

Check valves in pump
head for particles or cuts in
seals

Take piston from BPR and lubricate with Superlube.
If problem still exists change BPR kit

Unit not plugged in

Connect unit to 3 prong grounded outlet

Pump will not run

Loose wiring

See dealer

Solution hose fitting hard
to connect

Corrosion on fittings.

Clean with steel wool. Soak in acetic acid (white
vinegar). Lubricate lightly with silicone base lubricant.

Carpet not getting clean

Severe soil conditions

Make several passes at right angles to each other.
Use a pre-spray.

Carpet too wet

Over saturation

Adjust solution pressure to lower settings.  Make
several passes without spray

Leaving carpet too wet

Check for loss of vac pressure

Too much chemical

Check label for correct solution concentration

Carpet browning

Light carpet with no brown
prevention

Go over carpet with browning prevent only

Solution hose connection

Check for positive connection

Faulty pump

Repair or replace

Faulty floor tool valve

Repair or replace

Solution not flowing
properly

Faulty pump switch

Repair

Содержание Ensign E50

Страница 1: ...Read these instructions before operating the machine MODEL E50 98635 01 09 07 U CARPET EXTRACTOR Operating Instructions ENG ...

Страница 2: ..._________________________________________________________ OVERVIEW The Ensign is an electric powered carpet extractor intended for commercial use This appliance applies a cleaning solution to the carpet and then vacuums the soiled water back into the recovery tank MODEL _______________________________________ DATE OF PURCHASE __________________________ SERIAL NUMBER ______________________________ ...

Страница 3: ...ration 3 3 General Information 3 3 Pre Run Machine Inspection 3 3 Equipment Set up 3 3 Emptying Cleaning Tanks 3 3 MAINTENANCE Daily Maintenance 4 1 Periodic Maintenance 4 1 Monthly Maintenance 4 1 Semi annually 4 1 Lubrication 4 1 Storage 4 1 Vacuum Motor Replacement 4 2 Solution Pump Replacement 4 3 Pump Replacement Kit 4 3 Machine Troubleshooting 4 4 GROUP PARTS LIST Pump Group 5 1 Recovery Tan...

Страница 4: ...Replacement Solution Pump Replacement Troubleshooting The PARTS LIST section contains assembled parts illustrations and corresponding parts list The parts lists include a number of columns of information REF column refers to the reference number on the parts illustration PART NO column lists the part number for the part QTY column lists the quantity of the part used in that area of the machine DES...

Страница 5: ...horized service center Do not pull or carry machine by electrical cord use as a handle close a door on cord or pull cord around sharp edges or corners Do not run machine over cord Keep cord away from heated surfaces Do not unplug machine by pulling on cord To unplug grasp the electrical plug not the electrical cord Do not handle the electrical plug or machine with wet hands Do not operate the mach...

Страница 6: ...st be followed for safe operation of equipment Report machine damage or faulty operation immediately Do not use the machine if it is not in proper operating condition Following is information that signals some potentially dangerous conditions to the operator or the equipment Read this information carefully Know when these conditions can exist Locate all safety devices on the machine Please take th...

Страница 7: ...ETY LABEL LOCATION ENSIGN 98635 04 04 03 2 3 NOTE These drawings indicate the location of safety labels on the machine If at any time the labels become illegible promptly replace them LABEL WARNING 500009 ...

Страница 8: ...et that is properly installed and grounded in accordance with all local codes and ordinances This appliance is for use on a nominal 120 volt circuit and has a grounded plug that looks like the plug in Fig A A temporary adaptor that looks like the adaptor in Fig C may be used to connect this plug to a 2 pole receptacle as shown in Fig B if a properly grounded outlet is not available The temporary a...

Страница 9: ...ngle 3 stage Solution Pump 50 psi Solution Capacity 7 gal 26 L Recovery Capacity 6 gal 22 L Weight Empty 50 lbs 110 kg Weight Full Solution 105 lbs 230 kg Height 35 inches 88 90 cm Height Handle Folded Down 28 5 inches 72 39 cm Length 25 inches 63 50 cm Width 15 5 inches 39 37 cm Power Cord 22 feet 6 71 m ...

Страница 10: ...CONTROLS ENSIGN 98635 04 04 03 3 2 1 Vacuum Switch 2 Pump Switch ON OFF OFF ON VAC PUMP 1 2 ...

Страница 11: ... water Mix in a non foaming cleaning concentrate for use in hot water extraction machines following the manufacture s instructions printed on container NOTE When using a powder cleaner pre mix with hot water in a clean container before adding to the solution tank 6 Turn pump and vacuum switch s to the on position 7 Start cleaning EMPTYING AND CLEANING Always use defoamer if foaming occurs Foam wil...

Страница 12: ...nks to dry DO NOT attempt to repair hose Repairing high pressure hoses may result in severe burns and serious injury PERIODIC MAINTENANCE 1 Twice a month flush a white vinegar solution One quart vinegar to two gallons of water or anti browning solution mixed as directed through the extractor turning pump switch on off several times flush with clean water This will prevent build up of alkaline resi...

Страница 13: ...g will damage motor if brushes are allowed to wear away completely Periodically check the length of the carbon brushes Replace both carbon brushes when either is less than 3 8 9 5mm long 3 8 9 5mm Important These brushes wear quicker as the length shortens due to increased heat Spring inside brush housing will damage motor if brushes are allowed to wear away completely Periodically check the lengt...

Страница 14: ...off all switches and unplug the machine 2 Remove recovery tank 3 Remove solution hoses from fittings in pump 4 Remove the screws that fasten the pump to the frame 5 Reverse process to install pump Valve Asm 84162 Diaphragm 29207 Pump Head 65188 PUMP 250 63 REPLACEMENT KIT Pump Head 65235 Valve Asm 84191 Diaphragm 29263 PUMP 65233 REPLACEMENT KIT ...

Страница 15: ...wand to relieve air Pump runs no solution Internal or external solution line damaged and leaking Replace Internal pump components wearing out Replace see pump kit components pg 4 3 Pump runs loss of pressure Check valves in pump head for particles or cuts in seals Take piston from BPR and lubricate with Superlube If problem still exists change BPR kit Unit not plugged in Connect unit to 3 prong gr...

Страница 16: ...PUMP GROUP ENSIGN 98635 04 04 03 5 1 1 2 3 5 6 7 8 2 3 4 ...

Страница 17: ... NOTES 1 39049 1 HOSE 3 8 RUBBER X 11 2 20042 2 CLAMP 3 8 HOSE D SLOT 3 40043 2 HOSEBARB 3 8 MPT X 3 8 90 4 65216 1 PUMP ASM 115V 3ST SENSEI 5 110 22 4 GROMMET 6 GAL PORT 6 87013 2 WASHER 1 4 ID X 5 8 OD SS 7 70020 2 SCR 1 4 20 X 1 2 HHCS SS NP 8 39311 1 HOSE 3 8ID SGLBRD RBR X 14 ...

Страница 18: ...RECOVERY TANK GROUP ENSIGN 98635 03 18 05 5 3 3 4 5 6 9 10 11 12 14 16 17 18 20 21 22 23 24 13 15 26 15 1 27 7 8 19 2 32 25 28 29 30 31 ...

Страница 19: ...SCR 8 32 X PPHMS SS 13 15 808123 1 DUMP VALVE 2 14 11 800444 1 ELBOW 2 45D PVC SCH40 15 35256 2 GASKET DUMP VALVE 16 75338 1 TANK RECOVERY DK GRY 17 110 14A 3 CAP PLUG 1 18 57047 2 NUT 20 HEX NYLOCK 19 70393 2 SET SCR 1 4 20 X 1 25L 20 87013 2 WASHER 1 4 ID X 5 8 OD SS 21 140 12 1 KNOB 1 4 20 X 3 4 S S CUPPOINT 22 390 24 1 WASHER 1 4 X 5 8 BONDED NEOPRN 23 280 02 2 RIVIT AL 3 16 X 1 2 CLOSED 24 06...

Страница 20: ... TANK GROUP ENSIGN 98635 01 09 07 5 5 PARTS INSIDE TANK CONNECT TO PUMP ASM 4 5 7 8 6 6 1 2 9 10 41 6 11 12 6 14 13 15 18 19 22 20 21 17 16 23 24 28 29 30 18 31 32 33 34 35 38 37 39 39 40 36 3 26 27 25 23 42 43 ...

Страница 21: ...S SS 18 87013 3 WASHER 1 4 ID X 5 8 OD SS 19 70015 1 SCR 1 4 20 X 3 4 HHCS SS NP 20 060 04A 1 CORD ASM 14 3 SJT X 25 BLK 21 320 05 1 VELCRO STRAP 22 73195 1 STRAIN RELIEF 3 4 NPT 23 87018 4 WASHER 10 X 9 16 OD 24 70051 2 SCR 8 32 X 1 2 PPHMS NP 25 70052 2 SCR 8 32 X 3 8 PPHMS SS 26 57049 3 NUT 6 32 HEX NYLOCK SS 27 41394 1 HINGE ACCESS PLATE 28 70721 2 SHOULDER BOLT 1 2 OD X 2 25 L 29 040 08 2 WHE...

Страница 22: ...VACUUM MOTOR GROUP ENSIGN 98635 04 04 03 5 7 3 1 2 4 5 ...

Страница 23: ...M NOTES 1 065 24E 3 VAC SPACER 3 1 8 2 87013 3 WASHER 1 4 ID X 5 8 OD SS 3 70062 3 SCR 1 4 20 X 4 HHCS GR5 PLTD 4 53130 1 VAC MOTOR 120V 5 7 3ST W O TB 140687 BRUSH SET 120V VAC WINDSOR SERVICE ONLY 140676 BRUSH SET 120V 3ST VAC AMETEK SERVICE ONLY 5 35011 1 GASKET 3 8T 5 7 VAC FAN SEAL ...

Страница 24: ...WIRING DIAGRAM ENSIGN 98635 04 04 03 5 9 ...

Страница 25: ... 34380 FLOAT SHUT OFF 260 64A ACCESS COVER CLEAR 6 W RIM 11 800444 ELBOW 1 5 FS X FS 45D PVC 72142 SWITCH SPST 15A EURO ROCKER 320 05 VELCRO STRAPS 35011 GASKET 3 8T 5 7 VAC FAN SEAL 140 12 KNOB 1 4 20 X 3 4 S S CUPPOINT 140687 BRUSH SET 120V VAC WINDSOR 140676 BRUSH SET 120V 3ST VAC AMETEK ...

Страница 26: ...NOTES ENSIGN 98635 04 04 03 5 11 ...

Отзывы: