background image

Basic Operation 

 01750171533 F                BEETLE /Fusion Compact – Operating Manual                                  13 
  

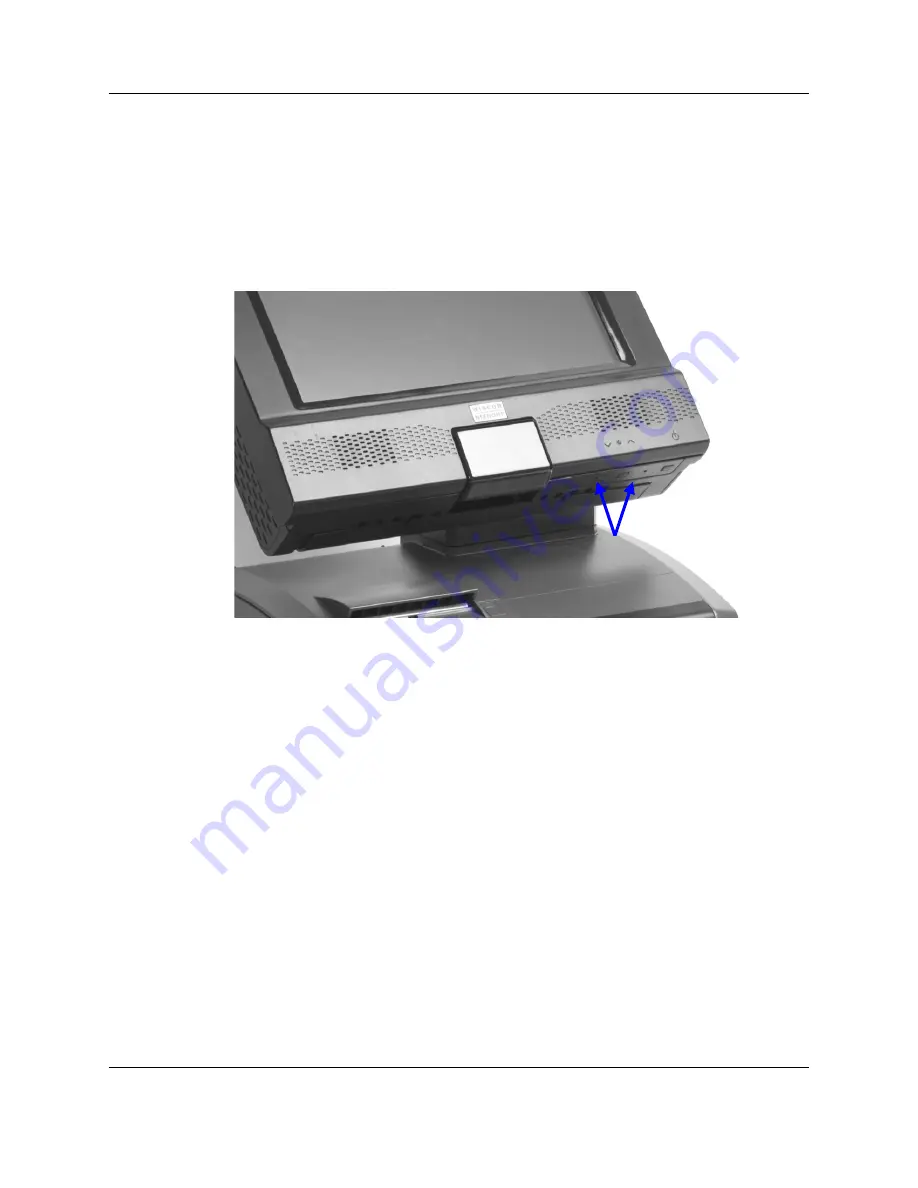
Brightness and contrast adjustment 


The buttons for the brightness adjustment are located at the bottom right 

corner of the display unit (see picture below). 


Press  the  ‘Arrow  Up’  or  ‘Arrow  Down’  buttons  to  adjust  the  brightness 

until the appropriate adjustment is acceptable by the user. 


Brightness adjustment 

buttons 

Содержание BEETLE Compact

Страница 1: ...BEETLE Fusion Compact Operating Manual ...

Страница 2: ... without express authority Offenders will be liable for damages All rights including rights created by patent grant or registration of a utility model or design are reserved Delivery subject to availability technical modifications possible Copyright Wincor Nixdorf International GmbH 2009 ...

Страница 3: ...BEETLE Fusion Compact Operating Manual Edition Mar 2010 ...

Страница 4: ...fety Precautions 4 Care of the BEETLE Fusion 5 Repairs 5 Overview 6 Configurations 6 Fusion Compact Peripherals 8 Front view 9 Rear View 10 Basic Operation 11 Switching on off device 12 Brightness and contrast adjustment 13 Rotating and tilting Display 14 Touch screen 16 How to Operate 16 Cleaning Instructions 16 Printer 18 Overview 18 Operator Control Panel 19 Self Test Printout 21 Paper Roll Exc...

Страница 5: ...nsor Adjustment 24 Keyboard 25 General 25 Keypad 27 Key switch 27 LEDs 28 Swipecard reader SCR 29 Slim DVD CD R W 31 Appendix 32 Technical Data 32 AC Power Adapter 33 Power Cord Selection 34 System configuration 35 I O connection ports 37 Total Available Power of External I O Ports 38 Approved Printer List 39 ...

Страница 6: ......

Страница 7: ...device complies with the requirements of the 2004 108 EC EMC Directive and 2006 95 EC Low Voltage Directive Therefore you will find the CE mark on the device or packaging Tested Safety The BEETLE Fusion has been provided with the symbol for Tested Safety In addition the device has received the UL symbol and cUL symbol ...

Страница 8: ...use harmful interference to radio communications Operation of this equipment in a residential area is likely to cause harmful interference in which case the user will be required to correct the interference at own expense Le présent appareil numérique ne génère pas de bruits radioélectriques dépassant les limites applicable aux appareils numériques de la Class A prescrites dans le Règlement sur le...

Страница 9: ... used in this guide Text following this mark represents an item in a list Text in quotation marks contains references to other chapters or sections in this document Paragraphs following this symbol are actions to be performed in the specific order Texts following this symbol are actions to be performed in order to avoid damage or injury This symbol identifies paragraphs which contain general notes...

Страница 10: ...l cables in such a way that they will not be damaged or crushed in any way Have damaged power cables replaced immediately The lithium battery must be disposed of in accordance with local regulations for special waste If the display element is damaged and the liquid crystal solution leaks out onto your hands or clothing please wash your hands or clothing immediately under running water for at least...

Страница 11: ...s Care of the BEETLE Fusion Clean your BEETLE Fusion at regular intervals with a moist cloth Make sure that the power plug is disconnected connector cables are un plugged and that no liquid finds its way into the device Repairs Repair work may only be carried out by authorized personnel Unauthorized opening of the device or repair work carried out improperly not only could result in considerable d...

Страница 12: ...owing components Panel PC processor options Intel Celeron M 1 0GHz Intel Celeron M 1 5GHz Intel Celeron Dual Core T3100 1 9GHz Intel Core 2 Duo P8400 2 26GHz Min 512MB RAM up to 2GB RAM Primary mass storage options 40GB 2 5 hard disk min 8GB SSD Secondary mass storage optional Slim DVD CD rewritable 40GB 2 5 hard disk min 12 LCD display options Non Touch Capacitive Touch Resistive Touch NVRAM opti...

Страница 13: ...Overview 01750171533 F BEETLE Fusion Compact Operating Manual 7 80mm 0 0 5mm Keyswitch 6 positions 7 x 12 key matrix keyboard Magnetic Swipe Reader optional 3 track ISO JIS Track 1 2 JIS Type II ...

Страница 14: ...Overview 01750171533 F BEETLE Fusion Compact Operating Manual 8 Fusion Compact Peripherals Cash drawer Scanner Scale ...

Страница 15: ...Overview 01750171533 F BEETLE Fusion Compact Operating Manual 9 Front view Panel PC 12 1 Printer TH230 USB Key switch 84 matrix keyboard MSR Slim DVD CDROM Stereo speakers ...

Страница 16: ...Overview 01750171533 F BEETLE Fusion Compact Operating Manual 10 Rear View ...

Страница 17: ...c Operation The BEETLE Fusion Compact system is easy to operate To start operating the device follow the steps listed below Step 1 Connect power adapter to BEETLE Fusion system as shown Step 2 Switch on the main power Step 3 Wait for the system to fully boot up before operation ...

Страница 18: ... the system does not start up switch off the system Switch off the power to the system completely by disconnecting the power cord from the AC main outlet Check all connectors to ensure that there are no loose connections before switching on the system again This may be due to the poor handling of the system resulting in the loose connection If the problem persists switch off the system and disconn...

Страница 19: ...ntrast adjustment The buttons for the brightness adjustment are located at the bottom right corner of the display unit see picture below Press the Arrow Up or Arrow Down buttons to adjust the brightness until the appropriate adjustment is acceptable by the user Brightness adjustment buttons ...

Страница 20: ...Basic Operation 01750171533 F BEETLE Fusion Compact Operating Manual 14 Rotating and tilting Display The display unit can be rotated 30 o to the left and 90 o to the right ...

Страница 21: ...Basic Operation 01750171533 F BEETLE Fusion Compact Operating Manual 15 The display unit can be tilted between 20o to 55o ...

Страница 22: ...ended material for a stylus is polyacetal The stylus should have a minimum spherical radius of 0 8 mm and contain no sharp edges or burrs that may cause damage to the topsheet Cleaning Instructions Always turn off the system before cleaning To ensure that water does not get to the printer and keyboard base whilst cleaning cover them with a plastic sheet For Capacitive Touch The glass surface of yo...

Страница 23: ... be cleaned with a water based solvent or a non abrasive cleaner Do not use solvents containing acetic acid or methylene chloride Use a soft fine meshed cloth to clean the surface Dampen the cloth slightly and then clean the screen A wrong maintenance may cause damages to the screen which are not covered by guarantee or warranty ...

Страница 24: ...Printer 01750171533 F BEETLE Fusion Compact Operating Manual 18 Printer The Fusion Compact system is equipped with a thermal receipt printer Overview Printer cover Paper output Operator panel ...

Страница 25: ...d hold it down the printer feeds the paper as long as the button is not released The button can be locked by the application software and then will be without function LEDs indicator All LED off power is not stable Green POWER LED on power is stable Green POWER LED blinking printing speed may be low if necessary contact your technical support FEED POWER PAPER ERROR OPEN Access cover for cutter jam...

Страница 26: ... blinking an error has occurred Switch the printer off by terminating all applications shutting down the Operating System and then switch off the system and followed by switching on the system again In case of no success contact your technical support LED overview POWER PAPER ERROR Meaning Green Yellow Red Off Off Off No power Operation On Power on blinking Off If necessary call for technical supp...

Страница 27: ...ress and hold the printer line FEED button whilst powering up the System A service menu will be printed Press the FEED button two times shortly to select the self test Press the same button for more than one second to start the printout Press the FEED button one time shortly and one time for more than one second to end the self test ...

Страница 28: ...empty paper roll and any residual paper If necessary clean the print head and the rubber roller Unwind the outer layer winding of the paper roll Be sure there is no glue residual on the roll Insert the paper roll Lay the un winded paper over the front edge of the printer Hold down the paper and close the printer cover Press on the middle of the cover until it audibly and distinctly locks into plac...

Отзывы: