manualshive.com logo in svg
background image


WMP-24C/24F 


Medical Panel PC 


USER’S MANUAL 


Copyright© ,2017. All rights reserved 


All other brand names are registered trademarks of their respective owners. 


The information contained in this document is subject to change without notice


Содержание WMP-24C

Страница 1: ...cal Panel PC USER S MANUAL Copyright 2017 All rights reserved All other brand names are registered trademarks of their respective owners The information contained in this document is subject to change...

Страница 2: ...WMP 24C 24F User s manual i Version Change History Date Version Description Remark 2017 10 06 1 0 First release Cosa 2018 7 3 1 1 Modify VESA information Cosa...

Страница 3: ...Co Ltd C T is a trademark of Chips and Technologies Inc UMC is a trademark of United Microelectronics Corporation ITE is a trademark of Integrated Technology Express Inc PS 2 is a trademark of Intern...

Страница 4: ...to be causing harmful interference to radio or television reception this can be determined by turning the equipment on and off If interference is occurring the user is encouraged to try to correct th...

Страница 5: ...ble in providing your medical application needs Please follow the instructions below to ensure the unit continues to have high performance Unpacking After opening the carton there will be a medical pa...

Страница 6: ...ing hardware recommended by the manufacturer Electrical and Power Source Related 1 This medical panel PC unit must operate on a power source as shown on the specification label If you are not sure wha...

Страница 7: ...he medical panel PC unit 3 Having liquids seep in or inserting objects into the unit may result in electric shocks from taking and or short circuiting the internal parts 4 Do not place the medical pan...

Страница 8: ...of small electrical circuits which can be turned off or on by means of an electronic switch Each circuit represents a bit binary digit of information so that when the circuit is on it represents a 1 a...

Страница 9: ...ipment must only be connected to a supply mains with protective earth 4 If any of the following situations occur turn the power source off and unplug the unit Then contact a qualified service technici...

Страница 10: ...electronic products carrying the mark left must be disposed of separately from normal household waste This includes monitors and electrical accessories such as signal cables or power cords When you ne...

Страница 11: ...onnected to the analog and digital interfaces must be in compliance with the respective nationally harmonized IEC standards i e IEC 60950 for data processing equipment IEC 60065 for video equipment IE...

Страница 12: ...erator s position according to IEC 704 1 1982 is no more than 70dB A A Grounding reliability can only be achieved when the equipment is connected to an equivalent receptacle marked Hospital Only or Ho...

Страница 13: ...turer s declaration electromagnetic emissions 7 Guidance and manufacturer s declaration electromagnetic immunity 9 Immunity 10 Cleaning Disinfecting 12 Getting Started 12 System Set Up 12 Dimension 14...

Страница 14: ...lications The WMP 24C 24F includes all the features of a powerful computer into a slim and attractive chassis The WMP 24C 24F has a 23 8 high brightness TFT display with 1920 x 1080 resolutions The WM...

Страница 15: ...Station please make sure that the following items have been shipped The WMP 24F or WMP 24C Medical Panel PC unit User manual chipset drivers Power Adapter x 1 Mf Sinpro type model HPU180A 108 Power c...

Страница 16: ...internal corners IP65 at front side IPx1 for whole system Fanless solution High speed USB3 1 gen II One mini PCIe expansion support mSATA One M 2 E type support WLAN solution HDD Anti vibration mecha...

Страница 17: ...mobile Core i7 i5 i3 processor 35W max WMP 24C LGA1151 for 6th generation Intel mobile Core i7 i5 i3 processor Disk Drive Space 2 5 Hard Disk Drive SATA III Expansion One Mini PCIe slot One M 2 Type E...

Страница 18: ...output x 2 Reset x 1 DC in Jack x 1 with lock function Two 5W speaker on back side Isolated version USB 3 1 gen II x 2 USB 3 0 x 2 RJ 45 x 1 Gigabit Ethernet 3 5mm phone jack connector 2 Line out and...

Страница 19: ...ting DC 24V 7 5A MTBF 100 000 hrs operation at 25 C Classification Power by Class I certified power adapter No applied part Mode of operation Continuous operation System input rating DC 24V 7A Mechani...

Страница 20: ...Interface Controller with USB interface 5V Resolution 100ppi to 25ppi Based WIN7 definition ppi Pixel per inch Light Transmission 90 3 Life Time 100M times Guidance and manufacturer s declaration ele...

Страница 21: ...WMP 24C 24F as recommended below according to the maximum output power of the communications equipment Rated maximum output power of transmitter W Separation distance according to frequency of transm...

Страница 22: ...4 2 8 kV contact 15 kV air 8 kV contact 15 kV air Floors should be wood concrete or ceramic tile If floors are covered with synthetic material the relative humidity should be at least 30 Electrical fa...

Страница 23: ...interruptions it is recommended that the model WMP 24C 24F be powered from an uninterruptible power supply or a battery Power frequency 50 60 Hz magnetic field IEC 61000 4 8 30 A m 30 A m Power freque...

Страница 24: ...of equipment marked with the following symbol NOTE 1 At 80 MHz and 800 MHz the higher frequency range applies NOTE 2 These guidelines may not apply in all situations Electromagnetic propagation is aff...

Страница 25: ...peripherals with strong aromatic chlorinated ketone ether or Esther solvents sharp tools or abrasives Never immerse electrical connectors in water or other liquids Getting Started System Set Up The f...

Страница 26: ...USB CD DVD drive turn on computer power keep on pressing F11 key go into BIOS quick boot menu select USB CD ROM WAIT FOR 20 SECONDS then press enter system OS will boot up from USB CD DVD drive direct...

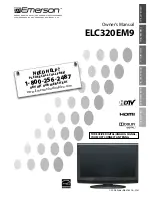
Страница 27: ...WMP 24C 24F User s manual 14 Dimension WMP 24F VESA Mount Screw type M4...

Страница 28: ...WMP 24C 24F User s manual 15...

Страница 29: ...WMP 24C 24F User s manual 16...

Страница 30: ...WMP 24C 24F User s manual 17 WMP 24C VESA Mount Screw type M4...

Страница 31: ...WMP 24C 24F User s manual 18...

Страница 32: ...WMP 24C 24F User s manual 19...

Страница 33: ...ght front view 1 1 Up HDD Amber 1 2 Down Battery1 Green Battery2 Amber LED 1 LED 2 Charge Discharge Low Batt present not present In charge blinking ON Discharge OFF ON Full charge ON ON Low battery bl...

Страница 34: ...connection 2 No signal 60S message off cable connected but no signal input 3 DVI input message for 3 sec Sys power on PC mode forcibly Switch to PC mode when sys power on In Windows Message for 3 sec...

Страница 35: ...WMP 24C 24F User s manual 22 Side View Standard model without door Customized model with DVD or Smart card reader Rear View WMP 24F Fan WMP 24C Fanless...

Страница 36: ...6 DC in 7 PCI E PCI expansion 8 Line out 9 Microphone in 10 DP Port x 2 Output I O parts Expansion I O version 1 LAN x 2 2 RS232 x 1 3 RS232 RS422 RS485 x 1 RS 485 auto flow support 4 USB 3 1 x 2 5 U...

Страница 37: ...C 24F User s manual 24 I O parts Isolated version isolation isolated COM 4KV isolated RS 232 x 1 RS 232 422 485 x 1 isolated USB 4KV isolated USB 2 0 x 1 Full speed isolated LAN 4KV isolated Lan x 1 G...

Страница 38: ...isconnect Device Turn off the system Turning off WMP 24C 24F properly is important for system reliability 1 On the start menu click Shut down and select OK Unplug the power cord from the power adapter...

Страница 39: ...is immediately activated Pressing the Del key immediately allows you to enter the Setup utility If you are a little bit late pressing the Del key POST Power On Self Test will continue with its test r...

Страница 40: ...s information on the BIOS information Embedded controller information and Battery information System Date Set the system date Use the Tab key to switch between data elements System Time Set the system...

Страница 41: ...r Disables System ability to Hibernate 0S S4 Sleep State This option may be not effective with some OS ACPI Sleep State Select the highest ACPI sleep state the system will enter when the SISPEND butto...

Страница 42: ...t 1 Configuration Serial Port Select an optimal settings for super IO Device Change Settings Select an optimal settings for Super IO Device Set Parameters of Serial Port 1 Serial Port 2 Configuration...

Страница 43: ...ed Select DynamicTime System will wake on the current time Increase minute s CPU Configuration CPU Configuration Parameters Active Processor Cores Number of cores to enable in each processor package I...

Страница 44: ...disabled the BIOS will Show hide hidden items For debug only Show hide hidden items Secure Erase Secure Erase mode Change behavior of Secure Erase module Simulated Causes the module to show the flow w...

Страница 45: ...onfig Serial ATA Port 1 Enable Disable Serial ATA Port 0 Port 0 Enable or Disable SATA Port HotPlug Designates this port as hot Pluggable External SATA External SATA Support Spin Up Device On an edge...

Страница 46: ...Idle Timeout config Enable Disable SATA DTIO Config Serial ATA Port 4 Enable Disable Serial ATA Port 0 Port 0 Enable or Disable SATA Port HotPlug Designates this port as hot Pluggable External SATA E...

Страница 47: ...eep USB devices available only for EFI applications XHCI Hand off Enable Disable XHCI Controller Legacy support USB Mass Storage Driver Support Enable Disable USB Mass Storage Driver Support USB hardw...

Страница 48: ...Turbo IMON current values supported 14 31 Skip Scaning of External Gfx Card If Enable it will not scan for external Gfx Card on PEG and PCH PCIE Ports Primary Display Select which of IGFX PEG PCI Grap...

Страница 49: ...controller and root ports for faster enumeration PCI Express Configuration settings XHCI Disable Compliance Mode Options to disable Compliance Mode Default is FALSE to not disable Compliance Mode Set...

Страница 50: ...P_LAN Low on DC Power Enable Disable SLP_LAN Low on DC power Wake on WLAN Enable Enable Disable PCI Express Wireless LAN to wake the system Restore AC Power Loss Select AC power state when power is re...

Страница 51: ...selected drive Secure Boot menu Secure Boot Secure Boot can be enabled if 1 System running in User mode with enrolled Platform key PK 2 CSM function is disabled Secure Boot Mode Secure Boot mode sele...

Страница 52: ...XE Boot PXE Network Boot Enable Disable Quiet Boot Enable or disables Quiet Boot option Boot Option 1 Sets the system boot order Boot Option 2 Sets the system boot order Fast Boot Enables or disables...

Страница 53: ...g any changes Save Changes and Reset Reset the system after saving the changes Discard Changes and Reset Reset system setup without saving the changes Save Changes Save the changes done so far to any...

Страница 54: ...WMP 24C 24F User s manual 41 Save as User Defaults Save the changes done so far as User Defaults Restore User Defaults Restore the User Defaults to all the setup options...

Страница 55: ...endix gives the definitions and shows the positions of jumpers headers and connectors All of the configuration jumpers on WMP 24C 24F are in the proper position Note Some of jumpers or connectors will...

Страница 56: ...IO IN BIOS function 5 6 DICOM BIOS function 7 8 eDP BIOS function JP3 mini PCIe connector mSATA Settings Description Jumper Setting mSATA 2 3 NA default PCIe 1 2 JP4 SATA or SATA DOM Selection Descrip...

Страница 57: ...nnector Definition PJ1 Battery Connector Pin Signal Description 1 Ground 2 BATT_EN 3 BATT_CLK 4 BATT_T 5 BATT 6 Ground 7 Ground 8 BATT_DAT 9 BATT 10 BATT PJ2 PJ3 HDD Power Connector Pin Signal Descrip...

Страница 58: ...45 PJ4 Power Jack Connector Pin Signal Description 1 DC In 2 DC In 3 Ground 4 Ground 5 Ground J1 Inverter connect 6 1 Pin Signal Description 1 12VS 2 12VS 3 Backlight Adjust 4 Backlight Enable 5 Groun...

Страница 59: ...in Signal Description 1 GND 2 12VS 3 CPU_FAN_RPM 4 FAN_PWM J3 PCI POWER Pin Signal Description 1 5V 2 Ground 3 5V J4 J5 J6 J7 J8 Internal USB Interface 6 1 Pin Signal Description 1 5VSB 2 5VSB 3 D 4 D...

Страница 60: ...scription J9 VEDIO IN 1 DVI_DATA0 2 DVI_DATA2 3 DVI_DATA0 4 DVI_DATA2 5 DVI_DATA1 6 GND 7 DVI_DATA1 8 DET_DVI 9 GND 10 DVI_5V 11 SCL 12 GND 13 SDA 14 DVI_CLK 15 HPD_DVI 16 DVI_CLK J10 SYSTEM FAN Pin S...

Страница 61: ...12 KEY A 13 KEY A 14 KEY A 15 KEY A 16 LED2 O OD 17 NA 18 GND 19 NA 20 NA 21 NA 22 NA 23 NA 24 KEY E 25 KEY E 26 KEY E 27 KEY E 28 KEY E 29 KEY E 30 KEY E 31 KEY E 32 NA 33 GND 34 NA 35 PETP0 36 NA 37...

Страница 62: ...S Interface Pin Signal Description Pin Signal Description 1 LCD 5VSB 2 LCD 5VSB 3 LCD 5VSB 4 LCD 5VSB 5 Ground 6 Ground 7 Ground 8 Ground 9 A_RxIn0 10 B_RxIn0 11 A_RxIn0 12 B_RxIn0 13 Ground 14 Ground...

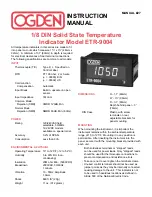
Страница 63: ...WMP 24C 24F User s manual 50 J13 J15 DIMM1 DIMM0 DDR4 Vertical Connect...

Страница 64: ...ND 3 LPC_FRAME 8 LPC_DAT2 13 NA 18 4 SMBCLK 9 3VS 14 SUS_SATA 5 PLT_RST 10 LPC_DAT1 15 3 3VSB J16 TPM ID 394 Pin Signal Description Pin Signal Description 1 LPC AD0 2 PCI reset 3 LPC AD1 4 SERIRQ 5 LP...

Страница 65: ...13 REFCLK 14 Reserved 15 GND 16 Reserved 17 Reserved 18 GND 19 Reserved 20 Reserved 21 GND 22 PERST 23 PERn0 24 3 3VSB 25 PERp0 26 GND 27 GND 28 1 5VS 29 GND 30 SMB_CLK 31 PETn0 32 SMB_DATA 33 PETp0...

Страница 66: ...7 GND 8 SPI_PROG 9 SPI_CLK 10 SPI_DO 11 SPI_DI 12 GND J19 J23 Standard SATA SATA DOM Interface Pin Signal Description 1 Ground 2 Tx 3 Tx 4 Ground 5 Rx 6 Rx 7 Ground 5VS jump select SATA DOM only J20...

Страница 67: ...24C 24F User s manual 54 7 394_RST 8 X 9 GND 10 X J21 CPU Interface Please refer to FCLGA1151 J22 CAP Front Bezel Button Connector Pin Signal Description 1 5V_AWS 2 3 3_AWS 3 KP_SCL 4 KP_SDA 5 PWR_LED...

Страница 68: ...19 Ground Ground 4 5VSB 3 3V_LAN 20 232_RI Ground 5 5VSB 3 3V_LAN 21 Ground USBPP9 6 5VSB 3 3V_LAN 22 Ground USBPN9 7 Ground Ground 23 PCIE_RXN12 Ground 8 LPC_AD0 5VS 24 PCIE_RXP12 ISOCOM_GPIO2 9 LPC_...

Страница 69: ...ption 1 LPC_AD0 2 5VS 3 LPC_AD1 4 3 3VS 5 LPC_AD2 6 L80HLAT 7 LPC_AD3 8 L80LLAT J28 WRDM Interface 6 1 Pin Signal Description 1 GND 2 232_EC_SOUT7 3 GND 4 232_EC_SIN7 5 5VSB 6 3 3VSB J29 Power Switch...

Страница 70: ...GHT J31 J32 COM5 COM6 Serial Port Pin Signal Description Pin Signal Description 1 232_DCD 2 232_DSR 3 232_SIN 4 232_RTS 5 232_SOUT 6 232_CTS 7 232_DTR 8 232_RI 9 GND 10 5VS J33 Battery Socket Pin Sign...

Страница 71: ...MIC R L Signals 2 AGND J38 J39 DisplayPort Interface Pin Signal Description Pin Signal Description 1 ML_LANE0 11 GND 2 GND 12 ML_LANE3 3 ML_LANE0 13 CONFI G1 4 ML_LAN1 14 CONGI G2 5 GND 15 AUX_CH 6 M...

Страница 72: ...LAN1_MDI2_P 5 LAN1_MDI1_N 6 LAN1_MDI1_P 7 LAN1_MDI0_N 8 LAN1_MDI0_P J41 USB3 1 Gen2 Ports Pin Signal Description Pin Signal Description 1 5VSB 10 5VSB 2 Data1 11 Data2 3 Data1 12 Data2 4 GND 13 GND 5...

Страница 73: ...10 5VSB 2 Data1 11 Data2 3 Data1 12 Data2 4 GND 13 GND 5 SSRX1 14 SSRX2 6 SSRX1 15 SSRX2 7 GND 16 GND 8 SSTX1 17 SSTX2 9 SSTX1 18 SSTX2 J43 Audio Earphone MIC Signal Description UP Line Out stereo Gre...

Страница 74: ...DP_AUX_DN_R 30 Ground 3 EDP_TX3_DN_R 17 Ground 31 Ground 4 EDP_TX3_DP_R 18 VLCD 32 EDP_BKLT_EN 5 Ground 19 VLCD 33 EDP_BKLT_CTL 6 EDP_TX2_DN_R 20 VLCD 34 Test Point 7 EDP_TX2_DP_R 21 VLCD 35 Test Poin...

Страница 75: ...62 B L type Stand optional kit Key Features and Benefits Similar color as WMP series 5 000 times hinge life cycle Specifications Weight Capacity Max 10kgs Monitor Mounting Holes VESA 100 100mm Applic...

Страница 76: ...Charge Voltage 8 4V Cut Off Voltage 6 0v Suggested Charge Current Max 2A System Continuous Discharging Current Max 16 6 A The End of Charge Condition 150 mA min Discharge Protection UVP OCP Charge Pro...

Страница 77: ...mmended that you should inform us as soon as possible for the suitable solution For the computers that are no longer useful or work well please contact with worldwide distributors for recycling The wo...

Отзывы: