background image


© by WilTec Wildanger Technik GmbH  

Item 61055 

Page 9 


http://www.WilTec.de


http://www.aoyue.eu 


10 2021

-1


http://www.teichtip.de


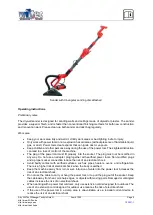
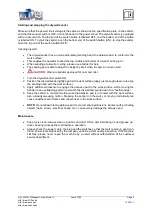
Starting and stopping the drywall sander


Make sure that the power circuit voltage is the same as shown on the specification plate on the sander, 
and that the sander switch is OFF. Connect Sander to the power circuit. The drywall sander is equipped 
with a rocker switch. The top end of the switch button is labelled OFF, and the bottom end of the button 
is labelled ON. To start the sander, push the bottom end of the switch button (ON), to stop the sander, 
push the top end of the switch button (OFF). 
 

Sanding drywall 


  The drywall sander has a unique articulating sanding head: the abrasive pad, to conform to the 

work surface. 

  This enables the operator to sand the top, middle and bottom of a wall or ceiling joint. 

  When sanding a tall wall or ceiling, please use a ladder for help. 

  The sanding pad is able to adjust the height by itself when it meets an uneven wall. 


 CAUTION:


Wear a respirator approved for dust and mist. 


1.  Turn the drywall sander switch ON. 
2.  Position the drywall sander lightly against the work surface (apply just enough pressure to align 

the sanding head with the work surface). 

3.  Apply additional pressure to engage the abrasive pad to the work surface: while  moving the 

Sander in an overlapping pattern to smooth the drywall compound down to a “feather

-

edge.”


4.  Keep the sander in constant motion while the abrasive pad is in contact with the work surface. 

Use a steady sweeping motion. Stopping the sander (on the work), or moving it erratically can 
cause unesthetic swirl marks and unevenness in the work surface. 


NOTE: 

Do not allow rotating abrasive pad to contact sharp protrusions. Contact with protruding 

objects (nails, screws, electrical boxes, etc,), can severely damage the abrasive pad. 


Maintenance 


  Keep tools clean. Always clean up debris and dust. Often add lubricating oil and grease (re-

ducer, bearing) to keep the tool flexible in operation. 

  Always check the power cable, the plug and the switches so that the tools remain in good con-

dition. Power tools produced by the company underlie a strict quality inspection. If the machine 
still  fails,  please  never  repair  the  machine  by  yourself  without  authorization  of  the  customer 
service department. 


Содержание 61055

Страница 1: ...operating instructions and safety information before using for the first time Technical changes reserved Due to further developments illustrations functioning steps and technical data can differ insi...

Страница 2: ...ice wiltec info or use our contact form https www wiltec de contacts The most recent version of this manual in various languages can be found in our online shop via https www wiltec de docsearch Our p...

Страница 3: ...can cause hearing damage General safety guidelines Warning Read all of the safety guidelines and instructions Failure to comply with the safety guidelines or instructions can result in electrical shoc...

Страница 4: ...230 Power W 710 Frequency 50 Speed r min round grinding discs 1000 2100 triangular grinding discs 2800 5600 Grinding disc diameter 225 Triangular grinding disc edge length 28 5 Length of telescopic ha...

Страница 5: ...chine The plug of the power tool must fit properly into the socket The plug must not be modified in any way Do not use an adapter plug together with earthed power tools Non modified plugs and a proper...

Страница 6: ...d safer with the correct power tool and within the power capacity range Do not use a power tool whose power switch is defective A power tool that can no longer be turned on or off is dangerous and mus...

Страница 7: ...and 240 grit are available for situations requiring a smoother finish Installation Before repair or replacement of electric tool parts or accessories be sure to pull out the plug from the socket Sandp...

Страница 8: ...rol The speed is adjusted by turning the control knob The control knob is labelled from min to max with min being the slowest speed approx 1000 r min and max being the fastest speed approx 2100 r min...

Страница 9: ...n the drywall sander switch ON 2 Position the drywall sander lightly against the work surface apply just enough pressure to align the sanding head with the work surface 3 Apply additional pressure to...

Страница 10: ...European countries with a separate col lection system for these appliances The logo on the article or on its packaging points out that this article must not be treated as normal house hold waste but m...

Отзывы: