


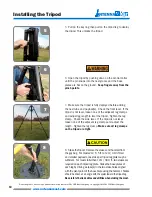

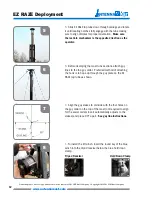


Installing the Tripod
5
8
6
7
5.
Pull on the key ring then pull on the tripod leg to deploy
the tripod. This unlocks the tripod.
6.
Open the tripod by pushing down on the central collar
until the pin snaps into the next groove and the base
plates are flat on the ground.
Keep fingers away from the
pinch points.
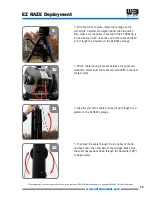
7.
Make sure the tripod is fully deployed before adding
the next tube and payload(s). Check the front level. If the
tripod is not level, loosen one of the adjacent leg clamps
and adjust leg length to level the tripod. Tighten the leg
clamp. Check the side level. If the tripod is not level,
loosen one of the adjacent leg clamps and adjust the
length. Tighten the leg clamp.
Make sure all leg clamps
on the tripod are tight.
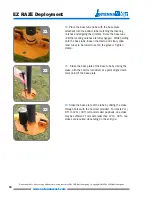
8.
Stake the Tripod: Remove the stakes and hammer from
the guy bag. For masts 2m / 6.5 ft. to 12m / 39.3 ft. tall
and smaller payloads, one stake per tripod leg plate may be
sufficient. For masts taller than 12m / 39.3 ft., two stakes are
required on each tripod leg plate. Stake the base plates of
each leg by driving a stake(s) in the two stake holes aligned
with the pivot point of the base blate using the hammer. Stakes
should be driven at an angle with the eyelet toward the tripod leg.
Be careful of buried cables and utilities when staking the mast.
www.antennamast.com
Do not duplicate, alter, or copy without the written consent of The Will-Burt Company. © Copyright 2013 The Will-Burt Company
10


