Wickes 223740 Скачать руководство пользователя страница 7

7

NOISE INFORMATION

A weighted sound pressure   

L

pA

: 82dB(A)

A weighted sound power    

L

wA

: 93dB(A)

K

pA 

& K

wA

 3.0dB(A)

Wear ear protection when sound pressure is over:  

80dB(A) 

Vibration total values (triax vector sum) determined according to EN60745:
Vibration value emissioa

Vibration emission value a

h

 = 5.08m/s

Uncertainty  K=1.5m/s

2

The declared vibration total value may be used for comparing one tool with another, and may also be used in a 

preliminary assessment of exposure.

WARNING!

 The vibration emission value during actual use of the power tool can differ from the declared value 

depending on the ways in which the tool is used dependant on the following examples and other variations on 

how the tool is used:

How the tool is used and the materials being cut or drilled.

The tool being in good condition and well maintained.

The use the correct accessory for the tool and ensuring it is sharp and in good condition.

The tightness of the grip on the handles and if any anti vibration accessories are used.

And the tool is being used as intended by its design and these instructions.

This tool may cause hand-arm vibration syndrome if its use is not adequately managed.

WARNING!

 To be accurate, an estimation of exposure level in the actual conditions of use should also take 

account of all parts of the operating cycle such as the times when the tool is switched off and when it is running 

idle but not actually doing the job. This may significantly reduce the exposure level over the total working period, helping 

to minimize your vibration exposure risk.

ALWAYS use sharp sanding sheets.

Maintain this tool in accordance with these instructions and keep well lubricated (where appropriate).

If the tool is to be used regularly then invest in anti vibration accessories.

Avoid using tools in temperatures of 10

o

C or less.

Plan your work schedule to spread any high vibration tool use across a number of days.

VIBRATION INFORMATION

Содержание 223740

Страница 1: ...PBS900G 1 223740 BELT SANDER 920W 76x533MM...

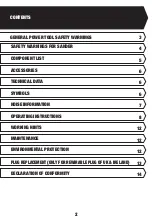
Страница 2: ...2 12 12 13 14 COMPONENT LIST SAFETY WARNINGS FOR SANDER ACCESSORIES TECHNICAL DATA SYMBOLS NOISE INFORMATION OPERATING INSTRUCTIONS MAINTENANCE WORKING HINTS ENVIRONMENTAL PROTECTION PLUG REPLACEMENT...

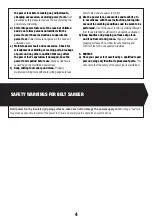
Страница 3: ...AFETY a Stay alert watch what you are doing and use common sense when operating a power tool Do not use a power tool while you are tired or under the influence of drugs alcohol or medication A moment...

Страница 4: ...th sharp cutting edges are less likely to bind and are easier to control g Use the power tool accessories and tool bits etc in accordance with these instructions taking into account the working condit...

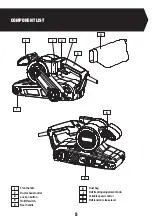
Страница 5: ...ENT LIST Front handle Dust exhaust outlet Lock on button On Off switch Rear handle Dust bag Belt tracking adjustment knob Variable speed control Belt tension release lever 1 3 2 4 7 6 5 8 9 1 2 3 4 5...

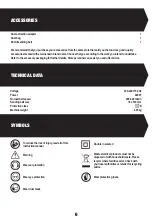
Страница 6: ...personnel can assist you and offer advice SYMBOLS TECHNICAL DATA To reduce the risk of injury read all of this instruction manual Warning Wear ear protection Wear eye protection Wear dust mask Double...

Страница 7: ...ol and ensuring it is sharp and in good condition The tightness of the grip on the handles and if any anti vibration accessories are used And the tool is being used as intended by its design and these...

Страница 8: ...belt centering adjustment Turn the machine upside down hold it firmly with one hand start the tool and release the switch immediately after observing tracking of sanding belt If the sanding belt runs...

Страница 9: ...t bag When the dust bag is full remove and empty by opening the zip on the dust bag 5 ON OFF SWITCH Depress to start and release to stop your tool SWITCH LOCK ON BUTTON Depress on off switch 4 then lo...

Страница 10: ...t the variable speed control dial 8 to increase or decrease the speed according to the material and sanding belt specification to be used also possible during no load operation See the table below for...

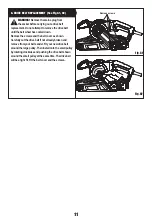
Страница 11: ...as shown Carefully cut the drive belt if not already broken and remove from your belt sander Fit your new drive belt around the large pulley Then install onto the small pulley by rotating clockwise an...

Страница 12: ...lection WORKING HINTS FOR YOUR BELT SANDER Remove the plug from the socket before carrying out any adjustment servicing or maintenance Your power tool requires no additional lubrication or maintenance...

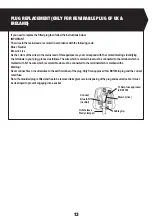
Страница 13: ...ollows The wire which is colored blue must be connected to the terminal which is marked with N The wire which is colored brown must be connected to the terminal which is marked with L Warning Never co...

Страница 14: ...achinery Directive 2014 30 EU Electromagnetic Compatibility Directive 2011 65 EU EU 2015 863 RoHS Restriction of Hazardous Substances Directive and conforms to the following standards Standards specif...

Страница 15: ......

Страница 16: ...Customer Helpline 0345 2005409...

Отзывы: