


3460AFCAF Stayton Media Console;
3462AFCAF Stayton Media Center
Assembly Instructions
3460AFCAF_3462AFCAF
— Page 6 — 04/13
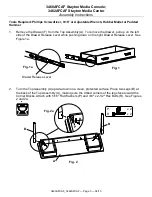
7.
Lay the unit with the drawer opening face down. The back apron of the Top Assembly has pre-
punched location holes. Place the Back Assembly (E) with the horizontal cleat of the top edge
against the back apron of the Top Assembly. Attach by inserting three #6 x 5/8” Philtruss
Screws (K) through the pre-punched location holes in the Back Apron. Insert three additional #6
x 5/8” Philtruss Screws through the holes in the bottom edge of the Back Assembly into the
Lower Shelf Assembly.
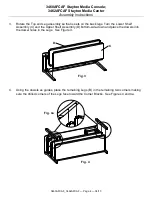
8.
Turn the table upright and insert the Drawer. See Figure 8.
9.
Place the unit at its final destination. To level the table, rotate the Adjustable Glides (V) found on
the bottoms of the legs. See Figure 8.
Fig. 8
V
V
Fig. 7
K
x 6
E
K
(Front View of
Back Assembly)
Fig. 7a
E
TOP


