background image

1380AFGACg; 1380AFCAFg McKenzie Cal-King Bookcase Storage Bed 

Parts List


1380AFGACg_1380AFCAFg 

— Page 4 — 06/14 


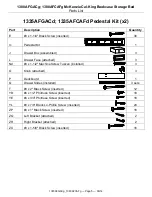
1383AFGACg; 1383AFCAFg Footboard Kit (x1) 


Part 

Description 

Quantity 

Ba 

Footboard Assembly 


Da 

Trestle With T-Nuts 


#8 x 1-1/4" Black Screw 


45 

(9 inserted) 

1/4" x 1-3/4" Hex Bolt 


26 

1/4" Flat Washer 


26 

Ua 

Assembled Foot 


Adjustable Glide (installed) 


YC 

Short Center Deckboard 


YD 

#6 x 1/2" Philtruss Screw 


YH 

90

o

 Bracket 


YM 

#10 x 3/4" Pan Head Screw (inserted) 


12 

ZM 

Long Center Deckboard 


ZP 

#8 x 1" Black Screw (inserted) 


16 

ZQ 

Left Bracket (attached) 


ZR 

Right Bracket (attached) 


ZU 

1/4" T-Nut (inserted) 


28 

ZX 

#8 x 1-5/8" Black Screw (inserted) 


ZY 

Foot Bracket (attached) 


Содержание McKenzie 1380AFCAFg

Страница 1: ...t chemicals or substances including wood dust is present even in trace amounts Drilling sawing sanding or machining wood products generates wood dust a substance known to the State of California to ca...

Страница 2: ...ed 6 R Assembled Door attached 2 Sg False Bottom 4 XA Top Assembly attached 1 XB Power Bar and USB installed 1 YA Large Adjustable Glide installed 2 YB 8 x 5 8 Pan Head Screw inserted 8 YJ 8 x 1 3 8 L...

Страница 3: ...8 Undercut Screw AB inserted 44 ZJ 6 x 5 8 Philtruss Screw inserted 16 ZN 8 x 1 1 4 Pan Head Screw inserted 10 ZO 8 x 2 1 4 Black Screw inserted 6 ZP 8 x 1 Black Screw inserted 16 ZQ Left Bracket att...

Страница 4: ...ck Screw 45 9 inserted F 1 4 x 1 3 4 Hex Bolt 26 H 1 4 Flat Washer 26 Ua Assembled Foot 3 W Adjustable Glide installed 3 YC Short Center Deckboard 1 YD 6 x 1 2 Philtruss Screw 8 YH 90o Bracket 2 YM 10...

Страница 5: ...Box assembled 3 L Drawer Face attached 3 Nd 8 x 1 1 2 Machine Screw Tuscan installed 3 O Knob attached 3 P Deckboard 1 Q Drawer Slides installed 3 sets T 8 x 2 Black Screw inserted 12 YD 6 x 1 2 Phil...

Страница 6: ...e measure Note The Headboard Assembly can be separated into three pieces for ease of maneuvering through narrow halls and stairways if you need to perform this process see steps 17 through 21 1 Remove...

Страница 7: ...embly requires two people 1380AFGACg_1380AFCAFg Page 7 06 14 3 To attach the Footboard Ba to the Pedestal Assembly Ic align the Brackets and slide the Pedestal Assembly down on to the Footboard Ba See...

Страница 8: ...Bookcase Storage Bed Assembly Instructions This assembly requires two people 1380AFGACg_1380AFCAFg Page 8 06 14 5 Align the Brackets on both sides and slide the Pedestal Footboard assembly down on to...

Страница 9: ...re 6a Line up the upper edges of the trestle and braces so they are nearly flush Insert two 1 4 x 1 3 4 Hex Bolts F and Washers H and tighten Repeat for the second upper brace Place a Trestle with T N...

Страница 10: ...es 7 and 7a Line up the upper edges of the trestle and braces so they are nearly flush Insert two 1 4 x 1 3 4 Hex Bolts F and Washers H and tighten Place a Trestle with T Nuts on the outside surface o...

Страница 11: ...inating the need for an Assembled Foot in this position where it would be easily visible Do not attach an Assembled Foot in the position near the footboard Facing the Headboard place two Assembled Fee...

Страница 12: ...n where it would be easily visible Do not attach an Assembled Foot in the position near the footboard Facing the Footboard place an Assembled Foot Ua on the inside of the second set of Trestles and at...

Страница 13: ...This assembly requires two people 1380AFGACg_1380AFCAFg Page 13 06 14 10 Facing the Footboard attach the Pedestal Assembly to the Footboard with a 90 Bracket YH and four 6 x 1 2 Philtruss Screws YD R...

Страница 14: ...e Figure 11 To level the headboard stand in the open area in between the two attached deckboards and reach through the front of the platform See Figure 11 Using a slotted screwdriver rotate the Large...

Страница 15: ...To make sure the bed is square measure the distance between opposing corners If one of the measurements is larger tap on a footboard leg until the measurement is equal See Figure 12 13 Place the Deckb...

Страница 16: ...k Screws E If you need to readjust the center feet remove the Long Center Deckboard ZM adjust the glides and reattach the deckboard 15 Open the Door R To adjust the brake tension on the Door Stay ZE t...

Страница 17: ...bbies use the Wire Clips ZS on the underside of the cubbies to secure the wires Close the door tightly making sure the magnetic catches and plates securely touch Optional 17 To divide the Headboard As...

Страница 18: ...ws YJ attaching the Sides and Vertical Dividers to the Top and 8 x 1 1 4 Pan Head Screws attaching the Front Apron to the Top Carefully remove the Top Assembly XA from the Case See Figures 18 and 18a...

Страница 19: ...ctions This assembly requires two people 1380AFGACg_1380AFCAFg Page 19 06 14 20 Carefully separate the two halves of the Case Assembly See Figures 20 and 20a 21 After moving the headboard sections int...

Отзывы: