Whittier Wood 2322CAFd Скачать руководство пользователя страница 15

CAM - LOCK SYSTEM INSTRUCTIONS


P.O. Box 2827 
Eugene, OR 97402 USA 
Toll Free: 800-653-3336 
Ph: 541-687-0213 
Fax: 541-687-2060 
www.whittierwood.com


Page 1 of 1 


Rev. 01/13


NOTE: To avoid scratching the surface of the 
wood, assemble the unit and place face-down 
on a clean, protected surface. 

12

1

2

3

4

5

6

7

8

9

10

11

Optimum 
tightness 

Face of 

Cam Housing 

Correct way to tighten 

your Cam-Lock system. 

Cam Connector 

Shoulder must be 
flush with the surface 
of the wood. 

DO NOT embed  
the shoulder into the wood! 

1.  Insert the Cam Housing so the arrow faces the Cam 

Connector. To achieve tension and holding power, 
you 

MUST TURN

 the Cam Housing clockwise at 

LEAST

 1/4 turn to the 9:00 position. Turning the 

Cam Housing between 1/4 and 1/2 turn should be 
enough to ensure rigid tension. Tension should be 
initiated as soon as 10:00. You should receive  
optimum tightness at 11:00. IF this does not occur, 
tighten or loosen the Cam Connector to achieve 
proper tension. 
 

2.  You may need extra tension if: 

A. 

The Cam Connector was screwed in deeper or 
not as deep as if should. 

B. 

If the furniture is repeatedly assembled and 
disassembled. 

C. 

If you place a heavy load in the unit. 


To achieve extra tension,tighten the Cam 
Connector between the 11:00 and 12:00 
positions. 

Shelf 

Side Panel 

Cam 
Connector 

Cam 
Housing 

Install the Cam 
Housing so the 
arrow is directly 
over the bolt. 

Lock the Cam 
Housing with: 

Phillips 

Screwdriver 

Slotted 

Screwdriver 

Содержание 2322CAFd

Страница 1: ...wood This product can expose you to chemicals including formaldehyde which are known to the State of California to cause cancer For more information go to www p65warnings ca gov furniture DESIGN SUBJE...

Страница 2: ...nd part name 2317GAC 2317CAF Queen Mantel Headboard Footboard Kit x1 Part Description Quantity A Headboard Assembly 1 B Footboard Assembly 1 YI 8x 1 1 4 Pan Head Screw inserted 8 ZP 8 x 1 Black Screw...

Страница 3: ...Page 3 05 17 2320GACa 2320CAFa King Mantel Headboard Footboard Kit x1 Part Description Quantity Aa Headboard Assembly 1 B Footboard Assembly 1 Rb Center Deckboard 1 YH Top Assembly 1 YI 8 x 1 1 4 Pan...

Страница 4: ...ached 3 H Notched Deckboard attached 1 I Left Right Center Deckboard 1 J Queen Trestle 11 9 16 2 K King Trestle 27 9 16 2 L Assembled Foot 3 M Foot Bracket attached 3 N Adjustable Glide installed 3 P...

Страница 5: ...t inserted 8 YM 10 x 3 4 Pan Head Screw inserted 12 ZA Left Pedestal Angle Bracket inserted 2 ZB Right Pedestal Angle Bracket inserted 2 ZC Left Pedestal Bracket inserted 1 ZD Right Pedestal Bracket i...

Страница 6: ...nzie King Mantel Storage Bed for Adjustable Bed Bases 2325 1 Remove the Center Deckboard Rb from the back of the Headboard Aa and place to the side See Figure 1 2 NOTE READ CAM INSTRUCTIONS NOW BEFORE...

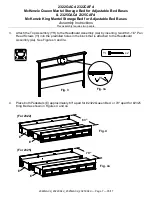
Страница 7: ...5GACd_2325CAFd Page 7 05 17 3 Attach the Top Assembly YH to the Headboard Assembly Aa by inserting two 8x1 1 4 Pan Head Screws YI into the predrilled holes in the block that is attached to the Headboa...

Страница 8: ...Bed Bases Assembly Instructions This assembly requires two people 2322GACd_2322CAFd_2325GACd_2325CAFd Page 8 05 17 5 To attach the Footboard B to the Pedestal E align the Brackets and slide the Pedes...

Страница 9: ...Kenzie King Mantel Storage Bed for Adjustable Bed Bases Assembly Instructions This assembly requires two people 2322GACd_2322CAFd_2325GACd_2325CAFd Page 9 05 17 7 Align the Brackets on both sides and...

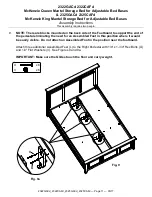
Страница 10: ...here are blocks mounted on the back side of the Footboard to support the end of the pedestal eliminating the need for an Assembled Foot in this position where it would be easily visible Do not attach...

Страница 11: ...e blocks mounted on the back side of the Footboard to support the end of the pedestal eliminating the need for an Assembled Foot in this position where it would be easily visible Do not attach an Asse...

Страница 12: ...Adjustable Bed Bases Assembly Instructions This assembly requires two people 2322GACd_2322CAFd_2325GACd_2325CAFd Page 12 05 17 10 Facing the Footboard attach the Pedestal Assembly to the Footboard wit...

Страница 13: ...as shown in Figures 11 and 11a Recycle discard the Trestles for the size of bed not purchased IMPORTANT the center two trestles nest into the notches at the top of the Foot Assemblies The trestles at...

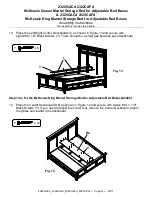
Страница 14: ...Right Center Deckboards I as shown in Figure 13 and secure with eight 8x1 1 4 Black Screws Y There should be a small gap between each deckboard Step 14 is for the McKenzie King Mantel Storage Bed for...

Страница 15: ...TURN the Cam Housing clockwise at LEAST 1 4 turn to the 9 00 position Turning the Cam Housing between 1 4 and 1 2 turn should be enough to ensure rigid tension Tension should be initiated as soon as 1...

Отзывы: