
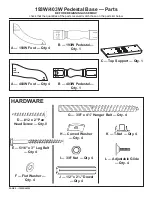

PAGE 4 — 193W/403W
4)
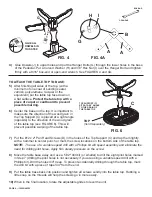
Glue Dowels (J) in upper holes and put the Hanger Bolts (G) through the lower holes in the base
of the Pedestal. Put a Curved Washer (H) and 3/8" Hex Nut (I) over the Hanger Bolt and tighten
firmly with a 9/16" box-end or open-end wrench. See FIGURES 4 and 4A.
FIG. 4
J
G
FIG. 4A
H
I
B
A
G
A
BOX-END
OPEN-END
GLUE ALL
DOWELS IN
THIS STEP.
7)
Put the #12 x 2" Pan Head Screws (D) in the holes of the Top Support (C) and tap them lightly
with a hammer to center punch or mark the screw locations on the bottom side of the table top.
NOTE: The use of a variable speed drill with a Phillips bit will speed assembly and eliminate the
need for drilling pilot holes. Apply firm steady pressure on the screw.
8)
Move the table base away and use a 5/32" drill bit (or smaller) to drill the eight pilot holes marked
in Step 7 (drilling the pilot holes is not necessary if you are using a variable speed drill with a
Phillips bit). Drill the holes 3/4" deep. To prevent accidentally drilling through the table top, mark
the drill bit with a piece of tape 3/4" from the end.
9)
Put the table base back into position and tighten all screws solidly into the table top. Rubbing a
little soap on the threads will help the screws go in more easily.
10)
When in the final location, rotate the adjustable glides to level the unit.
TOP SUPPORT (C)
SITS AT A 90° ANGLE
TO THE GRAIN OF
THE TABLE TOP
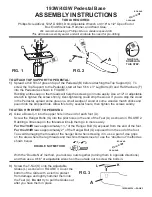
TO ATTACH THE TABLE TOP TO BASE:
5)
After finishing all sides of the top, (with a
minimum of one coat of sanding sealer,
varnish, polyurethane, lacquer or the
equivalent) put the table top face down on
a flat surface.
Protect the table top with a
piece of carpet or cardboard to prevent
possible marring.
6)
Center the base on the top. It is important to
make sure the direction of the wood grain in
the Top Support (C) is placed at a right angle
(opposite) to the direction of the wood grain
of the table top (see FIGURE 6). This will
prevent possible warping of the table top.
TOP
(Sold Separately)
C
FIG. 6


