3460AFCAFa Stayton Media Console;
3462AFCAFa Stayton Media Center
Assembly Instructions
3460AFCAFa_3462AFCAFa
— Page 3 — 03/14
Tools Required: Phillips Screwdriver, 9/16" or Adjustable Wrench, Rubber Mallet or Padded
Hammer
1.
Remove the Drawer (F) from the Top Assembly (A). To remove the drawer, pull up on the left
side of the Drawer Release Lever while pushing down on the right Drawer Release Lever. See
Figure 1a.
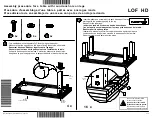
2.
Turn the Top Assembly (A) upside-down on a clean, protected surface. Place two Legs (B) at
the back of the Top Assembly (A), making sure the drilled corners of the legs face toward the
Corner Blocks. Attach with 5/16" Flat Washers (P) and 3/8" x 2-1/2" Hex Bolts (R). See Figures
2 and 2a.
Fig. 2
B
B
Fig. 2a
A
P
R
x 2
x 2
R
P
Fig. 1
Drawer Release Lever
Fig. 1a