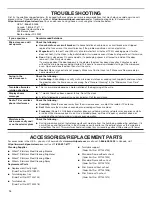
Whirlpool YWMT50011KS0 Скачать руководство пользователя страница 14

14

TROUBLESHOOTING

First try the solutions suggested here. If you need further assistance or more recommendations that may help you avoid a service call, 

please visit the “Troubleshooting” section at 

https://www.whirlpool.com/owners

 for Troubleshooting help. In Canada, visit  

https://www.whirlpool.ca/owners

. You can also reach us by phone or mail using the information below:


USA: 1-866-698-2538 


Canada: 1-800-807-6777 


Whirlpool Customer Service 


553 Benson Road 


Benton Harbor, MI 49022

If you experience

Recommended Solutions

Microwave oven will 

not operate

Check the following:


Household fuse or circuit breaker: 

If a household fuse has blown or a circuit breaker has tripped, 

replace the fuse or reset the circuit breaker. If the problem continues, call an electrician.


Magnetron:

 Try to heat 1 cup (250 mL) of cold water for 2 minutes at 100% cooking power. If water 

does not heat, try the steps in the bullets below. If microwave oven still does not operate, call for service.


Door:

 Firmly close door. On some models, if a packaging spacer is attached to inside of the door, 

remove it, then firmly close door. 

If a message about the door appears in the display, the door has been closed for 5 minutes or more 

without the microwave oven being started. This occurs to avoid unintended starting of the microwave 

oven. Open and close the door, then start the cycle.


Control:

 Make sure control is set properly. Make sure Control Lock is off. Make sure Demo mode (on 

some models) is off.

Arcing in the  

microwave oven

Check the following:


Soil buildup: 

Soil buildup on cavity walls, microwave inlet cover, cooking rack supports, and area where 

the door touches the frame can cause arcing. See “General Cleaning” in the “Microwave Oven Care” 

section.

Turntable alternates 

rotation directions


This is normal and depends on motor rotation at the beginning of the cycle.

Display shows 

messages


“:” means there has been a power failure. Reset the clock.


A letter followed by a number is an error indicator. Call for assistance.

Radio, TV, or cordless 

phone interference

Check the following:


Proximity: 

Move the receiver away from the microwave oven, or adjust the radio or TV antenna.


Soil:

 Make sure the microwave oven door and sealing surfaces are clean.


Frequency:

 Some 2.4 GHz based cordless phones and home wireless networks may experience static 

or noise while microwave oven is on. Use a corded phone, a different frequency cordless phone, or 

avoid using these items during microwave oven operation.

Moisture in the 

microwave cavity and/

or on the exterior glass

Check the following:


During microwave cycles that release significant moisture from the item being cooked (i.e. potatoes), it is 

normal to see and feel moisture in the microwave cavity and/or on the exterior glass as this moisture is 

vented from the unit. This moisture should not impact any surrounding surface. Wipe away with towel.

ACCESSORIES/REPLACEMENT PARTS

For accessories in the U.S.A., you can visit our website at 

www.whirlpool.com

 or call us at

 1-866-698-2538

. In Canada, visit

https://www.whirlpool.ca/owner

 or call us at 

1-800-807-6777

.

Cleaning Supplies


Affresh

®

 Stainless Steel Cleaning Mousse


Affresh

®

 Stainless Steel Cleaning Brightener


Affresh

®

 Stainless Steel Cleaning Wipes


Affresh

®

 Stainless Steel Cleaning Spray

Replacement Parts


Replacement Cavity Light 
(Order Part No: W10709921)


Turntable glass tray 
(Order Part No: W11443145)


Turntable hub 
(Order Part No: W11452278)


Turntable support
(Order Part No: W11443144)


Standard Frame without cut-out 
(Order Part No: W11451304)


Standard Frame with cut-out 
(Order Part No: W11451313)


Slim Frame without cut-out 
(Order Part No: W11451308)


Slim Frame with cut-out 
(Order Part No: W11451314)

Содержание YWMT50011KS0

Страница 1: ...________________ Serial Number____________________________________________ Table of Contents W11416163C MICROWAVE OVEN SAFETY 2 Electrical Requirements 4 FEATURES 4 Standby Mode 7 Demo Mode 7 Control Lock 7 MICROWAVE OVEN USE 7 Food Characteristics 7 Cooking Guidelines 7 Cookware and Dinnerware 8 Aluminum Foil and Metal 8 Microwave Cooking Power 8 Popcorn 9 Reheat 9 Frozen Entree 9 Defrost 9 Cook ...

Страница 2: ...d and follow the specific PRECAUTIONS TO AVOID POSSIBLE EXPOSURE TO EXCESSIVE MICROWAVE ENERGY found in this section The microwave oven must be grounded Connect only to properly grounded outlet See GROUNDING INSTRUCTIONS found in this section and in the provided Installation Instructions Install or locate the microwave oven only in accordance with the provided Installation Instructions Some produc...

Страница 3: ...er panel Do not use the cavity for storage purposes Do not leave paper products cooking utensils or food in the cavity when not in use Liquids such as water coffee or tea are able to be overheated beyond the boiling point without appearing to be boiling Visible bubbling or boiling when the container is removed from the microwave oven is not always present THIS COULD RESULT IN VERY HOT LIQUIDS SUDD...

Страница 4: ...ven is equipped with a cord having a grounding wire with a grounding plug The plug must be plugged into an outlet that is properly installed and grounded WARNING Improper use of the grounding plug can result in a risk of electric shock Consult a qualified electrician or serviceman if the grounding instructions are not completely understood or if doubt exists as to whether the microwave oven is pro...

Страница 5: ...ed cook time is reached NOTE Holding the START button will add up to 10 minutes to the current time countdown When 10 minutes has been added or the maximum time has been reached invalid retry tones will sound and the display will show the final time setting If you want more time you can release the keypad then press and hold the START button again to add up to another 10 minutes Start Function Pre...

Страница 6: ...s guide for the food category or reference the sticker on the door of the microwave 3 Use the number keypads to enter the weight Close the door 4 Press START button The display will count down the defrost time For better results a preset standing time is included in the defrosting time This may make the defrosting time seem longer than expected When the stop time is reached the microwave oven will...

Страница 7: ...and allow a standing time Food Characteristics When the microwave oven is cooking the amount size and shape starting temperature composition and density of the food will affect the cooking results Amount of Food The more food that is heated at once the longer the cook time that is needed Check for doneness and add small increments of time if necessary Size and Shape Smaller pieces of food will coo...

Страница 8: ...d approved meat thermometers may be used with the following guidelines To avoid damage to the microwave oven do not allow aluminum foil or metal to touch the inside cavity walls ceiling or floor Always use the turntable To avoid damage to the microwave oven do not allow contact with another metal object during microwave cooking Do Not Use Metal cookware and bakeware gold silver pewter non approved...

Страница 9: ...ith plastic wrap and vent 10 or 20 or 40 or 60 oz 283 or 567 g or 1134 or 1701 g Defrost For optimal results food should be 0 F 18 C or colder when defrosting Unwrap foods and remove lids from fruit juice before defrosting Shallow packages will defrost more quickly than deep blocks Separate food pieces as soon as possible during or at the end of the cycle for more even defrosting Foods left outsid...

Страница 10: ...to several times with a fork Place on paper towel around turntable edges at least 1 2 5 cm apart Let stand 5 minutes after cooking 1 4 pieces 4 7 oz 113 198 g 6 Large Potatoes Pierce each potato several times with a fork Place on paper towel around turntable edges at least 1 2 5 cm apart Let stand 5 minutes after cooking 1 4 pieces 8 12 oz 227 340 g 7 Rice Follow measurements on package for ingred...

Страница 11: ...ot use soap filled scouring pads abrasive cleaners steel wool pads gritty washcloths or some paper towels On stainless steel models rub in direction of grain to avoid damaging the unit The area where the microwave oven door and frame touch when closed should be kept clean Cleaning Method Average soil Mild nonabrasive soaps and detergents Rinse with clean water and dry with soft lint free cloth Hea...

Страница 12: ...screws which fasten the trim kit frame to the microwave oven and set the 4 screws aside 5 Pull the Trim Kit Frame away from the front of the microwave to release it Note the TOP and up arrow molded into the frame the 4 locating pins and the locating slots set frame aside 6 Remove the light cover screw from the top front of the microwave oven 7 Remove the light cover A Trim kit frame B Mounting hol...

Страница 13: ...p 4 to fasten the trim kit frame to the microwave oven 13 Use the 3 screws removed in step 3 to reattach the leftside cooling duct 14 Slide the microwave oven back to the cabinet Plug in the microwave oven 15 Reattach the trim kit frame and microwave to the cabinet using the screws removed in step 1 Electrical Shock Hazard Plug into a grounded 3 prong outlet Do not remove ground prong Do not use a...

Страница 14: ...le alternates rotation directions This is normal and depends on motor rotation at the beginning of the cycle Display shows messages means there has been a power failure Reset the clock A letter followed by a number is an error indicator Call for assistance Radio TV or cordless phone interference Check the following Proximity Move the receiver away from the microwave oven or adjust the radio or TV ...

Страница 15: ...Tous droits réservés 2020 All rights reserved W11416163C 06 20 ...

Отзывы: