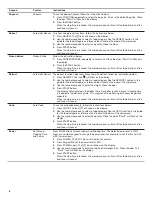
Whirlpool YWMT50011KS0 Скачать руководство пользователя страница 10

10

Item Food Category

Quantity

1

Bacon

Average thickness: Follow 

directions on package. For 

best results, place bacon on 

microwave-safe bacon rack.

1-6 slices

2

Canned Vegetable

Place in microwave-safe 

container. Cover with plastic 

wrap, and vent. Stir and 

let stand 2-3 minutes after 

cooking.

1, 2, 3 or 4 cups   

(250, 500, 750 mL or 1 L)

3

Fresh Vegetable

Place in microwave-safe 

container and add 2-4 tbs 

water. Cover with plastic wrap 

and vent. Stir and let stand  

2-3 minutes after cooking.

1-4 cups (250 mL-1 L)

4

Frozen Vegetable

Place in microwave-safe 

container and add 2-4 tbs 

water. Cover with plastic wrap 

and vent. Stir and let stand 

2-3 minutes after cooking.

1-4 cups (250 mL-1 L)


Item

Food Category

Quantity

5

Small Potatoes

Pierce each potato several 

times with a fork. Place on 

paper towel, around turntable 

edges, at least 1" (2.5 cm) 

apart. Let stand 5 minutes 

after cooking.

1-4 pieces, 4-7 oz  

(113-198 g)

6

Large Potatoes

Pierce each potato several 

times with a fork. Place on 

paper towel, around turntable 

edges, at least 1" (2.5 cm) 

apart. Let stand 5 minutes 

after cooking.

1-4 pieces, 8-12 oz 

(227-340 g).

7

Rice

Follow measurements on 

package for ingredient 

amounts. Place rice and 

liquid in microwave-safe 

dish. Cover with loose fitting 

lid. Let stand 5 minutes after 

cooking, or until liquid is 

absorbed. Stir.

0.5,1.0, 1.5, 2.0 cups  

(125, 250, 375, 500 mL)  

(dry, white long grain)

NOTE: 

During microwave cycles that release significant moisture 

from the item being cooked (i.e. potatoes), it is normal to see and 

feel moisture in the microwave cavity and/or on the exterior glass 

as this moisture is vented from the unit. This moisture should not 

impact any surrounding surface. Wipe away with towel.

Cook

Содержание YWMT50011KS0

Страница 1: ...________________ Serial Number____________________________________________ Table of Contents W11416163C MICROWAVE OVEN SAFETY 2 Electrical Requirements 4 FEATURES 4 Standby Mode 7 Demo Mode 7 Control Lock 7 MICROWAVE OVEN USE 7 Food Characteristics 7 Cooking Guidelines 7 Cookware and Dinnerware 8 Aluminum Foil and Metal 8 Microwave Cooking Power 8 Popcorn 9 Reheat 9 Frozen Entree 9 Defrost 9 Cook ...

Страница 2: ...d and follow the specific PRECAUTIONS TO AVOID POSSIBLE EXPOSURE TO EXCESSIVE MICROWAVE ENERGY found in this section The microwave oven must be grounded Connect only to properly grounded outlet See GROUNDING INSTRUCTIONS found in this section and in the provided Installation Instructions Install or locate the microwave oven only in accordance with the provided Installation Instructions Some produc...

Страница 3: ...er panel Do not use the cavity for storage purposes Do not leave paper products cooking utensils or food in the cavity when not in use Liquids such as water coffee or tea are able to be overheated beyond the boiling point without appearing to be boiling Visible bubbling or boiling when the container is removed from the microwave oven is not always present THIS COULD RESULT IN VERY HOT LIQUIDS SUDD...

Страница 4: ...ven is equipped with a cord having a grounding wire with a grounding plug The plug must be plugged into an outlet that is properly installed and grounded WARNING Improper use of the grounding plug can result in a risk of electric shock Consult a qualified electrician or serviceman if the grounding instructions are not completely understood or if doubt exists as to whether the microwave oven is pro...

Страница 5: ...ed cook time is reached NOTE Holding the START button will add up to 10 minutes to the current time countdown When 10 minutes has been added or the maximum time has been reached invalid retry tones will sound and the display will show the final time setting If you want more time you can release the keypad then press and hold the START button again to add up to another 10 minutes Start Function Pre...

Страница 6: ...s guide for the food category or reference the sticker on the door of the microwave 3 Use the number keypads to enter the weight Close the door 4 Press START button The display will count down the defrost time For better results a preset standing time is included in the defrosting time This may make the defrosting time seem longer than expected When the stop time is reached the microwave oven will...

Страница 7: ...and allow a standing time Food Characteristics When the microwave oven is cooking the amount size and shape starting temperature composition and density of the food will affect the cooking results Amount of Food The more food that is heated at once the longer the cook time that is needed Check for doneness and add small increments of time if necessary Size and Shape Smaller pieces of food will coo...

Страница 8: ...d approved meat thermometers may be used with the following guidelines To avoid damage to the microwave oven do not allow aluminum foil or metal to touch the inside cavity walls ceiling or floor Always use the turntable To avoid damage to the microwave oven do not allow contact with another metal object during microwave cooking Do Not Use Metal cookware and bakeware gold silver pewter non approved...

Страница 9: ...ith plastic wrap and vent 10 or 20 or 40 or 60 oz 283 or 567 g or 1134 or 1701 g Defrost For optimal results food should be 0 F 18 C or colder when defrosting Unwrap foods and remove lids from fruit juice before defrosting Shallow packages will defrost more quickly than deep blocks Separate food pieces as soon as possible during or at the end of the cycle for more even defrosting Foods left outsid...

Страница 10: ...to several times with a fork Place on paper towel around turntable edges at least 1 2 5 cm apart Let stand 5 minutes after cooking 1 4 pieces 4 7 oz 113 198 g 6 Large Potatoes Pierce each potato several times with a fork Place on paper towel around turntable edges at least 1 2 5 cm apart Let stand 5 minutes after cooking 1 4 pieces 8 12 oz 227 340 g 7 Rice Follow measurements on package for ingred...

Страница 11: ...ot use soap filled scouring pads abrasive cleaners steel wool pads gritty washcloths or some paper towels On stainless steel models rub in direction of grain to avoid damaging the unit The area where the microwave oven door and frame touch when closed should be kept clean Cleaning Method Average soil Mild nonabrasive soaps and detergents Rinse with clean water and dry with soft lint free cloth Hea...

Страница 12: ...screws which fasten the trim kit frame to the microwave oven and set the 4 screws aside 5 Pull the Trim Kit Frame away from the front of the microwave to release it Note the TOP and up arrow molded into the frame the 4 locating pins and the locating slots set frame aside 6 Remove the light cover screw from the top front of the microwave oven 7 Remove the light cover A Trim kit frame B Mounting hol...

Страница 13: ...p 4 to fasten the trim kit frame to the microwave oven 13 Use the 3 screws removed in step 3 to reattach the leftside cooling duct 14 Slide the microwave oven back to the cabinet Plug in the microwave oven 15 Reattach the trim kit frame and microwave to the cabinet using the screws removed in step 1 Electrical Shock Hazard Plug into a grounded 3 prong outlet Do not remove ground prong Do not use a...

Страница 14: ...le alternates rotation directions This is normal and depends on motor rotation at the beginning of the cycle Display shows messages means there has been a power failure Reset the clock A letter followed by a number is an error indicator Call for assistance Radio TV or cordless phone interference Check the following Proximity Move the receiver away from the microwave oven or adjust the radio or TV ...

Страница 15: ...Tous droits réservés 2020 All rights reserved W11416163C 06 20 ...

Отзывы: