background image

13

TROUBLESHOOTING

Try the solutions suggested here first in order to avoid the cost of an unnecessary service call.

Nothing will operate

Has a household fuse blown, or has a circuit breaker 
tripped?
Replace the fuse or reset the circuit breaker. If the problem 
continues, call an electrician.

Microwave oven will not operate

Is the magnetron working properly?
Try to heat 1 cup (250 mL) of cold water for 2 minutes at 
100% cooking power. If water does not heat, try the steps in 
the bullets below. If microwave oven still does not operate, 
call for service. See “Assistance or Service” section.

Is the door completely closed?
Firmly close door.

Is a packaging spacer (on some models) attached to the 
inside of the door?
Remove packaging spacer, then firmly close door.

Is the electronic microwave oven control set correctly?
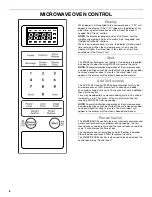
See “Microwave Oven Control” section.

Is the Control Lock set?
See “Control Lock” section.

Does “door” appear in the display?
Open and close the microwave oven door, and then touch 
START. See “Start” section.

Microwave oven makes humming noise

This is normal and occurs when the power supply in the 
magnetron cycles on.

Microwave oven door looks wavy

This is normal and will not affect performance.

Turntable will not operate

Is the turntable properly in place?
Make sure turntable is correct side up and is sitting securely 
on the turntable support. See “Turntable” section.

Is the turntable support operating properly?
Remove turntable. Remove and clean turntable hub and 
support. Replace hub, support and turntable. Place 1 cup 
(250 mL) of water on the turntable, then restart microwave 
oven. If it still is not working, call for service. See “Assistance 
or Service” section. Do not operate the microwave oven 
without turntable and turntable support working properly.

Turntable alternates rotation directions

This is normal and depends on motor rotation at beginning of 
cycle.

Display shows messages

Is the display showing “1:01”?
There has been a power failure, or the Clock time has been 
turned off. See “Display” section to clear display. See “Clock” 
section to reset or turn on Clock.

Display shows time countdown, but the microwave oven 
is not operating

Is the Timer in use?
See “Timer” section.

Cooking times seem too long

Is the cooking power set properly?
See “Microwave Cooking Power” section.

Are large amounts of food being heated?
Larger amounts of food need longer cooking times.

Is the incoming voltage less than that specified in 
“Electrical Requirements?”
Have a qualified electrician check the electrical system in the 
home.

Interference with radio, TV, cordless phone, etc.

Is the microwave oven plugged into the same outlet?
Try a different outlet for the electronic device.

Is the radio or TV receiver near the microwave oven?
Move the receiver away from the microwave oven, or adjust 
the radio or TV antenna.

Are the microwave oven door and sealing surfaces clean?
Make sure these areas are clean.

Is the cordless phone frequency 2.4 GHz?
Some 2.4 GHz-based cordless phones and home wireless 
networks may experience static or noise while the microwave 
oven is on. Use a corded phone or a different frequency 
cordless phone, or avoid using these items during microwave 
oven operation.

Содержание WMC10009

Страница 1: ... 1 800 253 1301 In Canada call 1 800 807 6777 or visit our website at www whirlpool com or www whirlpool ca FOUR À MICRO ONDES Guide d utilisation et d entretien Au Canada composez le 1 800 807 6777 ou visitez notre site web à www whirlpool ca Table of Contents Table des matières 2 W10474403A Model Modèle WMC10009 ...

Страница 2: ...ÈRES SÉCURITÉ DU FOUR À MICRO ONDES 17 INSTRUCTIONS D INSTALLATION 19 Déballage 19 Exigences d emplacement 19 Spécifications électriques 19 PIÈCES ET CARACTÉRISTIQUES 20 Plateau rotatif 20 TABLEAU DE COMMANDE DU FOUR À MICRO ONDES 21 Affichage 21 Start mise en marche 21 Add 30 Seconds ajouter 30 secondes 21 Pause Cancel pause annulation 22 Horloge 22 Minuterie 22 Signaux sonores 22 Verrouillage de...

Страница 3: ...sealed containers for example closed glass jars are able to explode and should not be heated in the microwave oven Use the microwave oven only for its intended use as described in the manual Do not use corrosive chemicals or vapors in the microwave oven This type of oven is specifically designed to heat cook or dry food It is not designed for industrial or laboratory use As with any appliance clos...

Страница 4: ...RTANT SAFETY INSTRUCTIONS SAVE THESE INSTRUCTIONS Liquids such as water coffee or tea are able to be overheated beyond the boiling point without appearing to be boiling Visible bubbling or boiling when the container is removed from the microwave oven is not always present THIS COULD RESULT IN VERY HOT LIQUIDS SUDDENLY BOILING OVER WHEN THE CONTAINER IS DISTURBED OR A SPOON OR OTHER UTENSIL IS INSE...

Страница 5: ...Failure to follow these instructions can result in death fire or electrical shock WARNING GROUNDING INSTRUCTIONS SAVETHESE INSTRUCTIONS For all cord connected appliances The microwave oven must be grounded In the event of an electrical short circuit grounding reduces the risk of electric shock by providing an escape wire for the electric current The microwave oven is equipped with a cord having a ...

Страница 6: ...Add 30 Seconds The ADD 30 SEC control START pad automatically starts the microwave oven at 100 power for 30 seconds and adds 30 seconds of cook time up to 10 minutes with each additional touch of the control Time may be added to any manual cooking cycle in 30 second increments up to 10 minutes at the current power level by touching ADD 30 SEC during cooking NOTE To avoid unintentional operation of...

Страница 7: ...ll sound These tones indicate the following One tone Valid entry Control lock activated or deactivated Two tones End of stage in multistage cooking Reminder During Defrost cycle reminder to check turn rearrange or separate food Three tones End of Timer countdown Four tones End of cycle Control Lock The Control Lock disables the control panel pads to avoid unintended use of the microwave oven To Lo...

Страница 8: ...er foods Heavy dense foods such as meat and potatoes require a longer cook time than the same size of a light porous food such as cake Cooking Guidelines Covering Covering food helps retain moisture shorten cook time and reduce spattering Use the lid supplied with cookware If a lid is not available wax paper paper towels or plastic wrap approved for microwave ovens may be used Plastic wrap should ...

Страница 9: ...cent name or number For example 70 7 Medium High Use the following chart as a general guide for the suggested cooking power of specific foods Melamine Follow manufacturer s recommendations Paper Towels Dinnerware Napkins Use nonrecycled and those approved by the manufacturer for microwave oven use Plastic Wraps Bags Covers Dinnerware Containers Use those approved by the manufacturer for microwave ...

Страница 10: ...a guide for preset cooking To avoid damage to the microwave oven do not use regular paper bags or glassware For best cooking results do not try to pop unpopped kernels Use fresh bags of popcorn for optimal results Cooking results may vary by brand and fat content If using a microwave popcorn popper follow manufacturer s instructions To Use Preset Cooking 1 Place food on the turntable and close the...

Страница 11: ...t from 0 1 lb to 6 5 lbs 45 g to 2 9 kg 4 Touch START The display will count down the defrost time During defrosting 2 tones will sound These tones indicate it is time to check turn rearrange or separate food Open door turn food if necessary close door and touch START to resume defrosting When the cycle ends END will appear in the display and the end of cycle tones will sound 5 Touch PAUSE CANCEL ...

Страница 12: ...e Inlet Cover To avoid arcing and microwave oven damage the microwave inlet cover see Parts and Features should be kept clean Wipe with wet cloth MICROWAVE OVEN DOOR AND EXTERIOR The area where the microwave oven door and frame touch when closed should be kept clean Mild nonabrasive soaps and detergents Rinse with clean water and dry with soft lint free cloth Glass cleaner and paper towels or nona...

Страница 13: ...ce hub support and turntable Place 1 cup 250 mL of water on the turntable then restart microwave oven If it still is not working call for service See Assistance or Service section Do not operate the microwave oven without turntable and turntable support working properly Turntable alternates rotation directions This is normal and depends on motor rotation at beginning of cycle Display shows message...

Страница 14: ...Whirlpool designated service company in your area you can also look in your telephone directory Yellow Pages For further assistance If you need further assistance you can write to Whirlpool Corporation with any questions or concerns at Whirlpool Brand Home Appliances Customer eXperience Center 553 Benson Road Benton Harbor MI 49022 2692 Please include a daytime phone number in your correspondence ...

Страница 15: ...that have been removed altered or cannot be easily determined This warranty is void if the factory applied serial number has been altered or removed from your appliance The cost of repair or replacement under these excluded circumstances shall be borne by the customer If you reside in the United States and your Whirlpool Countertop Microwave should cease to operate within the first year of ownersh...

Страница 16: ...plete model number and serial number You can find this information on the model and serial number label located on the product Dealer name____________________________________________________ Address ________________________________________________________ Phone number__________________________________________________ Model number __________________________________________________ Serial number ___...

Страница 17: ...icro ondes uniquement pour les applications auxquelles il est destiné telles qu elles sont décrites dans ce manuel Ne pas utiliser de vapeurs ou de produits chimiques corrosifs dans le four à micro ondes Ce type de four est spécifiquement conçu pour chauffer cuire ou sécher des aliments Il n est pas conçu pour des applications industrielles ou de laboratoire Comme pour tout appareil ménager les en...

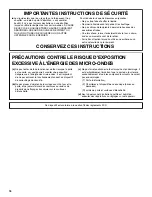
Страница 18: ... dans le récipient PRÉCAUTIONS CONTRE LE RISQUE D EXPOSITION EXCESSIVE À L ÉNERGIE DES MICRO ONDES a Ne pas tenter de faire fonctionner ce four lorsque la porte est ouverte car ceci pourrait susciter une exposition dangereuse à l énergie des micro ondes Il est important de ne pas entraver le fonctionnement correct du dispositif de verrouillage de sécurité b Ne pas placer d objet entre la surface a...

Страница 19: ...tions électriques Observer les dispositions de tous les codes et règlements en vigueur Nécessaire Une alimentation électrique de 120 volts 60 Hz CA seulement 15 ou 20 ampères protégée par fusibles ou disjoncteur Recommandé Un fusible temporisé ou un disjoncteur temporisé Un circuit distinct exclusif à ce four à micro ondes AVERTISSEMENT Risque de choc électrique Brancher sur une prise à 3 alvéoles...

Страница 20: ...ion 1 Placer le support sur le fond de la cavité du four à micro ondes 2 Placer le plateau rotatif sur le support Insérer les protubérances arrondies au centre du dessous du plateau rotatif entre les trois rayons de l axe Les roulettes sur le support devraient se loger à l intérieur du pourtour cranté du dessous du plateau rotatif A Poignée de porte sur les modèles sans bouton poussoir pour ouvrir...

Страница 21: ... éviter l utilisation involontaire du four à micro ondes il est impossible de lancer une fonction de cuisson si la porte du four à micro ondes a été fermée pendant environ 5 minutes Le mot door porte apparaît sur l affichage jusqu à ce que l on ouvre puis referme la porte Add 30 Seconds ajouter 30 secondes La commande ADD 30 SEC ajouter 30 secondes démarre automatiquement le four à micro ondes à p...

Страница 22: ...e retentisse Répéter pour réactiver les signaux sonores Pour désactiver activer tous les signaux sonores Avec la porte ouverte appuyer sur la touche numérique 5 pendant 5 secondes Répéter pour réactiver les signaux sonores un signal sonore retentit Ces signaux sonores indiquent ce qui suit Un seul signal sonore Entrée valide Verrouillage des commandes activé ou désactivé Deux signaux sonores Fin d...

Страница 23: ...nts de forme irrégulière Température de début Les aliments à température ambiante chaufferont plus vite que les aliments réfrigérés et les aliments réfrigérés chaufferont plus vite que les aliments congelés Composition et densité Les aliments à haute teneur en gras et en sucre atteindront une température plus élevée et chaufferont plus vite que les autres Les aliments lourds et denses tels que la ...

Страница 24: ...c les précautions suivantes Pour éviter d endommager le four à micro ondes ne pas laisser le papier d aluminium ou le métal toucher les parois le plafond ou le fond de la cavité intérieure Toujours utiliser le plateau rotatif Pour éviter d endommager le four à micro ondes ne pas permettre un contact avec un autre objet en métal durant la cuisson Utilisation à éviter Les ustensiles de cuisson et de...

Страница 25: ...EVEL niveau de puissance puis entrer la puissance de cuisson désirée pour la première étape Voir Puissance de cuisson des micro ondes 4 Appuyer sur STAGE COOK cuisson par étapes et puis répéter les étapes 2 et 3 pour les deuxième et troisième étapes 5 Appuyer sur START mise en marche Deux signaux sonores sont émis entre les étapes À la fin du programme End fin apparaît sur l affichage et les signa...

Страница 26: ...l afficheur et les signaux de fin de programme sont émis 4 Appuyer sur PAUSE CANCEL pause annulation ou ouvrir la porte pour effacer l affichage ALIMENT QUANTITÉ PAR PORTION INSTRUCTIONS Potato Pomme de terre 1 2 3 ou 4 moyennes 8 à 18 oz 227 à 283 g chacune de taille similaire Percer plusieurs fois chaque pomme de terre avec une fourchette Placer sur de l essuie tout sur le pourtour du plateau ro...

Страница 27: ...ebours de la durée de décongélation s affiche Pendant la décongélation 2 signaux sonores retentissent Ces signaux sonores indiquent qu il convient d inspecter ré agencer ou séparer les aliments Ouvrir la porte tourner les aliments si nécessaire fermer la porte et appuyer sur START mise en marche pour poursuivre la décongélation Lorsque le programme est terminé END fin apparaît sur l affichage et l...

Страница 28: ...es dommages causés au four à micro ondes le couvercle orifice d introduction des micro ondes voir la section Pièces et caractéristiques doit être maintenu propre Essuyer avec un chiffon humide PORTE DU FOUR À MICRO ONDES ET EXTÉRIEUR La surface où la porte et le cadre du four à micro ondes se touchent quand la porte est fermée doit être maintenue propre Savons et détergents doux non abrasifs Rince...

Страница 29: ...r le plateau rotatif puis remettre le four à micro ondes en marche S il ne fonctionne toujours pas faire un appel de service Voir la section Assistance ou service Ne pas faire fonctionner le four à micro ondes sans que le plateau rotatif et son support fonctionnent correctement Le plateau rotatif tourne dans les deux sens Ceci est normal et dépend de la rotation du moteur au début du programme L a...

Страница 30: ...téristiques et spécifications sur toute notre gamme d appareils électroménagers Consignes d utilisation et d entretien Ventes d accessoires et de pièces de rechange Références aux marchands locaux aux distributeurs de pièces de rechange et aux compagnies de service Les techniciens de service désignés par Whirlpool Canada LP sont formés pour remplir la garantie des produits et fournir un service ap...

Страница 31: ...et soient signalés à Whirlpool dans les 30 jours suivant la date d achat 7 Toute perte d aliments due à la défaillance du four à micro ondes 8 Les réparations aux pièces ou systèmes résultant d une modification non autorisée apportée à l appareil 9 Les fours à micro ondes dont les numéros de série et de modèle originaux ont été enlevés modifiés ou ne peuvent pas être facilement identifiés Cette ga...

Страница 32: ...eignements suivants au sujet de votre gros appareil ménager pour mieux vous aider à obtenir assistance ou service en cas de besoin Vous devrez connaître le numéro de modèle et le numéro de série au complet Vous trouverez ces renseignements sur la plaque signalétique située sur le produit Nom du marchand ______________________________________________ Adresse ________________________________________...

Отзывы: