background image

7

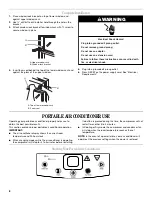
4. Open the window.

5. Measure the window opening.

If the window opening is too narrow for the window slider 
kit, remove the inner slider section from the window slider 
kit.

Using a saw, cut the inner slider section to fit the window 
opening.

Slide the inner slider section into the outer slider section 
of the window slider kit.

6. Place the window slider kit into the window, extending it to fit 

the width of the window. Be sure the rain cover is on the 
outside of the window.

NOTE: For casement window installation, the window slider 
kit may be installed vertically with the window slider kit 
opening at the bottom.

7. Insert 

¹⁄₂

" screw (provided) into the hole in the inner slider 

section that is closest to the end of the outer slider section of 
the window slider kit.

8. Close the window onto the window slider kit to secure.

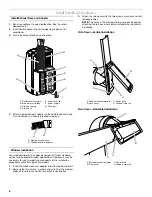
A. Inner slider section
B. Outer slider section

A

B

A.

¹⁄₂

" screw (provided)

B. Inner slider section

C. Outer slider section

A. To portable air conditioner
B. Outdoors 

C. Rain cover 

D. Window slider kit

E. Window exhaust adapter 
F. Flexible exhaust hose 

A

B

C

D

A

B

C

E

F

Содержание PORTABLE AIR CONDITIONER

Страница 1: ...ONADOR DE AIREPORTÁTIL Manualdeusoycuidado Si tiene preguntas respecto a las características funcionamiento rendimiento partes o servicio técnico llame al 1 877 465 3566 o visite nuestro sito de internet en www whirlpool com CLIMATISEUR PORTATIF Guided utilisationetd entretien Au Canada pour assistance installation ou service composez le 1 800 360 2742 ou visitez notre site web à www whirlpool com...

Страница 2: ... USAR SU ACONDICIONADOR DE AIRE PORTÁTIL 23 Cómo poner en marcha su acondicionador de aire portátil 24 Cómo usar el control remoto 26 Cómo cambiar la dirección del aire 29 Sonidos normales 29 CÓMO CUIDAR SU ACONDICIONADOR DE AIRE PORTÁTIL 30 Desagüe del acondicionador de aire 30 Limpieza del filtro de aire 30 Limpieza del exterior 30 Almacenamiento después del uso 30 SOLUCIÓN DE PROBLEMAS 31 AYUDA...

Страница 3: ...ety messages This is the safety alert symbol This symbol alerts you to potential hazards that can kill or hurt you and others All safety messages will follow the safety alert symbol and either the word DANGER or WARNING These words mean follow instructions instructions DANGER WARNING IMPORTANT SAFETY INSTRUCTIONS WARNING To reduce the risk of fire electrical shock or injury when using your air con...

Страница 4: ...reaker is recommended All wiring must comply with local and national electrical codes and be installed by a qualified electrician If you have any questions contact a qualified electrician Power Supply Cord NOTE Your air conditioner s device may differ from the one shown This room air conditioner is equipped with a power supply cord required by UL This power supply cord contains state of the art el...

Страница 5: ... must not be repaired The power supply cord contains no user serviceable parts Opening the tamper resistant case voids all warranty and performance claims INSTALLATION INSTRUCTIONS UnpacktheAirConditioner Remove packaging materials Remove and dispose of recycle packaging materials Remove tape and glue residue from surfaces before turning on the air conditioner Rub a small amount of liquid dish soa...

Страница 6: ... the window exhaust adapter into the window slider kit 2 Remove the two screws washers and nuts from the window slider kit for either the vertical or horizontal installation 3 Attach the rain cover with the two screws washers and nuts removed earlier NOTE The holes in the window slider kit are positioned for attaching the rain cover for vertical installation or horizontal installation Rain Cover V...

Страница 7: ... cover is on the outside of the window NOTE For casement window installation the window slider kit may be installed vertically with the window slider kit opening at the bottom 7 Insert screw provided into the hole in the inner slider section that is closest to the end of the outer slider section of the window slider kit 8 Close the window onto the window slider kit to secure A Inner slider section...

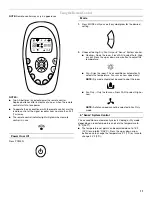
Страница 8: ...ner display shows the current room temperature and 24 hour clock When changing modes while the air conditioner is operating the compressor will stop for 3 to 5 minutes before restarting If a button is pressed during this time the compressor will not restart for another 3 to 5 minutes In Cooling or Dry mode the compressor and condenser fan will stop when the room temperature reaches the set tempera...

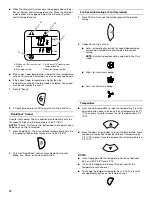
Страница 9: ...or Dry mode depending on the room temperature and sets the temperature to 79ºF 26ºC The temperature set point can be adjusted down to 75ºF 24ºC or up to 83ºF 28ºC Press the plus or minus button once to change the temperature 2ºF 1ºC or twice to change it 4ºF 2ºC When the set point is increased a line appears above the 6th Sense System control temperature line When the set point is decreased a line...

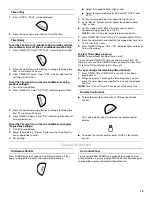
Страница 10: ...icator light will flash 3 Press the plus or minus button to change the delay time from 10 minutes to 24 hours 4 Press TIMER again Timer ON indicator light and the set time will remain on To set the Timer to turn on the air conditioner changing the previous settings 1 Turn off air conditioner 2 Adjust mode to 6th Sense System control Cooling Dry or Fan Only 3 For Cooling mode Adjust fan speed to Au...

Страница 11: ...or 6th Sense System control Cooling Cools the room Press FAN to select Auto High or Low Press the up or down arrow button to adjust the temperature Dry Dries the room The air conditioner automatically selects the temperature Fan runs on Low speed only NOTE Dry mode should not be used to cool the room Fan Only Only the fan runs Press FAN to select High or Low NOTE Auto fan speed cannot be selected ...

Страница 12: ...he up arrow button Fan Speed in Cooling or Fan Only modes 1 Press FAN until you see the symbol glow for the desired setting 2 Choose Auto High or Low Auto automatically controls fan speed depending on current room temperature and temperature control setting NOTE Auto fan speed cannot be selected in Fan Only mode High for maximum cooling Low for minimum cooling Temperature Press the up arrow button...

Страница 13: ... and 6th Sense System control adjust temperature up or down by 4ºF 2ºC NOTE In Fan Only mode temperature cannot be set 7 Press TIMER ON Timer ON 12 00 indicator light will flash 8 Press the up or down arrow button to change delay time from 10 minutes to 24 hours 9 Press TIMER ON again Timer ON indicator light and the set time will remain on To clear Timer delay program NOTE Air conditioner can be ...

Страница 14: ...r dry filter completely before replacing to ensure maximum efficiency 5 Place the filter back on the filter panel 6 Close the filter panel 7 Press POWER to start the air conditioner CleaningtheOutside 1 Unplug air conditioner or disconnect power 2 Remove the filter and clean separately See Cleaning the Air Filter 3 Wipe outside of air conditioner with a soft damp cloth 4 Plug in air conditioner or...

Страница 15: ...n Keep doors and windows closed The current air conditioner replaced an older model The use of more efficient components may cause the air conditioner to run longer than an older model but the total energy consumption will be less Newer air conditioners do not emit the blast of cold air you may be accustomed to from older units but this is not an indication of lesser cooling capacity or efficiency...

Страница 16: ...__________________________________ Store Address __________________________________________________ Store Phone ____________________________________________________ Keep this book and the sales slip together for future reference IntheU S A Call Customer Service toll free 1 877 465 3566 or visit our website at www whirlpool com Our consultants provide assistance with Features and specifications on ...

Страница 17: ...17 Notes ...
Страница 18: ...Este símbolo le llama la atención sobre peligros potenciales que pueden ocasionar la muerte o una lesión a usted y a los demás Todos los mensajes de seguridad irán a continuación del símbolo de advertencia de seguridad y de la palabra PELIGRO o ADVERTENCIA Estas palabras significan INSTRUCCIONES IMPORTANTES DE SEGURIDAD ADVERTENCIA Para reducir el riesgo de incendio choque eléctrico o lesiones per...

Страница 19: ...ciones eléctricas deberán cumplir con los códigos eléctricos nacionales y locales y deberán ser hechas por un instalador eléctrico calificado En caso de dudas póngase en contacto con un electricista calificado Cable de suministro de energía NOTA El dispositivo de su unidad puede ser diferente de los que se ilustran Este acondicionador de aire para habitación está equipado con un cable de suministr...

Страница 20: ...y no debe ser reparado El cable de suministro de energíano contiene piezas que pueda arreglar el usuario Todos los reclamos de desempeño y la garantía quedarán anulados si se abre el estuche resistente a alteraciones INSTRUCCIONES DE INSTALACIÓN Desempaqueelacondicionadorde aire Quite los materiales de empaque Quite y deshágase de todos los materiales de embalaje o recíclelos Quite las cintas y lo...

Страница 21: ...aque los dos tornillos las arandelas y las tuercas del juego deslizable para ventana para la instalación vertical u horizontal 3 Ajuste la cubierta contra la lluvia con los dos tornillos las arandelas y las tuercas anteriormente desmontadas NOTA Los orificios en el juego deslizable para ventana están ubicados de modo tal de poder ajustar tanto el soporte deslizable vertical como el horizontal para...

Страница 22: ...exterior de la ventana NOTA Para la instalación de ventana a bisagra el juego deslizable para ventana puede ser instalado verticalmente con la abertura del juego deslizable para ventana en la parte inferior 7 Coloque el tornillo de provisto en el orificio en la sección deslizadora interior que se encuentre más cerca del extremo de la deslizadora exterior del juego deslizable para ventana 8 Cierre ...

Страница 23: ... acondicionador de aire muestra la temperatura actual de la habitación y un reloj de 24 horas Cuando se cambien los modos mientras el acondicionador de aire esté en funcionamiento el compresor se detendrá de 3 a 5 minutos antes de volver a comenzar Si se presiona un botón durante este tiempo el compresor no volverá a comenzar hasta que hayan transcurrido otros 3 a 5 minutos En el modo de Cooling E...

Страница 24: ...e El ventilador funciona solamente en la velocidad Low Baja NOTA El modo de Dry no debe utilizarse para enfriar la habitación Fan Only Sólo ventilador Hace funcionar sólo el ventilador Oprima FAN SPEED Velocidad del ventilador para seleccionar High Alta o Low Baja NOTA Auto fan speed Velocidad del ventilador automática no puede seleccionarse en el modo de Fan Only Sólo ventilador Control del siste...

Страница 25: ... 4ºF 2ºC la temperatura fijada NOTAS En el modo de enfriamiento la temperatura puede fijarse entre 64 F 18 C y 90 F 32 C En el modo de Fan Only Sólo ventilador y en el modo de control del sistema 6th Sense no se puede ajustar la temperatura Para cambiar la temperatura que se muestra en la pantalla de F a C presione el botón de cambio de visualización en el control remoto Hora del día 1 Presione y ...

Страница 26: ...F durante 3 segundos para despejar la característica de Timer Off Temporizador apagado Presione y sostenga TIMER durante 3 segundos para despejar la característica de Timer On Temporizador encendido La luz indicadora del temporizador se apagará Para ver o cambiar el tiempo restante en horas 1 Presione una vez TIMER Temporizador o TIMER OFF Temporizador apagado después de que se haya programado 2 U...

Страница 27: ... temperatura del punto de ajuste se ha seleccionado el modo de Cooling Enfriamiento La velocidad del ventilador puede ser seleccionada por el usuario 1 Oprima 6th Sense 2 En el modo de Cooling Enfriamiento presione FAN Ventilador para seleccionar Auto Automática High Alta y Low Baja Control RapidCool Se utiliza este modo para enfriar rápidamente El acondicionador de aire fija automáticamente la ve...

Страница 28: ...dor de aire se apague el acondicionador de aire tiene que estar Encendido 1 Presione TIMER OFF Temporizador apagado La luz indicadora Timer Temporizador OFF 00 00 Apagado 00 00 destellará 2 Presione el botón con la flecha hacia arriba o hacia abajo para cambiar el tiempo de retraso de 10 minutos a 24 horas 3 Oprima TIMER OFF Temporizador apagado otra vez La luz indicadora de Timer OFF Temporizador...

Страница 29: ...sido programado 2 Mientras la pantalla muestra el tiempo restante usted puede oprimir el botón con la flecha hacia arriba o hacia abajo para aumentar o disminuir el tiempo NOTA Timer On Temporizador encendido y Timer Off Temporizador apagado pueden ajustarse en el mismo momento Bloqueo del control remoto Para bloquear el control remoto presione LOCK Bloqueo en el control remoto La luz indicadora d...

Страница 30: ...e el acondicionador de aire o desconecte el suministro de energía 2 Saque el filtro de aire y límpielo separadamente Vea Limpieza del filtro de aire 3 Limpie el exterior del acondicionador de aire con un paño suave y húmedo 4 Enchufe el acondicionador de aire o reconecte el suministro de energía 5 Oprima POWER Encendido para encender el acondicionador de aire Almacenamientodespuésdeluso 1 Quite el...

Страница 31: ...able de suministro de energía Luego de corregir el problema presione y suelte RESET Reposición escuche el chasquido el botón de reposición queda asegurado y se mantiene asegurado para reanudar el funcionamiento Si el cable de suministro de energía no se reposiciona póngase en contacto con un técnico de servicio NOTA Un cable de suministro de energía dañado debe ser reemplazado por un nuevo cable d...

Страница 32: ... están confeccionadas con la misma precisión empleada en la fabricación de cada electrodoméstico nuevo Para encontrar piezas de repuesto especificadas de fábrica en su localidad llámenos o comuníquese con el centro de servicio designado más cercano a su localidad Por favor anote la información sobre su modelo Siempre que llame para solicitar servicio del aparato necesitará saber el número del mode...

Страница 33: ...bole d alerte de sécurité Ce symbole d alerte de sécurité vous signale les dangers potentiels de décès et de blessures graves à vous et à d autres Tous les messages de sécurité suivront le symbole d alerte de sécurité et le mot DANGER ou AVERTISSEMENT Ces mots signifient IMPORTANTES INSTRUCTIONS DE SÉCURITÉ AVERTISSEMENT Pour réduire les risques d incendie de choc électrique ou des blessures lors ...

Страница 34: ...Le câblage électrique doit respecter les codes local et national de l électricité et être installé par un électricien qualifié Contacter un électricien qualifié en cas de questions Cordon d alimentation REMARQUE Votre climatiseur peut différer de celui qui est illustré Ce climatiseur de pièce est équipé d un cordon d alimentation conforme aux exigences de UL Ce cordon d alimentation comporte des c...

Страница 35: ...cordon d alimentation ne contient pas de pièces réparables par le client L ouverture du casier inviolable annule toute garantie et empêche toute réclamation relative à la performance INSTRUCTIONS D INSTALLATION Déballageduclimatiseur Enlèvement des matériaux d emballage Enlever et jeter recycler de façon appropriée les matériaux d emballage Enlever tout résidu de ruban adhésif et de colle des surf...

Страница 36: ... et écrous de l ensemble coulissant pour fenêtre pour une installation verticale ou horizontale 3 Fixer la housse de protection contre la pluie avec les deux vis rondelles et écrous retirés auparavant REMARQUE Les trous de l ensemble coulissant pour fenêtre sont placés de manière à pouvoir fixer soit la housse pour fenêtre à coulissement vertical soit la housse pour fenêtre à coulissement horizont...

Страница 37: ... à l extérieur de la fenêtre REMARQUE Pour une installation dans une fenêtre à battants l ensemble coulissant pour fenêtre peut être installé verticalement avec l ouverture dans la partie inférieure 7 Insérer une vis de fournie dans le trou de la section coulissante intérieure la plus proche de l extrémité de la section coulissante extérieure de l ensemble pour fenêtre 8 Fermer la fenêtre sur l en...

Страница 38: ...heur du climatiseur indique la température ambiante et une horloge de 24 heures En cas de modification des modes en cours de fonctionnement du climatiseur le compresseur fonctionne pendant 3 à 5 minutes avant de redémarrer Si on appuie sur un bouton au cours de cette période le compresseur ne redémarrera pas avant 3 à 5 minutes Au mode Cooling refroidissement ou Dry séchage le compresseur et le ve...

Страница 39: ...QUE Le mode de séchage ne doit pas être utilisé pour refroidir la pièce Fan Only ventilateur seulement Seul le ventilateur fonctionne Appuyer sur le bouton FAN SPEED vitesse du ventilateur pour choisir la vitesse du ventilateur High élevée ou Low basse REMARQUE La vitesse automatique du ventilateur ne peut pas être sélectionnée au le mode Fan Only Système de commande 6th Sense Le climatiseur sélec...

Страница 40: ...pour réduire la température réglée de 2 F 1 C ou appuyer deux fois pour réduire la température de 4ºF 2ºC REMARQUES Au mode de refroidissement la température peut être réglée entre 64 F 18 C et 90 F 32 C Au mode Fan Only ventilation seulement et avec le système de commande 6th Sense la température ne peut pas être réglée Pour permuter l affichage de température ºF ºC appuyer sur le bouton de modif...

Страница 41: ... le temps qui reste en heures 1 Appuyer une fois sur TIMER ou TIMER OFF après la programmation 2 Alors que l afficheur présente le temps résiduel on peut utiliser le bouton ou pour augmenter ou diminuer la durée de la période de fonctionnement REMARQUE On peut effectuer le paramétrage en même temps pour les heures de début et fin d utilisation de la minuterie Timer On Timer Off Utilisationdelatélé...

Страница 42: ...e mode de refroidissement est sélectionné La vitesse du ventilateur Fan Speed peut être sélectionnée par l utilisateur 1 Appuyer sur le bouton du système de commande 6th Sense 2 Au mode Cooling refroidissement appuyer sur FAN ventilateur pour sélectionner Auto High ou Low Commande RapidCool Utilisé pour un refroidissement rapide Règle automatiquement la vitesse du ventilateur à High et la températ...

Страница 43: ...e vers le haut ou vers le bas pour changer la durée de délai 10 minutes à 24 heures 4 Appuyer à nouveau sur TIMER ON L indicateur lumineux ON et la durée réglée resteront allumés Pour régler la minuterie du climatiseur en changeant les réglages précédents 1 Éteindre le climatiseur 2 Régler le mode sur le système de commande 6th Sense Cooling Dry Fan ou la commande RapidCool 3 Pour le mode de refro...

Страница 44: ...sous l effet du ventilateur Déclics émis par le thermostat Vibrations ou bruits imputables à une construction médiocre du mur ou de la fenêtre Bourdonnement à fréquence élevée ou pulsations à cause du compresseur moderne à haute efficacité qui se met en marche et s arrête de façon intermittente ENTRETIEN DU CLIMATISEUR PORTATIF Vidangeduclimatiseur 1 Appuyer sur POWER pour arrêter le climatiseur 2...

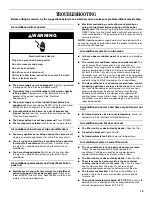
Страница 45: ... télécommande et les remiser avec le climatiseur dans un endroit propre et sec DÉPANNAGE Avant de faire un appel de service essayez les suggestions ci dessous pour déterminer si vous pouvez résoudre votre problème sans aide extérieure Le climatiseur ne fonctionne pas Le cordon d alimentation est débranché Brancher sur une prise à 3 alvéoles reliée à la terre Voir Spécifications électriques Vous ut...

Страница 46: ...lateurs d évacuation d air pendant les opérations de cuisson ou les bains et essayer de ne pas utiliser d appareil générateur de chaleur pendant les périodes les plus chaudes de la journée Les climatiseurs portatifs sont conçus comme un dispositif supplémentaire de refroidissement de zones locales dans une même pièce Il est peut être nécessaire de choisir un climatiseur de plus grande capacité sel...

Страница 47: ... du magasin _______________________________ Conservez ce manuel et votre reçu de vente ensemble pour consultation ultérieure AuxÉtats Unis Téléphoner au Service à la clientèle sans frais d interurbain au 1 877 465 3566 ou visitez notre site web à www whirlpool com Nos consultants sont prêts à vous aider pour les questions suivantes Caractéristiques et spécifications sur toute notre gamme d apparei...

Страница 48: ...er license by Hisense U S A Inc Suwanee Georgia Marca registrada TM Marca de comercio de Whirlpool U S A Fabricado bajo licencia por Hisense Hisense U S A Inc Suwanee Georgia Marque déposée TM Marque de commerce de Whirlpool U S A Fabriqué sous licence par Hisense Hisense U S A Inc Suwanee Géorgia 10 07 Printed in China Impreso en China Imprimé en Chine ...

Отзывы: