background image

14

G
B

MAINTENANCE & CLEANING

C

LEANING


IS


THE


ONLY


MAINTENANCE


 normally re-

quired. 

F

AILURE


TO


MAINTAIN


THE


OVEN


 in a clean condition 

could lead to deterioration of the surface that 
could adversely affect the life of the appliance 
and possibly result in a hazardous situation.

D

O


NOT


USE


METAL


SCOURING


PADS

A

BRASIVE


CLEANSERS

 steel-wool pads, grit-

ty washcloths, etc. which 
can damage the control 
panel, and the interior 
and exterior oven surfac-
es. Use a sponge with a mild detergent or a 
paper towel with spray glass cleaner. Apply 
spray glass cleaner to a paper towel.

D

O


NOT


SPRAY


 directly on the oven.

A

T


REGULAR


INTERVALS

 especially if spill 

overs have occurred, remove the 
turntable, the turntable support 
and wipe the base of the oven 
clean.

DISHWASHER SAFE:

T

URNTABLE


SUPPORT

.

G

LASS


TURNTABLE

.

T

HIS


OVEN


IS


DESIGNED


to operate with the turnta-

ble in place.

D

O


NOT


 operate the microwave oven 

when the turntable has been removed 
for cleaning.

U

SE


A


MILD


DETERGENT

 water and a soft cloth to 

clean the interior surfaces, front and rear of the 
door and the door opening.

D

O


NOT


ALLOW


GREASE


 or food particles to 

build up around the door.

F

OR


STUBBORN


STAINS

 boil a cup of water in the 

oven for 2 or 3 minutes. Steam will soften the 
marks.

C

OVER

S

TEAMER

B

ABYBOTTLE


HOLDER

A

DDING


SOME


LEMON


JUICE


 to a cup of water, plac-

ing this on the turntable and boiling for a few 
minutes can eliminate odors inside the oven.

D

O


NOT


USE


STEAM


CLEANING


APPLIANCES


 when 

cleaning your microwave oven.

Содержание MW A00

Страница 1: ...1 G B D E F R I T MW A00 MW A40 MW A01 MW A41 ...

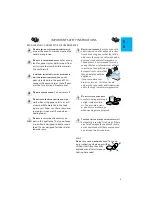
Страница 2: ...se instructions DO NOT OPERATE THIS APPLIANCE if it has a damaged mains cord or plug if it is not working properly or if it has been dam aged or dropped Do not immerse the mains cord or plug in water Keep the cord away from hot surfaces Electrical shock fire or other hazards may result DO NOT REMOVE THE MICROWAVE INLET PROTECTION PLATES located on the side of the oven cavity wall They prevent grea...

Страница 3: ...is able to use the oven in a safe way and un derstands the hazards of improper use The appliance is not intended for use by young children or infirm persons without supervision Young children should be supervised to ensure that they do not play with the appliance If your oven has a com bination mode children should only use the oven under adult supervision due to the high temperatures generated DO...

Страница 4: ... To prevent this possibility the following steps should be taken 1 Avoid using straight sided containers with narrow necks 2 Stir the liquid before placing the container in the oven and let the teaspoon remain in the container 3 After heating allow standing for a short time stirring again before carefully re moving the container from the oven CAREFUL ALWAYS REFER to a microwave cookbook for de tai...

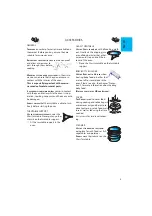
Страница 5: ...hat they do not come in contact with the interior of the oven This is especially important with accesso ries made of metal or metal parts ALWAYS ENSURE that the turntable is able to turn freely before starting the oven THERE ARE a number of accessories available on the market Before you buy ensure they are suitable for microwave use COVER THE COVER is used to cover food during cooking and reheatin...

Страница 6: ... the door to cancel the signal NOTE The oven will only hold the settings for 60 seconds if the door is opened and then closed after the cooking is finished START PROTECTION CHILD LOCK THIS AUTOMATIC SAFETY FUNCTION IS ACTIVATED ONE MINUTE AFTER the oven has returned to stand by mode The oven is in stand by when the 24 hour clock is displayed or if the clock has not been set when the display is bla...

Страница 7: ...lure the display is blank If the clock is not set the display will remain blank until the cooking time is set IF YOU WISH TO REMOVE THE CLOCK from the display once it has been set simply press the Stop button again for 3 seconds and then press the Stop button once more TO REINSTATE THE CLOCK follow the above procedure KITCHEN TIMER USE THIS FUNCTION when you need a kitchen timer to measure exact t...

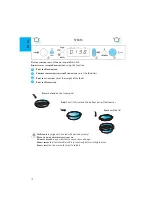
Страница 8: ...NCTION for normal cooking and reheating such as vegetables fish potatoes and meat q PRESS THE BUTTONS to set the time w PRESS THE POWER BUTTON repeatedly to set the power e PRESS THE START BUTTON ONCE THE COOKING PROCESS HAS BEEN STARTED The time can easily be increased in 30 second steps by pressing the Start button Each press in creases the time with 30 seconds You may also alter the time by pre...

Страница 9: ... twist ties THE SHAPE OF THE PACKAGE alters the de frosting time Shallow packets defrost more quickly than a deep block SEPARATE PIECES as they begin to defrost Individual slices defrost more easily SHIELD AREAS OF FOOD with small pieces of aluminum foil if they start to become warm e g chicken legs and wing tips BOILED FOOD STEWS AND MEAT SAUCES de frost better if stirred during defrost ing time ...

Страница 10: ...EFROST BUTTON w PRESS THE BUTTONS to set the weight of the food e PRESS THE START BUTTON MIDWAY THROUGH THE DEFROSTING PROCESS the oven stops and prompts you to TURN FOOD Open the door Turn the food Close the door and restart by pressing the Start button NOTE The oven continues automatically after 2 min if the food hasn t been turned The defrosting time will be longer in this case THIS FUNCTION NE...

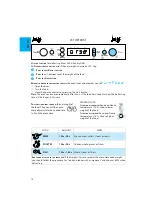
Страница 11: ...N PROVIDES you with an easy way to quickly recall a preferred setting THE PRINCIPLE OF THE MEMORY FUNCTION is to store whatever setting that is currently displayed q PRESS THE MEMO BUTTON w PRESS THE START BUTTON HOW TO STORE A SETTING q SELECT any function and make the nesseccary settings w MAKE the nesseccary settings e PRESS AND KEEP THE MEMO BUTTON PRESSED for 3 seconds until an acoustic signa...

Страница 12: ...he weight of the food r PRESS THE START BUTTON PLACE the food on the steam grid ADD 100 ml 1dl water in the bottom part of the steamer COVER with the lid THE STEAMER IS designed to be used with microwaves only NEVER USE IT WITH ANY OTHER FUNCTION AT ALL USING THE STEAMER in any other function may cause damage ALWAYS ENSURE that the turntable is able to turn freely before starting the oven ALWAYS P...

Страница 13: ...nutes FISH FILETS 150g 500g DISTRIBUTE FILLETS EVENLY on the steamgrid Interlace thin parts Allow to stand for 1 2 minutes after cooking COOKING VEGETABLES PLACE THE VEGETABLES into the strainer Pour 100 ml water into the bottom part Cover with the lid and set the time SOFT VEGETABLES such as broccoli and leek require 2 3 minutes cooking time HARDER VEGETABLES such as carrots and potatoes require ...

Страница 14: ... spill overs have occurred remove the turntable the turntable support and wipe the base of the oven clean DISHWASHER SAFE TURNTABLE SUPPORT GLASS TURNTABLE THIS OVEN IS DESIGNED to operate with the turnta ble in place DO NOT operate the microwave oven when the turntable has been removed for cleaning USE A MILD DETERGENT water and a soft cloth to clean the interior surfaces front and rear of the do...

Страница 15: ...sary calls for which you will be charged When calling for Service please give the serial number and type number of the oven see Ser vice label Consult your warranty booklet for further advice IF THE MAINS CORD NEEDS REPLACING it should be replaced by the original mains cord which is avail able via our service organi zation The mains cord may only be replaced by a trained service technician SERVICE...

Страница 16: ...onsequences for the environment and human health which could otherwise be caused by inappropriate waste handling of this product THE SYMBOL on the product or on the docu ments accompanying the product indicates that this appliance may not be treat ed as household waste In stead it shall be handed over to the applicable collection point for the recycling of electrical and electronic equipment DISPO...

Страница 17: ...DAS GERÄT NICHT IN BETRIEB wenn das Stromkabel oder der Steck er beschädigt ist das Gerät nicht ein wandfrei funktioniert heruntergefallen ist oder in irgendeiner Weise beschädigt wurde Das Netzkabel oder den Stecker nicht in Wasser tauchen Das Kabel von heißen Flächen fern halten Sonst kön nen Stromschlag Brand oder sonstige Risiken die Folge sein ENTFERNEN SIE NICHT DIE PLATTEN ZUM SCHUTZ DER MI...

Страница 18: ...chend eingewiesen wur den und sich der Gefahren eines unsach gemäßen Gebrauchs bewusst sind Ohne Aufsicht darf das Gerät nicht von kleinen Kindern oder gebrechlichen Personen benutzt werden Kleinere Kinder bei Verwendung des Mikrowellengerätes nicht unbeaufsichtigt lassen damit diese nicht mit dem Gerät spielen Wenn das Gerät einen Kombinationsmodus besitzt dürfen Kinder das Gerät wegen der entste...

Страница 19: ...s zu vermeiden ergreifen Sie folgende Vorsichtsmaßnahmen 1 Verwenden Sie möglichst keine hohen schmalen Gefäße mit engem Hals 2 Rühren Sie die Flüssigkeit um bevor Sie das Gefäß in den Garraum stellen und lassen Sie einen Teelöffel im Gefäß 3 Lassen Sie die Flüssigkeit nach dem Erhit zen kurz stehen und rühren Sie sie vor der vorsichtigen Entnahme des Gefäßes aus dem Gerät nochmals um ACHTUNG GENA...

Страница 20: ... Das gilt besonders dann wenn die Zubehörteile aus Metall oder Metallteilen bestehen DER DREHTELLER MUSS SICH STETS ungehindert dre hen können bevor das Gerät eingeschaltet wird EINE REIHE von Zubehörteilen kann käuflich er worben werden Prüfen Sie vor dem Kauf ob das Zubehör für das Mikrowellengerät geeig net ist ABDECKHAUBE DIE ABDECKHAUBE dient dazu die Speisen beim Garen und Auf wärmen in der ...

Страница 21: ...Sie zum Abschalten des Pieptons die Stopptaste oder öffnen Sie die Gerätetür HINWEIS Das Gerät behält die Einstellungen nur 60 Sekunden lang bei wenn die Tür nach Ende des Garvorgangs geöffnet und dann geschlos sen wird STARTSCHUTZ KINDERSICHERUNG DIESE AUTOMATISCHE SICHERHEITSFUNKTION WIRD EINE MINUTE nachdem das Gerät in den Be reitschaftsmodus zurückgekehrt ist aktiviert Das Gerät befindet sich...

Страница 22: ...geschlossen oder nach einem Stro mausfall eingeschaltet wird bleibt das Display dunkel Wenn die Uhr nicht eingestellt wird bleibt das Display dunkel bis die Garzeit eingestellt ist WENN DIE UHR nach dem Einstellen auf dem Display ausgeblendet werden soll drücken Sie die Zeittaste erneut für 3 Sekunden und anschließend die Taste STOP UM DIE UHR NEU EINZUSTELLEN gehen Sie wie vorstehend beschrieben ...

Страница 23: ... dient zur normalen Zubereitung und zum Aufwärmen von Speisen wie Gemüse Fisch Kartoffeln und Fleisch q STELLEN SIE MIT DEN TASTEN die Zeit ein w DRÜCKEN SIE DIE TASTE LEISTUNGSSTUFE mehrmals bis die gewünschte Leistungsstufe gewählt ist e DRÜCKEN SIE AUF DIE STARTTASTE WÄHREND DES GARVORGANGS Die Garzeit kann problemlos durch Drücken der Starttaste in 30 Sekunden Schritten verlängert werden Mit j...

Страница 24: ...chlüsse enthalten DIE AUFTAUZEIT WIRD AUCH durch die Ver packungsform beeinflusst Speisen in dünneren Verpackungen tauen sch neller auf als dicke Blöcke TRENNEN SIE DIE SPEISESTÜCKE sobald sie antauen Einzelne Scheiben tauen schneller auf DECKEN SIE BESTIMMTE SPEISEBE REICHE z B Hähnchenschen kel oder flügelchen mit kleinen Stückchen Alufo lie ab sobald diese anfangen warm zu werden GEKOCHTES GESC...

Страница 25: ...CKEN SIE DIE JET DEFROST TASTE w GEBEN SIE MIT DEN TASTEN das Gewicht der Speise ein e DRÜCKEN SIE AUF DIE STARTTASTE NACH DER HÄLFTE DES AUFTAUVORGANGS hält das Gerät an und es erscheint die Meldung TURN FOOD Speisen wenden Öffnen Sie die Tür Wenden Sie die Speisen Schließen Sie die Tür nehmen Sie das Gerät durch Drücken der Starttaste wieder in Betrieb HINWEIS Das Gerät setzt sich automatisch na...

Страница 26: ...evorzugte Einstellung aufrufen MIT DIESER FUNKTION KÖNNEN SIE jede aktuell angezeigte Funktion und Einstellung speichern q DRÜCKEN SIE DIE SPEICHERTASTE w DRÜCKEN SIE DIE STARTTASTE EINE EINSTELLUNG SPEICHERN q WÄHLEN SIE eine Funktion aus und nehmen Sie die erforderlichen Einstellungen vor w NEHMEN SIE die erforderlichen Einstellungen vor e DRÜCKEN SIE DIE SPEICHERTASTE und halten Sie sie 3 Sekun...

Страница 27: ...r DRÜCKEN SIE AUF DIE STARTTASTE LEGEN SIE die Speisen auf den Dämpfeinsatz GEBEN SIE 100 ml 1 dl Wasser in den unteren Teil des Dämpfeinsatzes DECKEN Sie das Gargut ab DER DÄMPFEINSATZ DARF NUR bei Mikrowellenbetrieb verwendet werden NIEMALS ZUSAMMEN MIT ANDEREN FUNKTIONEN VERWENDEN WIRD DER DÄMPFEINSATZ für andere Funktionen verwendet kann er beschädigt werden DER DREHTELLER MUSS SICH STETS unge...

Страница 28: ...nuten stehen FISCHFILETS 150g 500g VERTEILEN SIE DIE FILETS gleichmäßig auf dem Dämpfein satz Legen Sie dünne Teile übereinander Lassen Sie den Behälter nach dem Garen 1 bis 2 Minuten stehen GAREN VON GEMÜSE GEBEN SIE DAS GEMÜSE in den Dämpfeinsatz Gießen Sie 100 ml Wasser in den unteren Teil Decken Sie das Gargut ab und stellen Sie die Zeit ein WEICHES GEMÜSE wie Brokkoli und Porree benötigt eine...

Страница 29: ...ernen Sie dabei den Drehteller und die Drehtellerauflage und reinigen Sie den Garraumboden SPÜLMASCHINENFESTES ZUBEHÖR DREHTELLERAUFLAGE GLASDREHTELLER VERWENDEN SIE DIE MIKROWELLENFUNKTION NUR mit eingesetztem Drehteller DIE MIKROWELLE ERST WIEDER IN BETRIEB NEHM EN wenn der Drehteller nach der Reini gung wieder eingesetzt wurde VERWENDEN SIE NUR MILDE REINIGUNGSMITTEL Was ser und ein weiches Wis...

Страница 30: ...iensttechnikers vermieden werden die für Sie mit Kosten verbunden sind Wenn Sie den Kundendiensttechniker an fordern müssen Sie die Seriennummer und die Typenbezeichnung des Gerätes angeben siehe Aufkleber Weitere Hinweise finden Sie im Garantieheft DAS NETZKABEL DARF NUR GEGEN EIN ORIGI NALKABEL AUSGETAUSCHT WERDEN das über unseren Kunden dienst bezogen werden kann Das Netzkabel darf nur von eine...

Страница 31: ...orgung die ses Geräts leisten Sie einen positiven Beitrag für den Schutz der Umwelt und die Gesund heit des Menschen und verhindern negative Folgen die im Falle einer unsachgemäßen Ent sorgung entstehen können AUF DEM PRODUKT oder der beiliegenden Produktdokumentation ist ein Symbol abgebildet das angibt dass dieses Gerät nicht im Hausmüll entsorgt werden darf Es muss im Recy clinghof mit einer ge...

Страница 32: ... ou la prise de courant est endommagé si l appareil ne fonc tionne pas correctement ou s il a été en dommagé ou est tombé Ne plongez ja mais le cordon d alimentation ou la prise dans l eau Éloignez le cordon des sur faces chaudes Si l appareil a été endom magé son utilisation peut s avérer dan gereuse NE DÉMONTEZ PAS LES PLAQUES DE PROTECTION CON TRE LES MICRO ONDES situées sur les flancs de la ca...

Страница 33: ...le four sans surveillance d un adulte que si des instruc tions appropriées ont été données afin que l enfant puisse utiliser le four de façon sûre et comprenne les dangers d un usage in correct L appareil ne doit pas être utilisé par de jeunes enfants ou des personnes handicapées sans surveil lance Les enfants doi vent être surveillés pour s assurer qu ils ne jouent pas avec l appareil Si le four ...

Страница 34: ...tez d utiliser des récipients à bord droit et col étroit 2 Agitez le liquide avant de placer le récipi ent dans le four et laisser la cuillère à café dans le récipient 3 Après avoir chauffé attendez un court in stant et agitez de nouveau avant de sortir le récipient du four ATTENTION REPORTEZ VOUS SYSTÉMATIQUEMENT à un livre de recettes pour plus de détails sur la cuisson au four micro ondes En pa...

Страница 35: ...s en contact direct avec l intérieur du four Ceci est particulièrement important pour les accessoires en métal ou avec des parties métalliques ASSUREZ VOUS TOUJOURS QUE le plateau tour nant peut tourner librement avant de mettre l appareil en marche DE NOMBREUX accessoires sont disponibles sur le marché Avant de les acheter assurez vous qu ils conviennent bien aux micro ondes COUVERCLE LE COUVERCL...

Страница 36: ...activer le signal appuyez sur la touche Stop Arrêt ou ou vrez la porte REMARQUE Les sélections ne restent affichées que 60 secondes si l on ouvre et referme la porte à la fin de la cuisson PROTECTION CONTRE UNE MISE EN MARCHE DU FOUR À VIDE SÉCURITÉ ENFANTS CETTE FONCTION DE SÉCURITÉ AUTOMATIQUE EST AC TIVÉE UNE MINUTE après le retour du four en mode veille Le four est en mode veille si l heure es...

Страница 37: ...après une panne de courant l écran est vide Si l horloge n est pas réglée l écran reste vide jusqu au réglage d un temps de cuisson SI VOUS SOUHAITEZ SUPPRIMER L AFFICHAGE DE L HEURE après le réglage de l horloge appuyez à nouveau sur la touche Horloge pendant 3 secondes puis sur ARRÊT STOP POUR RÉAFFICHER L HORLOGE suivez la procédure ci dessus MINUTEUR UTILISEZ CETTE FONCTION SI VOUS DEVEZ mesur...

Страница 38: ...els que les lé gumes le poisson les pommes de terre et la viande q APPUYEZ SUR LES TOUCHES pour régler la durée de cuisson w APPUYEZ PAR PRESSIONS SUCCESSIVES SUR LA TOUCHE PUISSANCE pour régler le niveau de puissance e APPUYEZ SUR LA TOUCHE START LORSQUE LA CUISSON A DÉMARRÉ Le temps de cuisson peut être augmenté facilement par paliers de 30 secondes en appuyant sur la touche Start Chaque nouvell...

Страница 39: ...tal liques LE TEMPS DE DÉCONGÉLATION dépend de la forme de l emballage Les paquets plats se dé congèlent plus rapidement qu un gros bloc SÉPAREZ LES MORCEAUX dès qu ils commencent à se décongeler LES TRANCHES SÉPARÉES SE DÉCON GÈLENT PLUS FACILEMENT ENVELOPPEZ CERTAINES ZONES des aliments dans de petits morceaux de papier aluminium quand elles commencent à roussir par exem ple les ailes et les cui...

Страница 40: ...q APPUYEZ SUR LA TOUCHE JET DEFROST w APPUYEZ SUR LES TOUCHES pour spécifier le poids des aliments e APPUYEZ SUR LA TOUCHE START À LA MOITIÉ DU PROCESSUS DE DÉCONGÉLATION le four s arrête et vous invite à TURN FOOD Tourner les aliments Ouvrez la porte Retournez les aliments Fermez la porte et redémarrez le four en appuyant sur la touche Start Démarrage REMARQUE four continue automatiquement après ...

Страница 41: ...our rappeler rapidement et simplement les réglages pré férés LE PRINCIPE DE LA FONCTION MÉMOIRE EST DE stocker tous les réglages qui sont affichés à un moment donné q APPUYEZ SUR LA TOUCHE MÉMO w APPUYEZ SUR LA TOUCHE START ENREGISTREMENT D UN RÉGLAGE q SÉLECTIONNEZ la fonction de votre choix et faites le réglage nécessaire w FAITES le réglage nécessaire e APPUYEZ ET MAINTENEZ ENFONCÉE LA TOUCHE M...

Страница 42: ... APPUYEZ SUR LES TOUCHES pour spécifier le poids des aliments r APPUYEZ SUR LA TOUCHE START PLACEZ les aliments dans le panier vapeur AJOUTEZ 100 ml 1dl d eau au fond du panier COUVREZ avec le couvercle LE CUIT VAPEUR EST conçu pour être utilisé avec les micro ondes seulement NE L UTILISEZ JAMAIS POUR UNE AUTRE FONCTION VOUS RISQUERIEZ de l endommager ASSUREZ VOUS TOUJOURS QUE le plateau tournant ...

Страница 43: ... DE POISSONS 150 g 500 g RÉPARTIR LES FILETS UNIFORMÉMENT dans le panier vapeur Superposer les tranches fines Laissez reposer 1 2 min utes après la cuisson CUISSON DE LÉGUMES PLACEZ LES LÉGUMES dans le panier Versez 100 ml d eau sur le fond Couvrez avec un couvercle et réglez le temps de cuisson LES LÉGUMES TENDRES TELS les brocolis et les poireaux cuisent en 2 3 minutes LES LÉGUMES DURS TELS les ...

Страница 44: ...plateau tournant le support du plateau tournant et es suyez la base du four NETTOYAGE AU LAVE VAISSELLE SUPPORT DU PLATEAU TOURNANT PLATEAU TOURNANT EN VERRE CE FOUR EST CONÇU POUR fonctionner avec le pla teau tournant NE METTEZ pas le four en marche si le pla teau tournant a été enlevé pour le net toyage UTILISEZ UN DÉTERGENT DOUX DE L EAU et un chiffon doux pour nettoyer l intérieur du four les ...

Страница 45: ...E VOUS CONTACTEZ le Service Après Vente veuillez préciser le modèle et le numéro de sé rie du four voir étiquette Service Consultez le livret de garantie pour de plus amples infor mations à ce sujet SI LE CORDON D ALIMENTATION DOIT être rem placé utilisez un cordon d origine disponible auprès du Service Après Vente Le câble d alimentation doit être remplacé par un tech nicien spécialisé du Service...

Страница 46: ...l vous contribuerez à empêcher toute conséquence nuisible pour l environnement et la santé de l homme LE SYMBOLE PRÉSENT SUR l appareil ou sur la documentation qui l accompagne indique que ce produit ne peut en aucun cas être traité comme déchet ménager Il doit par con séquent être remis à un centre de collecte des déchets char gé du recyclage des équi pements électriques et électroniques LA MISE ...

Страница 47: ...n il cavo di alimentazione o la spina danneg giati se non funziona correttamente o se ha subito danni o è caduto Non immer gete il cavo di alimentazione o la spina in acqua Tenete lontano il cavo di alimen tazione da superfici calde Potrebbero verificarsi scosse elettriche incendi o al tri pericoli NON RIMUOVETE LE PIASTRE DI PROTEZIONE del forno a microonde che si trova no lateralmente nella cavi...

Страница 48: ... in grado di utilizzare il forno in modo sicuro e di com prendere i rischi connessi ad un utilizzo im proprio Questo apparecchio non deve essere utiliz zato da bambini o da persone in ferme senza la supervisione di un adulto Non lasci are giocare i bambini con questo apparecchio Se il forno presenta una mo dalità combinata di funzionamento non consen tire ai bambini di usarlo senza la supervi sion...

Страница 49: ...mento improvviso di liquido bollente Per prevenire questa possibilità operate come segue 1 Evitare l uso di contenitori con colli stretti 2 Mescolare il liquido prima di mettere il re cipiente nel forno e lasciarvi immerso un cucchiaino da tè 3 Dopo il riscaldamento prevedere un tem po di riposo mescolando ancora prima di togliere il recipiente dal forno ATTENZIONE PER MAGGIORI dettagli riferitevi...

Страница 50: ...rmente im portante per gli accessori metallici o con componenti metallici ASSICURARSI SEMPRE che sempre che il piatto ro tante sia in grado di ruotare liberamente prima di avviare il forno IN COMMERCIO sono disponibili diversi accessori Prima di acquistarli accertarsi che siano speci fici per la cottura a microonde COPERCHIO UTILIZZARE l apposito coperchio per coprire l alimento durante la cot tur...

Страница 51: ...la porta per far cessare il seg nale NOTA Se si apre e chiude la porta al termine del processo di cottura le impostazioni rimango no memorizzate per 60 secondi PROTEZIONE ANTI AVVIO SICUREZZA BAMBINI QUESTA FUNZIONE DI SICUREZZA SI ATTIVA AUTOMATI CAMENTE UN MINUTO DOPO che il forno viene a trovarsi nella fase di attesa stand by Il forno si trova in modalità stand by quando appare visualizza to l ...

Страница 52: ... corrente sul visualizzatore non compare nessuna indicazione Se l orologio non è impostato il display resterà vuoto finché non verrà impostato un tempo di cottura PER TOGLIERE LA FUNZIONE OROLOGIO dal visualizzatore dopo averla programmata premere nuova mente il tasto Arresto per 3 secondi e poi il tasto di Arresto PER REINSERIRE LA FUNZIONE OROLOGIO seguite la procedura sopra descritta TIMER UTIL...

Страница 53: ...scaldamento di verdure pesce pa tate e carne q PREMERE I TASTI per impostare le ore w PREMETE RIPETUTAMENTE IL TASTO DELLA POTENZA per impostare il livello di potenza su 0 W e PREMERE DI NUOVO IL TASTO START UNA VOLTA CHE IL PROCESSO DI COTTURA È INIZIATO Il tempo può essere facilmente incrementato di 30 secondi alla volta premendo il tasto d avvio Ogni successiva pressione determina un incremento...

Страница 54: ...e sui tempi di scongelamento Confezioni di basso spes sore scongelano più rapidamente rispetto a un blocco più compatto RICORDATE DI STACCARE L UNA DALL ALTRA LE PAR TI dell alimento quando cominciano a sconge larsi LE FETTE SEPARATE UNA AD UNA SCON GELANO PIÙ RAPIDAMENTE SE DURANTE LO SCONGELAMENTO si nota che alcune parti di alimento iniziano a cuocere es cosce di pollo ed estremità delle ali è ...

Страница 55: ...w PREMERE I TASTI per impostare il peso del cibo e PREMERE DI NUOVO IL TASTO START A METÀ DEL PROCESSO DI SCONGELAMENTO il forno si arresta e invita a girare l alimento TURN FOOD Aprire la porta Girare l alimento Chiudere la porta e riavviare premendo il tasto Start NOTA il forno riprenderà a funzionare automaticamente dopo un minuto se il cibo non viene gira to In q uesto caso sarà richiesto un t...

Страница 56: ...richiamare rapidamente con la massima semplicità un impostazione preferita IL PRINCIPIO DELLA FUNZIONE MEMORIA è quello di memorizzare l impostazione visualizzata al momen to q PREMERE DI NUOVO IL TASTO START w PREMERE IL TASTO START PER MEMORIZZARE UN IMPOSTAZIONE q SELEZIONARE una funzione ed eseguire le impostazioni necessarie w ESEGUIRE LE impostazioni necessarie e PREMERE E MANTENERE PREMUTO ...

Страница 57: ...UOVO IL TASTO START COLLOCARE IL cibo sulla griglia del vapore AGGIUNGERE 100 ml 1dl di acqua nella parte inferiore della pentola per cottura a vapore COPRIRE con il coperchio LA COTTURA A VAPORE DEVE ESSERE UTILIZZATA ESCLUSIVAMENTE CON LA FUNZIONE MICROONDE NON USARE MAI LA PENTOLA PER COTTURA A VAPORE CON NESSUNA ALTRA FUNZIONE in quanto potrebbe causare danni ASSICURARSI sempre che il piatto r...

Страница 58: ...ti PESCE A FILETTI 150g 500g DISTRIBUIRE UNIFORMEMENTE I FILETTI SULLA griglia Interlace thin parts Allow to stand for 1 2 minutes after cook ing COTTURA DI VERDURE COLLOCARE LE VERDURE nel cestello Versare 100 ml di acqua nella parte inferiore Coprire con il coperchio e impostare il tempo LE VERDURE PIÙ TENERE come broccoli e porri cuociono in 2 3 minuti VERDURE DALLA POLPA PIÙ CONSISTENTE COME C...

Страница 59: ...overe il piatto rotante e il supporto e pu lite la base del forno LAVABILE IN LAVASTOVIGLIE GUIDA PER PIATTO ROTANTE PIATTO ROTANTE IN VETRO QUESTO FORNO È STATO PROGETTATO per funzionare con il piatto rotante alloggiato nella sua sede NON FAR FUNZIONARE il forno quando il pi atto rotante è stato rimosso per essere pulito USARE UN DETERGENTE NEUTRO acqua e un panno morbido per pulire le superfici ...

Страница 60: ...rebbero essere addebitate Quando si chiama l Assistenza indicate sem pre il numero di matricola e il modello del for no vedere la targhetta Service Per ulterio ri informazioni consultare il libretto della ga ranzia IL CAVO DI ALIMENTAZIONE DEVE ESSEREsostitu ito solo con un cavo originale disponibile tramite la nostra organizzazione del servizio assistenza Il cavo di ali mentazione deve essere sos...

Страница 61: ...ic Equipment WEEE Assicurandosi che questo prodotto sia smaltito in modo corretto l utente contribuisce a pre venire le potenziali conseguenze negative per l ambiente e la salute IL SIMBOLO sul prodotto o sulla documentazi one di accompagnamento indica che questo prodot to non deve essere tratta to come rifiuto domestico ma deve essere consegnato pres so l idoneo punto di raccol ta per il riciclag...

Страница 62: ...62 ...

Страница 63: ...63 ...

Страница 64: ...64 Whirlpool Sweden AB GB DE FR IT 4 6 1 9 6 9 4 6 1 1 6 2 ...

Отзывы: