background image

31

You can heat one or two 8-ounce (227 g) cups of
a beverage by touching just one pad. The number
of times you touch this pad determines the number
of cups your oven will heat.

1.

Place your cup(s) of beverage in the oven and
close the door.

2.

Touch BEVERAGE.

If you want to heat 1 cup, just wait 5 seconds
and the oven will start heating automatically
for 1 cup.

3.

Change to 2 cups, if desired.

After 5 seconds, the oven will start heating.

At end of heating time:

NOTES:

If you touch BEVERAGE 3 times, the display
returns to the 1-cup setting.

You do not need to touch START/ENTER to start
the oven. The oven will start heating by itself
in 5 seconds.

If you need more or less heating time, do not touch
BEVERAGE again. Touch COOK POWER before
the oven starts cooking. (See “Changing preset
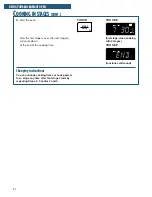
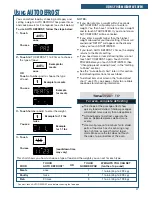
cooking times” in the “Getting to Know” section.)

U

SING

 BEVERAGE

TOUCH

YOU SEE

BEVERAGE

QTY

TOUCH

YOU SEE

BEVERAGE

QTY

OR

2

YOU SEE

REHEAT

AUTO

TIME

(countdown time – may
vary from above)
(example for 2 cups)

YOU SEE

REHEAT

AUTO

(four tones will sound)

USING YOUR MICROWAVE OVEN

Содержание MH6140XF

Страница 1: ...icrowave Oven 33 Cooking Guide 36 Questions and Answers 38 Troubleshooting 39 Requesting Assistance or Service 41 Index 43 Warranty 44 In the U S A for assistance or service call the Consumer Assistance Center 1 800 253 1301 In Canada for assistance or service see page 42 MODELS MH6140XF YMH6140XF PART NO 4393451 MicrowaveHood Combination Home Appliances ...

Страница 2: ... section Also record the other information shown in the next column Keep this book and the sales slip together in a safe place for future reference 1 800 253 1301 Model Number __________________________________ Serial Number ___________________________________ Purchase Date __________________________________ Dealer Name ____________________________________ Dealer Address __________________________...

Страница 3: ...XPOSURE TO EXCESSIVE MICROWAVE ENERGY found in this section The microwave oven must be grounded Connect only to properly grounded outlet See GROUND ING INSTRUCTIONS found at the end of this section Install or locate the microwave oven only in accordance with the provided installation instructions Some products such as whole eggs and sealed containers for example closed glass jars may explode and s...

Страница 4: ...ave energy It is important not to defeat or tamper with the safety interlocks b Do not place any object between the oven front face and the door or allow soil or cleaner residue to accumulate on sealing surfaces c Do not operate the oven if it is damaged It is particularly important that the oven door close properly and that there is no damage to the 1 door bent 2 hinges and latches broken or loos...

Страница 5: ...ing an escape wire for the electric current The microwave oven is equipped with a cord having a grounding wire with a grounding plug The plug must be plugged into an outlet that is properly installed and grounded WARNING Improper use of the grounding can result in a risk of electric shock Consult a qualified electrician or serviceman if the grounding instructions are not completely understood or i...

Страница 6: ...udding and 3 8 inch 95 cm thickness drywall or plaster lath Support for microwave oven hood weight of 150 pounds 68 kg plus the weight of items placed in the oven or upper cabinet 30 inch 76 2 cm wide minimum opening 14 inch 35 6 cm clearance between the bottom of microwave oven hood and the cooktop Protection from draft areas such as windows doors and strong heating vents Grounded electrical outl...

Страница 7: ...3 After removing all oven contents including the turntable and support tape the door in the closed position Then remove the two bolts securing the microwave oven to the upper cabinet wWARNING Excessive Weight Hazard Use two or more people to move and install microwave oven Failure to do so can result in back or other injury B C A D E F G 4 While wearing gloves grasp the microwave oven supports and...

Страница 8: ...olts securing the microwave oven to the upper cabinet REMOVINGANDREPLACINGTHEMICROWAVEOVEN CONT wWARNING Crush Hazard Attach microwave oven with bolts as shown Failure to do so can result in broken bones cuts or other injury 2 bolts 5 Untape the door and replace the turntable and support 6 Replace the vent grille 7 Replace the two screws in the top of microwave oven cabinet the screws located clos...

Страница 9: ...od as it turns on the turntable HOWYOURMICROWAVEOVENWORKS The glass turntable of your microwave oven lets microwaves pass through Then they bounce off a metal floor back through the glass turntable and are absorbed by the food Magnetron Metal floor Glass turntable Oven cavity GETTINGTOKNOWYOUR MICROWAVEOVEN This section discusses the concepts behind microwave cooking It also shows you the basics y...

Страница 10: ...ling surfaces of the oven Adjusting the receiving antenna of the radio or television HOWYOURMICROWAVEOVENWORKS CONT To test the oven put about 1 cup of cold water in a glass container in the oven Close the door and make sure it latches Follow the directions in Cooking at high cook power in the Using Your Microwave Oven section to set the oven to cook for 2 minutes When the time is up the water sho...

Страница 11: ... or reheating Liquids heated in certain containers especially containers shaped like cylinders may become overheated The liquid may splash out with a loud noise during or after heating or when adding ingredients coffee granules tea bags etc This can harm the oven and possibly injure someone Never lean on the door or allow a child to swing on it when the door is open Injury could result Use hot pad...

Страница 12: ...CONT Do not try to melt paraffin wax in the oven Paraffin wax will not melt in a microwave oven because it allows microwaves to pass through it Do not operate the microwave oven unless the glass turntable is securely in place and can rotate freely on the support rollers The turntable can rotate in either direction Make sure the rollers are completely inside the center circle of the turntable this ...

Страница 13: ...to give you more cooking space and better cooking results See pages 9 12 33 38 and 40 for more details 5 Charcoal and Grease Filters Included in oven cavity See page 34 for installation instructions and cleaning information 6 Cooktop Countertop Light Turn on to light your cooktop or countertop or turn on as a night light See page 16 for more information 7 Cooking Guide Label Use as a quick referen...

Страница 14: ...OK POWER Touch this pad after the cooking time has been set followed by a Number pad to set the amount of microwave energy released to cook the food Also touch this pad to lengthen or shorten a preset cooking time See pages 19 and 21 for more information 10 ADD MINUTE Touch this pad to cook for one minute at 100 cook power or to add an extra minute to your cooking cycle at the set cook power See p...

Страница 15: ...LPANELFEATURES CONT Audible signals Your microwave oven comes with audible signals that can guide you when setting and using your oven A programming tone will sound each time you touch a pad One long tone signals the end of a Minute Timer countdown Four tones signal the end of a cooking cycle Two quick short tones sound once every minute for the first 15 minutes after an end of cooking signal as a...

Страница 16: ... speed 1 or 2 more times depending on fan speed GETTING TO KNOW YOUR MICROWAVE OVEN The pad on the bottom left of the control panel controls the cooktop countertop light 1 Turn on light 2 Turn off light when desired TOUCH USINGTHECOOKTOP COUNTERTOPLIGHT TOUCH VENT FAN HIGH LOW OFF VENT FAN HIGH LOW OFF LIGHT ON NIGHT OFF LIGHT ON NIGHT OFF once for regular light twice for night light 1 or 2 times ...

Страница 17: ...t plugged in or after a power failure the display will flash If a time of day is not set will flash until you touch any pad SETTINGTHECLOCK NOTES If you touch in an invalid time and touch CLOCK 3 tones will sound Enter the correct time If you touch OFF CANCEL while setting the clock the display will show the last time of day set To turn off the clock touch CLOCK Number pad 0 and CLOCK again the se...

Страница 18: ... do not do this step within 5 sec onds of doing Step 2 START will appear You then have 1 minute to touch START ENTER or TIMER SET before the display returns to the time of day At the end of the countdown To cancel the minute timer During the countdown GETTING TO KNOW YOUR MICROWAVE OVEN ENTER TIMER ENTER TIMER TIMER TIMER YOU SEE one long tone will sound time of day TIMER SET 1 0 3 OR START ENTER ...

Страница 19: ...your cooking time cycle You can also use it to extend cooking time cycles in multiples of 1 minute up to 99 minutes NOTES To extend cooking time cycles in multiples of 1 minute touch ADD MINUTE repeatedly during cooking After closing the door you can enter ADD MINUTE without having to touch START ENTER 1 Make sure the food is in the oven 2 Touch ADD MINUTE Example for cooking for 1 minute If you t...

Страница 20: ...can change the cooking time any time during cooking by repeating Steps 2 3 and 4 TOUCH YOU SEE TOUCH YOU SEE four tones will sound ENTER POWER COOK TIME ENTER POWER COOK TIME TOUCH YOU SEE POWER COOK TIME YOU SEE COOK TIME USINGYOURMICROWAVEOVEN This section gives you instructions for operating each function Please read these instructions carefully COOKINGATHIGHCOOKPOWER COOK TIME 1 0 3 START ENTE...

Страница 21: ...r WHEN TO USE IT Quick heating many convenience foods and foods with high water content such as soups and beverages Cooking small tender pieces of meat ground meat poultry pieces fish fillets and most vegetables Heating cream soups Heating rice pasta or stirrable casseroles Cooking and heating foods that need a cook power lower than high for example whole fish and meat loaf or when food is cooking...

Страница 22: ...ooking time or cook power any time during cooking by repeating Steps 2 3 and or 4 and 5 TOUCH YOU SEE POWER COOK TIME YOU SEE four tones will sound COOK TIME START ENTER USING YOUR MICROWAVE OVEN COOKINGATDIFFERENTCOOKPOWERS CONT TOUCH YOU SEE TOUCH YOU SEE OR ENTER POWER COOK TIME TOUCH YOU SEE ENTER POWER COOK ENTER POWER COOK repeat until desired cook power appears 7 0 3 COOK POWER 5 COOK POWER...

Страница 23: ...or 7 minutes 30 seconds 4 Set the cook power for the first stage Example for 50 cook power 5 Repeat Steps 2 3 and 4 to set the cooking time and cook power for each additional stage TOUCH YOU SEE TOUCH YOU SEE ENTER POWER COOK TIME ENTER POWER COOK TIME USING YOUR MICROWAVE OVEN COOK TIME 7 0 3 TOUCH YOU SEE OR TOUCH YOU SEE ENTER POWER COOK ENTER POWER COOK repeat until desired cook power appears ...

Страница 24: ...f the cooking time Changing instructions You can change cooking times or cook powers for a stage any time after that stage starts by repeating Steps 2 3 and or 4 and 5 TOUCH YOU SEE POWER COOK TIME 1 2 YOU SEE four tones will sound COOK TIME first stage when cooking with 2 stages USING YOUR MICROWAVE OVEN START ENTER ...

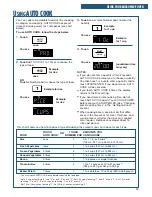
Страница 25: ...1 to 4 cups 237 mL to 946 mL 1 to 4 cups 237 mL to 946 mL 1 to 4 cups 237 mL to 946 mL 1 to 6 pieces average thickness 10 to 12 ounces or 20 to 21 ounces 284 g to 340 g or 567 g to 595 g 1 to 4 potatoes 10 to 13 oz 280 to 369 g each TOUCH AUTO COOK once twice 3 times 4 times 5 times 6 times 7 times This chart shows you how to choose a type of food and the amounts you can choose for each type You m...

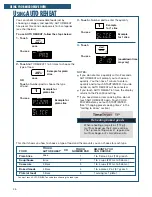
Страница 26: ... Casserole Baked Goods Plate of food TOUCH AUTO REHEAT once twice 3 times 4 times 5 times This chart shows you how to choose a type of food and the amounts you can choose for each type TOUCH NUMBER PAD 1 2 3 4 5 OR 2 Touch AUTO REHEAT 1 to 5 times to choose the type of food AUTO REHEAT Example for pizza slice OR Touch a Number pad to choose the type of food You see LBSOZ OFF TABLE TURN QTY ENTER S...

Страница 27: ...ROST will be canceled If you enter a weight higher than the highest weight allowed for your food setting 3 tones will sound and RETRY will appear on the display when you touch START ENTER If you touch AUTO DEFROST 4 times the display returns to the Meats setting If you need more or less defrosting time do not touch AUTO DEFROST again Touch COOK POWER before you touch START ENTER See Changing prese...

Страница 28: ...Steak Pot Roast Chuck Roast Rib Roast Rolled Rump Roast Stew Beef Lamb Cubes for Stew Chops 1 inch 2 5 cm thick Pork Chops 1 2 inch 13 mm thick Hot Dogs Spareribs Country Style Ribs Loin Roast Boneless Sausage Links Sausage Bulk USING YOUR MICROWAVE OVEN AUTODEFROSTCHART Meat setting Fish setting SPECIAL INSTRUCTIONS Place in a microwavable baking dish Carefully separate fillets under cold water P...

Страница 29: ...a microwavable roasting rack Finish defrosting by immersing in cold water Remove giblets when chicken is partially defrosted Place on a microwavable roasting rack Finish defrosting by immersing in cold water Place on a microwavable roasting rack Finish defrosting by immersing in cold water Place on a microwavable roasting rack Finish defrosting by immersing in cold water USING YOUR MICROWAVE OVEN ...
Страница 30: ...ge at a time If you are using a microwave popcorn popper follow manufacturer s instructions To use POPCORN follow the steps below 1 Place the bag in the center of the turntable 2 Touch POPCORN 1 to 3 times to choose the bag size You see TOUCH POPCORN once twice 3 times This chart shows you how to choose a bag size POPCORN USING YOUR MICROWAVE OVEN How well your popcorn cooks will depend on the bra...

Страница 31: ...tart heating At end of heating time NOTES If you touch BEVERAGE 3 times the display returns to the 1 cup setting You do not need to touch START ENTER to start the oven The oven will start heating by itself in 5 seconds If you need more or less heating time do not touch BEVERAGE again Touch COOK POWER before the oven starts cooking See Changing preset cooking times in the Getting to Know section US...

Страница 32: ...door 2 Touch WARM HOLD 3 Start the oven To make WARM HOLD automatically follow another cycle While entering cooking instructions touch WARM HOLD before touching START ENTER or during cooking Food cooked covered should be covered during WARM HOLD Pastry items pies turnovers etc should be uncovered during WARM HOLD Complete meals kept warm on a dinner plate should be covered during WARM HOLD Do not ...

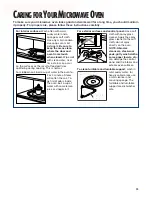
Страница 33: ...emon juice or vinegar in it For exterior surfaces and control panel Use a soft cloth with spray glass cleaner Apply the spray glass cleaner to the soft cloth do not spray directly on the oven NOTE Abrasive cleansers steel wool pads gritty wash cloths some paper towels etc can damage the control panel and the interior and exterior oven surfaces To clean turntable and turntable support wash in mild ...

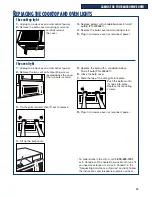
Страница 34: ... the filter out 4 Soak grease filters in hot water and a mild detergent Scrub and swish to remove embedded dirt and grease Rinse well and shake to dry Do not use ammonia corrosive cleaning agents such as lye based oven cleaners or place in a dishwasher The filter will turn black or could be damaged 5 To replace the charcoal filters push each filter to the back of the opening between the upper and ...

Страница 35: ...the bulb with a candelabra base 30 watt bulb PN 4393681 6 Close the bulb cover 7 Slide the top of the vent grille into place Push the bottom until it snaps into place Replace the mounting screws 8 Plug in microwave oven or reconnect power To order bulbs in the U S A call 1 800 253 1301 or in Canada call the nearest service branch see If you need assistance or service in Canada in the Requesting As...

Страница 36: ...mount of food you prepare the time it takes to cook that food will also change For example if you double a recipe add a little more than half the original cooking time Check for doneness and if necessary add more time in small increments Starting temperature of food The lower the temperature of the food being put into the microwave oven the longer it takes to cook Food at room temperature will be ...

Страница 37: ...e sterilization Arranging food For best results place food evenly on the plate You can do this in several ways If you are cooking several items of the same food such as baked potatoes place them in a ring pattern for uniform cooking When cooking foods of uneven shapes or thickness such as chicken breasts place the smaller or thinner area of the food towards the center of the dish where it will be ...

Страница 38: ...e removed from the oven and covered for additional time to allow it to finish cooking This frees the oven for other cooking Steam is normally produced during cooking The microwave oven has been designed to vent this steam out the vent Yes Pop packaged microwave popcorn following manufacturer s guidelines or use the preset POPCORN pad Do not use regular paper bags Use the listening test by stopping...

Страница 39: ...fix without tools of any kind Check the lists below and on the next page before calling for assistance or service If you still need help see the Requesting Assistance or Service section on pages 41 or 42 MICROWAVEOVENDOESNOTWORK PROBLEM Food is not cooked enough The display shows a time counting down but the oven is not cooking CAUSE The electric supply to your home or wall outlets is low or lower...

Страница 40: ... technician for repair Cooking without the turntable can give you poor results CAUSE You have not entered the correct command You have turned off the tone See the Audible signals section on page 15 TONES PROBLEM You do not hear the programming or end of cycle tone PROBLEM The display is flashing CAUSE There has been a power interruption Reset the clock See the Setting the clock section on page 17 ...

Страница 41: ...pt 2000 North M 63 Benton Harbor MI 49022 2692 Use and maintenance procedures Accessory and repair parts sales Specialized customer assistance Spanish speak ing hearing impaired limited vision etc Referrals to local dealers service companies and repair parts distributors Whirlpool service technicians are trained to fulfill the product warranty and provide after warranty service anywhere in the Uni...

Страница 42: ...cept 807 area code Outside the Ottawa area 1 800 807 6777 MANITOBA SASKATCHEWAN 1 800 665 1683 and 807 area code in ONTARIO QUEBEC Montreal except South Shore 1 800 361 3032 South Shore Montreal 1 800 361 0950 Quebec City 1 800 463 1523 Sherbrooke 1 800 567 6966 ATLANTIC PROVINCES 1 800 565 1598 FORFURTHERASSISTANCE If you need further assistance you can write to Inglis Limited with any questions ...

Страница 43: ... Interrupting cooking 15 Light 16 Minute timer 18 Number pads 14 OFF CANCEL 15 POPCORN 30 Stage cooking 23 24 START ENTER 15 TIMER SET 18 WARM HOLD 32 ELECTRICAL REQUIREMENTS 5 12 TOPIC PAGE EXHAUST FAN 16 FILTERS 34 HOW YOUR MICROWAVE OVEN WORKS 9 10 INSTALLATION INSTRUCTIONS 6 8 LIGHTS Replacing 35 Using 16 PARTS AND FEATURES Cooking guide label 13 Door handle 13 Door safety lock system 13 Magne...
Страница 44: ...airs to parts or systems resulting from unauthorized modifications made to the appliance 9 97 WHIRLPOOL CORPORATION SHALL NOT BE LIABLE FOR INCIDENTAL OR CONSEQUENTIAL DAMAGES Some states do not allow the exclusion or limitation of incidental or consequential damages so this exclusion or limitation may not apply to you This warranty gives you specific legal rights and you may also have other right...

Отзывы: