background image

2

GB

INSTALLATION

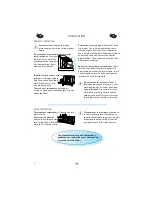
PRIOR TO CONNECTING

E

NSURE


THAT


THE


APPLIANCE


IS


NOT


DAMAGED

 Check 

that the oven door closes fi rmly against the 
door support and that the internal door seal is 
not damaged. Empty the oven and clean the 
interior with a soft, damp cloth.

AFTER CONNECTING

T

HE


EARTHING


OF


THIS


APPLIANCE


 is compulso-

ry.  The manufacturer will accept no re-
sponsibility for injury to persons, animals 
or damage to objects arising from the 
non-observance of this requirement.

The manufacturers are not liable for any 
problems caused by the user’s failure to ob-
serve these instructions.

D

O


NOT


OPERATE


THIS


APPLIANCE


 if it has a 

damaged mains cord or plug, if it is not 
working properly, or if it has been dam-
aged or dropped. Do not immerse the 
mains cord or plug in water. Keep the 
cord away from hot surfaces. Electrical 
shock, fi re or other hazards may result.

D

O


NOT


REMOVE


THE


MICROWAVE


INLET


PROTECTION


PLATES


 located on the side of 

the oven cavity wall. They 
prevent grease & food parti-
cles from entering the mi-
crowave inlet channels.

C

HECK


THAT


THE


VOLTAGE


  on the rating 

plate corresponds to the voltage in your 
home.

T

HE


OVEN


CAN


BE


OPERATED


ONLY


 if the oven door is 

fi rmly closed.

P

OOR


TELEVISION


RECEPTION


and radio interference may 
result if the oven is located 
close to a TV, radio or aerial.

P

LACE


THE


OVEN


ON


A


STABLE

EVEN


SUR

-

FACE

 that is strong enough to 

hold the oven and the food 
utensils you put in it. Use 
care when handling.

T

HIS


OVEN


IS


NOT


INTENDED

 to be placed or 

used on a working surface lower than 850 mm 
above the fl oor.

P

OSITION


THE


OVEN


AT


A


DISTANCE

 from other heat-

ing sources. For suffi

  cient ventilation there 

must be a space of at least 20 cm above the 
oven. Ensure that the space underneath, above 
and around the oven is empty to allow for 
proper airfl ow. The microwave oven shall not 
be placed in a cabinet.

Содержание JT 379

Страница 1: ...1 GB JT 379 www whirlpool com ...

Страница 2: ...l shock fire or other hazards may result DO NOT REMOVE THE MICROWAVE INLET PROTECTION PLATES located on the side of the oven cavity wall They prevent grease food parti cles from entering the mi crowave inlet channels CHECK THAT THE VOLTAGE on the rating plate corresponds to the voltage in your home THE OVEN CAN BE OPERATED ONLY if the oven door is firmly closed POOR TELEVISION RECEPTION and radio ...

Страница 3: ... Paper can char or burn and some plastics can melt if used when heating foods Do not leave the oven unattended if you are using a lot of fat or oil since they can overheat and cause a fire IF MATERIAL INSIDE OUTSIDE THE OVEN SHOULD IGNITE OR SMOKE IS OBSERVED keep oven door closed and turn the oven off Dis connect the power cord or shut off pow er at the fuse or circuit breaker panel READ CAREFULLY...

Страница 4: ...et the teaspoon remain in the container 3 After heating allow standing for a short time stirring again before carefully re moving the container from the oven CAREFUL ALWAYS REFER to a microwave cookbook for de tails Especially if cooking or reheating food that contains alcohol AFTER HEATING BABY FOOD or liquids in a baby bottle or in a baby food jar always stir and check the temperature before ser...

Страница 5: ...ade of metal or metal parts ALWAYS ENSURE that the turntable is able to turn freely before starting the oven If the turnta ble isn t able to turn freely you should use a smaller vessel CRISP PLATE PLACE THE FOOD DIRECTLY ON THE CRISP PLATE Always use the Glass turn table as support when us ing the Crisp plate DO NOT PLACE ANY UTENSILS on the Crisp plate since it will quickly be come very hot and i...

Страница 6: ...tir the food by opening the door The setting will be maintained for 10 minutes TO CONTINUE COOKING CLOSE THE DOOR and press the Start button ONCE The cooking is resumed from where it was paused PRESSING THE START BUTTON TWICE will increase the time by 30 seconds IF YOU DON T WANT TO CONTINUE COOKING YOU CAN REMOVE THE FOOD close the door and press the STOP button or turn the function knob to off p...

Страница 7: ...e shown Set buzzer q TURNING THE KNOB will switch between on and off w PRESS OK BUTTON to confirm selection Set contrast q TURNING THE KNOB to increase decrease contrast setting w PRESS OK BUTTON to confirm selection Set brightness q TURNING THE KNOB to increase decrease brightness setting w PRESS OK BUTTON to confirm selection ITEMS 1 2 3 4 5 6 7 Languages English French Italian German Swedish Sp...

Страница 8: ...OB to set the time to measure r PRESS OK OR START BUTTON to start counting AN ACOUSTIC SIGNAL will be heard when the timer has finished to count down POWER SAVE MODE WHEN THE OVEN STAY STANDBY MODE if the user does not set the clock and no any action during 10mins the oven will enter power save mode At this moment the display will be turn off This state can be left by turning the knobs or pressing...

Страница 9: ...nd steps by pressing the Start button Each press increas es the time with 30 seconds CHOOSING POWER LEVEL q TURN THE FUNCTION KNOB to the MW mode position w TURN THE KNOB to set the MW power e PRESS OK BUTTON to confirm The time digits will blink r TURN THE KNOB to set the cooking time t PRESS THE START BUTTON q w e r t MICROWAVES ONLY POWER SUGGESTED USE JET REHEATING of beverages water clear sou...

Страница 10: ...eeded for vari ous amounts TURN LARGE JOINTS halfway through the defrost ing process FROZEN FOOD IN PLASTIC BAGS plastic films or card board packages can be placed directly in the oven as long as the package has no met al parts e g metal twist ties THE SHAPE OF THE PACKAGE alters the de frosting time Shallow packets defrost more quickly than a deep block SEPARATE PIECES as they begin to defrost In...

Страница 11: ... Jet Defrost mode position w TURN THE KNOB to set the food class e PRESS OK BUTTON to confirm The weight digits will blink r TURN THE KNOB to set the weight of the food t PRESS THE START BUTTON MIDWAY THROUGH THE DEFROSTING PROCESS the oven stops and prompts you to TURN FOOD Open the door Turn the food Close the door and restart by pressing the Start button NOTE The oven continues automatically af...

Страница 12: ...ture 18 C choose higher weight of the food JET DEFROST FOOD CLASS AMOUNT HINTS q MEAT 100G 2KG Minced meat cutlets steaks or roasts w POULTRY 100G 3KG Chicken whole pieces or fillets e FISH 100G 2KG Whole steaks or fillets r VEGETABLES 100G 2KG Mixed vegetables peas broccoli etc t BREAD 100G 2KG Loaf buns or rolls FOR FOOD NOT LISTED IN THIS TABLE and if the weight is lesser or greater than recomm...

Страница 13: ...king time e PRESS THE START BUTTON FOR FOOD LIKE cheese toast steaks and sausages place food on the high wire rack ENSURE THAT THE UTENSILS used are heat resistant when you use this function DO NOT USE PLASTIC utensils when grilling They will melt Items of wood or paper are not suitable either BE CAREFUL NOT TO TOUCH the ceiling beneath the grill element e w q ...

Страница 14: ... IT IS POSSIBLE to switch off the microwaves by reducing the microwave power level to 0 W just press the Back button twice and turn the knob When 0 W is reached the oven switches to Grill only mode CHOOSING POWER LEVEL ENSURE THAT THE UTENSILS used are microwave safe and heat resistant when you use this function DO NOT USE PLASTIC utensils when grilling They will melt Items of wood or paper are no...

Страница 15: ...ble to heat THE OVEN AND THE CRISP PLATE become very hot when using this function q TURN THE FUNCTION KNOB to Crisp mode position w TURN THE KNOB to set the cooking time e PRESS THE START BUTTON IT IS NOT POSSIBLE TO CHANGE OR SWITCH the Power level or Grill on off when using the Crisp function ONLY USE the supplied Crisp plate with this function Other available Crisp plates on the market will not...

Страница 16: ...o allow the air to circulate properly around the food USE THE BAKING PLATE when baking small items like cookies or rolls DURING THE COOKING PROCESS the cooking time can be adjusted by turning the knob and the tem perature by pressing the Back button twice and then turning the knob If the Back button is pressed twice during cooking the temperature digits will blink The new temperature setting will ...

Страница 17: ... the air to circulate properly around the food DURING THE COOKING PROCESS the cooking time can be adjusted by turning the knob and the tem perature and microwave power by pressing the Back tutton thrice or twice and then turning the knob The new temperature and power settings will be valid after the the OK button has been pressed Once the temperature and microwave power digits are lit continously ...

Страница 18: ...be displayed Oven is still cooking with Forced Air func tion for 10 minutes in order to maintain the reached temperature No any cook parameters can be set in this state q TURN THE FUNCTION KNOB to the Quick heat mode position The temperature digits will blink w TURN THE KNOB to set the preferred temperature e PRESS THE START BUTTON USE THIS FUNCTION TO preheat the empty oven DO NOT PLACE FOOD befo...

Страница 19: ...CTION TO quickly reheat your food from frozen to serving temperature This function is used only for frozen ready made food q TURN THE FUNCTION KNOB to 6th Sense Cook function mode position w TURN THE KNOB to select 6th Sense Crisp e PRESS OK BUTTON to confirm r TURN THE KNOB to set the food class t PRESS OK BUTTON to confirm y PRESS THE START BUTTON ONLY THE FOOD IS TO be placed on the Crisp plate...

Страница 20: ...e recommendations on the package regarding the cooking time the amount of water rice Place the ingredients in the bottom part cover with the lid and set the time USE THIS FUNCTION FOR such food as vegetables fish rice and pasta THIS FUNCTION WORKS IN 2 STEPS THE FIRST STEP quickly brings the food to boiling temperature THE SECOND STEP automatically adjusts to simmering temperature in order to avoi...

Страница 21: ...s in which case the cover is not needed If the food is packaged in such way that it isn t possible to use the cover the package should be cut with 2 3 score to allow for excess pressure to escape during reheating RELEASING PRESSURE PLASTIC FOIL should be scored or pricked with a fork to relieve the pressure and to prevent burst ing as steam builds up during cooking THE NET WEIGHT shall be kept wit...

Страница 22: ...of instruction states proceeding the starting point or within 20 seconds after cooking started for some automatic functions u PRESS THE START BUTTON FOOD CATEGORY FOOD CLASS AMOUNT PREPARATION ACCESSORIES MEAT ROAST BEEF 800G 1 5KG Season the roast and place in oven when preheated Turn the roast when oven prompts For French roast beef set doneness minus function Microwave and oven proof dish on lo...

Страница 23: ...sh on low rack POULTRY ROAST CHICKEN 800G 1 5KG Season and place in cold oven with the breast side up Microwave and oven proof dish on low rack CHICKEN FIL LETS STEAM 300G 800G Season and place in steam grid Add 100ml water in bottom and cover with lid Steamer CHICKEN FIL LETS FRY 300G 1KG Lightly grease the crispplate Season and add fillets when crispplate is preheated Turn food when oven prompts...

Страница 24: ...spplate POTA TOES POTATOES BOILED 300G 1KG Place in steamer bottom and add 100ml water Cov er with lid Steamer bottom lid POTATOES BAKED 200G 1KG Wash and prick Turn when oven prompts Microwave and oven proof dish on turntable GRATIN 4 8 SERV INGS Slice raw potatoes and inter lace with onion Season with salt pepper and garlic and pour over cream Spinkle cheese on top Microwave and oven proof dish ...

Страница 25: ...ly oil the crispplate and add food when crispplate is preheated Turn when oven prompts Crispplate SQUASH STEAM 200G 500G Place in steam grid Add 100ml wa ter in bottom and cover with lid Steamer CORN ON COB 300G 1KG Place in steam grid Add 100ml wa ter in bottom and cover with lid Steamer TOMATOES 300G 800G Cut in halves season and sprinkle cheese on top Microwave and oven proof dish on low rack R...

Страница 26: ...e PAN PIZZA FROZEN 300G 800G Remove package Crispplate PIZZA CHILLED 200G 500G Add the pizza when crispplate is pre heated Crispplate QUICHE LORRAINE 1 BATCH Prepare the pastry 250g flour 150 g butter 2 tblsp water or use ready made pastry 400 450g Line the crisp plate with the pastry Prick it Prebake the pastry When oven prompts to add the stuffing add 200g of ham and 175g cheese and pour over a ...

Страница 27: ...mpts Oven proof dish on low rack B R E A D CAKES BREAD LOAF 1 2 PCS Prepare dough according to your favor ite recipe for a light bread Place on bak ing plate to rise Add when oven is pre heated Baking plate ROLLS 1 BATCH Prepare dough according to your favor ite recipe for a light bread Form to rolls and place on baking plate to rise Add when oven is preheated Baking plate ROLLS FROZEN 1 BATCH Add...

Страница 28: ... is preheated Baking plate SNACKS POPCORN 100G Place bag on turntable Only pop one bag at a time ROASTED NUTS 50G 200G Add nuts when the crispplate is pre heated Stir when oven prompts Crispplate BUFFALO WINGS FROZEN 300G 600G Remove package Crispplate NUGGETS FRO ZEN 250G 600G Add nuggets when crispplate is pre heated Turn when oven prompts Crispplate FOR LARGE AMOUNT PIECES OF FOOD like roasts a...

Страница 29: ...lean the interior surfaces front and rear of the door and the door opening DO NOT ALLOW GREASE or food particles to build up around the door FOR STUBBORN STAINS boil a cup of water in the oven for 2 or 3 minutes Steam will soften the marks ADDING SOME LEMON JUICE to a cup of water plac ing this on the turntable and boiling for a few minutes can eliminate odors inside the oven IF THE GRILL IS NOT U...

Страница 30: ...ce or repair oper ation which involves the re moval of any cover which gives pro tection against exposure to microwave energy DO NOT REMOVE ANY COVER ENVIRONMENTAL HINTS THE PACKING BOX may be fully recy cled as confirmed by the recy cling symbol Follow local disposal regulations Keep potentially hazardous pack aging plastic bags polysty rene etc out of the reach of chil dren THIS APPLIANCE is mar...

Страница 31: ...31 GB ...
Страница 32: ... Cool down mode is activated This is normal After this procedure the oven switch es off automatically The cooling procedure can be interrupted without any harm to the oven by opening the door 4 6 1 9 6 5 2 7 4 2 5 2 Test Amount Approx time Power level Container 12 3 1 1000 G 11 MIN 750 W PYREX 3 227 12 3 2 475 G 5 MIN 750 W PYREX 3 827 12 3 3 900 G 15 MIN 750 W PYREX 3 838 12 3 4 1100 G 28 30 MIN ...

Отзывы: