background image

3-6

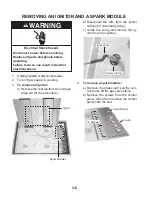
REMOVING AN IGNITOR AND A SPARK MODULE

1.  Unplug cooktop or disconnect power.
2.  Turn off gas supply to cooktop.
3. 

To remove an ignitor:

a)  Remove the cooktop from the unit (see 

page 3-2 for the procedure).

Spark Modules

Ignitor

Electrical Shock Hazard

Disconnect power before servicing.
Replace all parts and panels before    
operating.
Failure to do so can result in death or 
electrical shock.

WARNING

b) Disconnect the wire from the ignitor 

terminal (if not already done). 

c) Unclip the e-ring and remove the ig-

nitor from the cooktop.

 Ignitor e-Ring

 Ignitor Wire

4. 

To remove a spark module:

a) Remove the grates and pull the con-

trol knobs off the gas valve stems.

b) Remove the screws from the control 

panel, then lift and remove the control 
panel from the unit.

 4 Screws

Control Panel

Knobs

Содержание GLS3064RS

Страница 1: ...CONSUMER SERVICES TECHNICAL EDUCATION GROUP PRESENTS JOB AID KR 37 Part No 8178526 30 36 FLUSH MOUNT GAS COOKTOPS Model GLS3064R S Model GLS3665R S ...

Страница 2: ...Wiring Diagrams used in this Job Aid are typical and should be used for training purposes only Always use the Wiring Diagram supplied with the product when servicing the unit GOALS AND OBJECTIVES The goal of this Job Aid is to provide information that will enable the service technician to prop erly diagnose malfunctions and repair the 30 36 Flush Mount Gas Cooktops The objectives of this Job Aid a...

Страница 3: ... Gas Cooktop Warranty 1 5 INSTALLATION INFORMATION 2 1 L P Gas Conversion 2 1 COMPONENT ACCESS 3 1 Component Locations 3 1 Removing The Burners And Cooktop 3 2 Removing A Burner Base 3 4 Removing An Ignition Switch And Gas Valve 3 5 Removing An Ignitor And A Spark Module 3 6 Removing The Power Supply Cord 3 8 COMPONENT TESTING 4 1 Ignition Switch 4 1 WIRING DIAGRAMS 5 1 ...

Страница 4: ... iv NOTES ...

Страница 5: ...kill or hurt you and others All safety messages will follow the safety alert symbol and either the word DANGER or WARNING These words mean All safety messages will tell you what the potential hazard is tell you how to reduce the chance of injury and tell you what can happen if the instructions are not followed You can be killed or seriously injured if you don t immediately follow instructions You ...

Страница 6: ...N C BUILT IN COOKTOP J GOLD ELECTRIC COOKTOP L GOLD GAS COOKTOP CONFIGURATION S PORCELAIN STEEL TOP T TEMPERED GLASS TOP GAS ONLY C CERAMIC GLASS TOP M MODULAR DOWNDRAFT MODEL SIZE 20 20 30 30 36 36 FEATURE VARIATIONS 0 LOW SPEED COIL ELECTRIC OPEN LOW END BURNER GAS OPEN BAYS 1 HIGH SPEED COIL ELECTRIC SEALED BURNERS 2 CERAMIC RADIANT ELECTRIC 3 CERAMIC RADIANT DUAL 4 MODULAR 6 FLUSH MOUNT 0 NO E...

Страница 7: ...1 3 MODEL SERIAL NUMBER LABEL LOCATION The Model Serial Number label location is shown below Model Serial Number Label ...

Страница 8: ...Type Sealed Sealed Gas R Front Output BTU Nat LP 9 000 9 000 Gas L Front Output BTU Nat LP 15 000 12 000 Gas R Rear Output BTU Nat LP 12 000 12 000 Gas L Rear Output BTU Nat LP 9 000 9 000 Gas Center Rear Output BTU Nat LP N A 15 000 Gas Ignition Electronic Electronic Gas Auto Reignition Yes Yes Gas Valves Degrees 210 210 LP Conversion Kit Included Kit Included Miscellaneous Installation Instructi...

Страница 9: ...teration misuse abuse fire flood improper installation acts of God or use of products not approved by Whirlpool Corporation or Whirlpool Canada Inc 5 Repairs to parts or systems resulting from unauthorized modifications made to the appli ance 6 Replacement parts or repair labor costs for units operated outside the United States or Canada 7 In Canada travel or transportation expenses for customers ...

Страница 10: ...1 6 NOTES ...

Страница 11: ...ollowing steps 1 Unplug cooktop or disconnect power 2 Turn off gas supply to cooktop 3 Use a screwdriver and remove the ac cess cap on the gas distribution valve Access Cap Gas Distribution Valve 4 Turn the access cap over so that the let ters L P are facing up and then reinstall the cap on the valve NAT Position L P Position 5 To convert the cooktop burners for use with L P gas a Remove the grate...

Страница 12: ...use them Orifice Bags 36 Model Bypass Jet Pin Gas Valve L P Orifice Burner 1 2 3 4 1 4 3 2 9 000 BTU 12 000 BTU 15 000 BTU 9 000 BTU 1 5 3 4 12 000 BTU 9 000 BTU 9 000 BTU 1 2 2 3 4 5 12 000 BTU 15 000 BTU 30 Model Cooktop 36 Model Cooktop e Install the L P orifices in their appro priate burner bases be careful not to crossthread or overtighten the orifices Burner Orifice IMPORTANT Once removed pl...

Страница 13: ...To convert the gas valves for use with L P gas a Remove the control knobs from the gas valves b Reach inside the control panel open ings with your fingers and slide the rubber guards off the gas valve stems c Using a small screwdriver unscrew and remove the bypass jet pins from the gas valves d Install the L P bypass jet pins in the gas valves until they are just snug Do not overtighten the pins B...

Страница 14: ...2 4 NOTES ...

Страница 15: ...ooktops The components and their locations are shown below COMPONENT ACCESS Ignitor Spark Modules Gas Valves Ignition Switches Burner Base Cooktop Cooktop Chassis Power Supply Cord 30 Model Cooktop 36 Model Cooktop Spark Modules Burner Base Cooktop Chassis Ignitor Gas Valves Ignition Switches Power Supply Cord Cooktop ...

Страница 16: ...ates off the cooktop 4 Lift the burner caps off the burners 5 Pull the control knobs off the gas valve stems 6 Remove the two screws from each of the burners and remove the burners from the cooktop 7 Remove the eight screws from the cook top 8 Remove the screws from the side of the control panel and lift the control panel off the cooktop chassis Grates Burner Cap 4 Control Knobs 4 Burners Burner S...

Страница 17: ...SSEMBLY NOTE Since each of the burner ignitors for the 30 and 36 cooktops has its own spark module make sure that you connect each of the module output wires to its corresponding ignitor RF RR 4 Spark Module Output Wires To Ignitors RF LF LR RR Spark Modules LF LR C 5 Spark Module Output Wires To Ignitors LR LF C RF RR LF LR RR RF ...

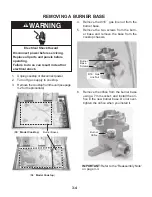
Страница 18: ...rom the cooktop chassis 6 Remove the orifice from the burner base using a 7 mm socket and install the ori fice in the new burner base Do not over tighten the orifice when you install it Electrical Shock Hazard Disconnect power before servicing Replace all parts and panels before operating Failure to do so can result in death or electrical shock WARNING Burner Orifice 9 16 Gas Line Nut Burner Base ...

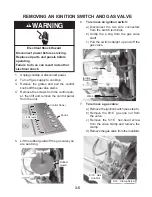
Страница 19: ...n death or electrical shock WARNING 5 Lift the rubber guard off the gas valve you are servicing 6 To remove an ignition switch a Disconnect the two wire connectors from the switch terminals b Unclip the e ring from the gas valve shaft c Pull the switch straight up and off the gas valve 7 To remove a gas valve a Remove the ignition switch see step 6 b Remove the 9 16 gas line nut from the valve c R...

Страница 20: ...ace all parts and panels before operating Failure to do so can result in death or electrical shock WARNING b Disconnect the wire from the ignitor terminal if not already done c Unclip the e ring and remove the ig nitor from the cooktop Ignitor e Ring Ignitor Wire 4 To remove a spark module a Remove the grates and pull the con trol knobs off the gas valve stems b Remove the screws from the control ...

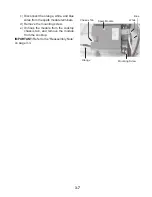
Страница 21: ...m the spark module terminals d Remove the mounting screw e Unhook the module from the cooktop chassis tab and remove the module from the cooktop Mounting Screw Orange White Blue Spark Module Chassis Tab IMPORTANT Refer to the Reassembly Note on page 3 3 ...

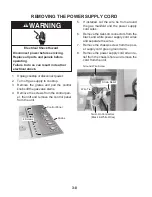
Страница 22: ... supply cord wires and separate the wires 7 Remove the chassis screw from the pow er supply cord green ground wire 8 Remove the power supply cord strain re lief from the chassis hole and remove the cord from the unit Ground Wire Screw Strain Relief Wire Tie Twist On Connectors Black White Wires 1 Unplug cooktop or disconnect power 2 Turn off gas supply to cooktop 3 Remove the grates and pull the c...

Страница 23: ...r test leads to the igni tion switch pins 5 Turn the gas valve shaft to the Off position The meter should indicate an open circuit infinite 6 Rotate the gas valve shaft The meter should indicate a closed circuit 0 Ω at approxmately 20 LITE position of rota tion and open again at approximately 30 of rotation IGNITION SWITCH Check all connections before replacing components looking for broken or loo...

Страница 24: ...4 2 NOTES ...

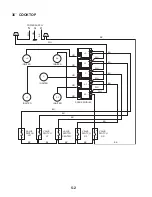
Страница 25: ... L1 N L1 N LF LF N L1 RF N L1 N N POWER SUPPLY IGNITER WH WH BK OR OR OR OR WH WH WH BU BK BK BK RF LF RR LR BU BU BU GN BK G L1 L1 IGNITER SPARK MODULE VALVE SWITCH VALVE SWITCH VALVE SWITCH BK VALVE SWITCH BK RF IGNITER IGNITER A B A B A B A B ...

Страница 26: ...N BK G L1 L1 VALVE SWITCH VALVE SWITCH VALVE SWITCH VALVE SWITCH VALVE SWITCH BK BK A B A B A B A B A B LR LR N L1 LF LF N L1 C C N L1 N RF RF N L1 RR RR N L1 IGNITER OR OR OR OR OR WH WH WH WH WH BU BU BU BU BU BU BU BU BK IGNITER IGNITER IGNITER SPARK MODULE IGNITER ...

Страница 27: ...RIZED SERVICER IN CANADA FOR PRODUCT SPECIFICATIONS AND WARRANTY INFORMATION CALL 1 800 461 5681 FOR TECHNICAL ASSISTANCE WHILE AT THE CUSTOMER S HOME CALL THE TECHNICALASSISTANCE LINE 1 800 488 4791 HAVE YOUR STORE NUMBER READY TO IDENTIFY YOU AS AN AUTHORIZED SERVICER FOR WHIRLPOOL PRODUCTS 1 800 253 1301 FOR KITCHENAID PRODUCTS 1 800 422 1230 FOR ROPER PRODUCTS 1 800 447 6737 FOR LITERATURE ORD...

Страница 28: ...CORPORATION ...

Отзывы: