background image

5

Allow the storage tank on the reverse osmosis system to refill 
after heavy usage.

If you have questions about your water pressure, call a licensed, 
qualified plumber.

Leveling

It is important for the ice maker to be level in order to work 
properly. Depending upon where you install the ice maker, you 
may need to make several adjustments to level it. You may also 
use the leveling legs to lower the height of the ice maker for 
undercounter installations. 

Tools needed:

Gather the required tools and parts before starting installation.

9" level

Adjustable wrench

NOTE: It is easier to adjust the leveling legs if you have another 
person to assist you.

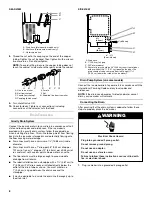
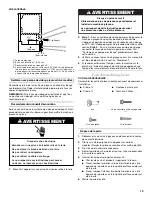
1. Move the ice maker to its final location. 

NOTE: If this is a built-in installation, move the ice maker as 
close as possible to the final location.

2. Place a carpenter’s level on top of the product to see if the ice 

maker is level from front to back and side to side.

3. Push up on the top front of the ice maker, and then locate the 

leveling screws that are on the bottom front of the ice maker. 

4. Using an adjustable wrench, change the height of the legs as 

follows:

Turn the leveling leg to the right to lower that side of the 
ice maker.

Turn the leveling leg to the left to raise that side of the ice 
maker.

NOTE: The ice maker should not wobble. Use shims to add 
stability when needed. 

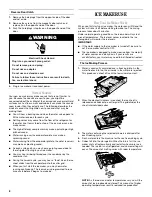
5. Push up on the top rear of the ice maker and locate the 

leveling legs that are on the bottom rear of the ice maker. 

6. Follow the instructions in Step 4 to change the height of the 

legs.

7. Use a carpenter’s level to recheck the ice maker to see that it 

is even from front to back and side to side. If the ice maker is 
not level, repeat steps 2 to 5. If the ice maker is level, go to 
the “Connect Water Supply” section.

Connect Water Supply

Read all directions thoroughly before you begin.
IMPORTANT:

Plumbing shall be installed in accordance with the 
International Plumbing Code and any local codes and 
ordinances.

Use copper tubing and check for leaks.

Install copper tubing only in areas where temperatures will 
remain above freezing.

Tools needed:

Gather the required tools and parts before starting installation. 
Read and follow the instructions provided with any tools listed 
here.

Flat-blade screwdriver

⁷⁄₁₆

" and 

¹⁄₂

" open-end wrenches or two adjustable wrenches

¹⁄₄

" nut driver

¹⁄₄

" drill bit

Hand drill or electric drill properly grounded

NOTE: Your ice maker dealer has a kit available with a 

¹⁄₄

(6.35 mm) saddle-type shutoff valve, a union, and copper tubing. 
Before purchasing, make sure a saddle-type valve complies with 
your local plumbing codes. Do not use a piercing-type or

 ³⁄₁₆

(4.76 mm) saddle valve which reduces water flow and clogs more 
easily.

Connecting the water line

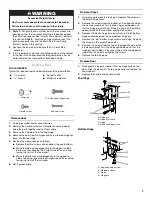
1. Turn off main water supply. Turn on nearest faucet long 

enough to clear line of water.

2. Find a 

¹⁄₂

" (12.70 mm) to 1

¹⁄₄

" (3.18 cm) vertical cold water 

pipe near the ice maker.

NOTE: Horizontal pipe will work, but the following procedure 
must be followed: Drill on the top side of the pipe, not the 
bottom. This will help keep water away from the drill. This 
also keeps normal sediment from collecting in the valve.

3. Using a grounded drill, drill a 

¹⁄₄

" (6.35 mm) hole in the cold 

water pipe you have selected.

4. Fasten shutoff valve to cold water pipe with pipe clamp. Be 

sure outlet end is solidly in the 

¹⁄₄

" (6.35 mm) drilled hole in the 

water pipe and that the washer is under the pipe clamp. 
Tighten packing nut. Tighten the pipe clamp screws carefully 
and evenly so washer makes a watertight seal. Do not 
overtighten the pipe clamp or you may crush cold water pipe 
if it is soft copper tubing. Do not use a piercing-type or 

³⁄₁₆

(4.76 mm) saddle-type valve which reduces water flow and 
clogs more easily.

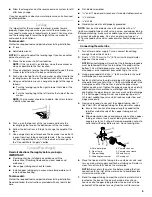
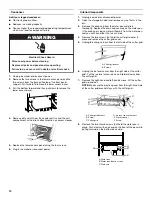
5. Now you are ready to connect the copper tubing. Use 

¹⁄₄

(6.35 mm) OD soft copper tubing for the cold water supply.

Ensure that you have the proper length needed for the 
job. Be sure both ends of the copper tubing are cut 
square.

Slip compression sleeve and compression nut on copper 
tubing as shown. Insert end of tubing into outlet end 
squarely as far as it will go. Screw compression nut onto 
outlet end with adjustable wrench. Do not overtighten.

6. Place the free end of the tubing into a container or sink, and 

turn on main water supply and flush out tubing until water is 
clear. Turn off shutoff valve on the water pipe.

NOTE: Always drain the water line before making the final 
connection to the inlet of the water valve to avoid possible 
water valve malfunction.

7. Bend the copper tubing to meet the water line inlet which is 

located on the back of the ice maker cabinet as shown. 
Leave a coil of copper tubing to allow the ice maker to be 
pulled out of the cabinet or away from the wall for service.

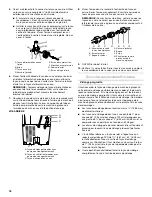
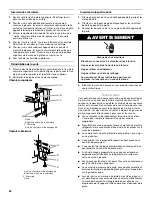
A. Cold water pipe
B. Pipe clamp

C. Copper tubing
D. Coupling (purchased) 

E. Compression nut
F. Compression sleeve

G. Shutoff valve
H. Packing nut

A

B

C

D

E

F

G

H

Содержание GI15NDXTB

Страница 1: ...r installation and service call 1 800 807 6777 or visit our website at www whirlpool com or www whirlpoolappliances ca MACHINE À GLAÇONS Guided utilisation etd entretien Au Canada pour assistance composez le 1 800 461 5681 pour installation ou service le 1 800 807 6777 ou visitez notre site web à www whirlpoolappliances ca Table of Contents Table des matières 2 2313683A ...

Страница 2: ... MATIÈRES SÉCURITÉ DE LA MACHINE À GLAÇONS 15 INSTRUCTIONS D INSTALLATION 15 Déballage de la machine à glaçons 15 Exigences d emplacement 16 Spécifications électriques 16 Spécifications de l alimentation en eau 16 Nivellement 17 Raccordement à la canalisation d eau 17 Raccordement au conduit d évacuation 18 Porte de la machine à glaçons 19 Sons normaux 20 UTILISATION DE LA MACHINE À GLAÇONS 21 Fon...

Страница 3: ... you what the potential hazard is tell you how to reduce the chance of injury and tell you what can happen if the instructions are not followed Your safety and the safety of others are very important We have provided many important safety messages in this manual and on your appliance Always read and obey all safety messages This is the safety alert symbol This symbol alerts you to potential hazard...

Страница 4: ...it Interrupter protected outlet nuisance tripping of the power supply may occur resulting in loss of cooling Ice quality may be affected If nuisance tripping has occurred and if the condition of the ice appears poor dispose of it Recommended grounding method For your personal safety this appliance must be grounded This appliance is equipped with a power supply cord having a 3 prong grounding plug ...

Страница 5: ...t Hand drill or electric drill properly grounded NOTE Your ice maker dealer has a kit available with a 6 35 mm saddle type shutoff valve a union and copper tubing Before purchasing make sure a saddle type valve complies with your local plumbing codes Do not use a piercing type or 4 76 mm saddle valve which reduces water flow and clogs more easily Connecting the water line 1 Turn off main water sup...

Страница 6: ...low the outlet of the drain tube as shown You must maintain a 1 2 54 cm air gap between the drain hose and the standpipe It may be desirable to insulate the drain line thoroughly up to the drain inlet SIDE VIEW Drain Pump System on some models Connect the ice maker drain to your drain in accordance with the International Plumbing Code and any local codes and ordinances NOTE If the drain hose becom...

Страница 7: ...ght side of the end cap facing the front of the ice maker 6 Set the door aside Reverse Hinges 1 Unscrew and remove the top hinge Replace the screws in the empty hinge holes 2 Remove the screws from the bottom of the opposite side of the ice maker cabinet Turn the top hinge upside down so that the hinge pin points up Place the hinge on the bottom opposite side of the ice maker and tighten screws 3 ...

Страница 8: ... ICE MAKER USE HowYourIceMakerWorks When you first start your ice maker the water pan will fill and the system will rinse itself before starting to make ice The rinsing process takes about 5 minutes Under normal operating conditions the ice maker will cycle at preset temperatures The ice level sensor located in the ice storage bin will monitor the ice levels IMPORTANT If the water supply to the ic...

Страница 9: ...o not use chlorine bleach on stainless steel surfaces Ice Maker System Minerals that are removed from water during the freezing cycle will eventually form a hard scaly deposit in the water system Cleaning the system regularly helps remove the mineral scale buildup How often you need to clean the system depends upon how hard your water is With hard water of 15 to 20 grains gal 4 to 5 grains liter y...

Страница 10: ...f the drain cap is loose water will empty from the water pan and you will have either thin ice or no ice 4 Remove the two screws that hold the cutter grid cover in place and remove the cutter grid cover 5 Unplug the wiring harness from the left side of the cutter grid 6 Unplug the ice level sensor from the right side of the cutter grid Pull the ice level sensor down and forward away from the cutte...

Страница 11: ...er grid cover and the two screws 15 Plug in ice maker or reconnect power VacationandMovingCare To shut down the ice maker 1 Unplug ice maker or disconnect power 2 Remove all ice from storage bin 3 Shut off the water supply 4 Remove the two screws in the lower access panel and the two screws from the base grille area of the front panel support Pull forward to remove the lower access panel 5 Disconn...

Страница 12: ...orator plate and the cutting grid Check to be sure that the ice maker is level See Leveling If the ice maker is level and the problem persists run a cleaning cycle See Cleaning IceProduction Ice maker runs but produces no ice Is the control set to ON Be sure that the control is set to ON Is the water supply connected Make sure the water supply is properly connected and turned on Is the drain cap s...

Страница 13: ...e made with the same precision used to build every new WHIRLPOOL appliance To locate FSP replacement parts in your area call our Customer eXperience Center telephone number or your nearest designated service center IntheU S A Call the Customer eXperience Center toll free 1 800 253 1301 Our consultants provide assistance with Features and specifications on our full line of appliances Installation i...

Страница 14: ... appliance is used in a country other than the country in which it was purchased DISCLAIMER OF IMPLIED WARRANTIES LIMITATION OF REMEDIES CUSTOMER S SOLE AND EXCLUSIVE REMEDY UNDER THIS LIMITED WARRANTY SHALL BE PRODUCT REPAIR AS PROVIDED HEREIN IMPLIED WARRANTIES INCLUDING WARRANTIES OF MERCHANTABILITY OR FITNESS FOR A PARTICULAR PURPOSE ARE LIMITED TO ONE YEAR OR THE SHORTEST PERIOD ALLOWED BY LA...

Страница 15: ... comment réduire le risque de blessure et ce qui peut se produire en cas de non respect des instructions Votre sécurité et celle des autres est très importante Nous donnons de nombreux messages de sécurité importants dans ce manuel et sur votre appareil ménager Assurez vous de toujours lire tous les messages de sécurité et de vous y conformer AVERTISSEMENT DANGER Voici le symbole d alerte de sécur...

Страница 16: ...te où l alimentation ne peut pas être coupée à l aide d un commutateur ou d un interrupteur à tirage IMPORTANT Si ce produit est connecté à une prise protégée par un disjoncteur de fuite à la terre un déclenchement intempestif peut se produire et causer une perte de refroidissement La qualité des glaçons peut en être affectée Si un déclenchement intempestif se produit et si les glaçons semblent de...

Страница 17: ...eau Raccordementàlacanalisationd eau Lire attentivement toutes les instructions avant de commencer IMPORTANT L installation de la plomberie doit être conforme au Code national de plomberie et respecter les codes locaux de plomberie Utiliser un tuyau en cuivre et vérifier s il y a des fuites Installer les tuyaux en cuivre seulement là où les températures resteront au dessus du point de congélation ...

Страница 18: ...tes Serrer tous les raccords y compris les raccordements de la valve ou les écrous qui coulent Raccordementauconduitd évacuation Vidange par gravité Il faut raccorder le tuyau de vidange de la machine à glaçons à votre drain de vidange conformément aux codes et règlements locaux et provinciaux Si la machine à glaçons est fournie avec un drain de vidange par gravité il faut suivre les instructions ...

Страница 19: ...açons ou déconnecter la source de courant électrique 2 Ôter les vis de la poignée et la poignée sur certains modèles Garder les pièces ensemble et les mettre de côté 3 Tirer l axe de la charnière supérieure 4 Retirer la porte des charnières et revisser l axe supérieur dans la charnière supérieure 5 Inverser les embouts de porte comme suit Ôter les deux vis et embouts supérieur et inférieur Placer ...

Страница 20: ...ent vous inquiéter La plupart de ces nouveaux bruits sont normaux Des surfaces dures comme le plancher les murs et les armoires peuvent faire paraître les bruits plus forts qu en réalité Les descriptions suivantes indiquent les genres de bruits qui peuvent être nouveaux pour vous et leur cause Vous entendrez un bourdonnement lorsque la valve d eau s ouvre pour remplir le réservoir d eau pour chaqu...

Страница 21: ...açons s arrête automatiquement dès que le bac est plein et elle se remet en marche lorsqu il faut plus de glaçons Le bac à glaçons n est pas réfrigéré et la glace fondra un peu Le degré de fonte dépend de la température de la pièce REMARQUE Selon les variations de températures de la pièce et de l eau la quantité de glace produite et entreposée variera Ceci signifie que les températures de fonction...

Страница 22: ...2 Attendre de 5 à 10 minutes que la glace tombe dans le bac d entreposage Retirer toute la glace du bac d entreposage 3 Dévisser le capuchon de vidange du bas du bac à eau situé à l intérieur du bac d entreposage tel qu illustré Laisser l eau se vidanger complètement 4 Réinstaller le capuchon de vidange solidement sur le bac à eau Si le capuchon de vidange est desserré l eau s écoulera du bac à ea...

Страница 23: ...e et retirer le couvercle de la grille de coupe 5 Débrancher le faisceau de câblage du côté gauche de la grille de coupe 6 Débrancher le détecteur de niveau de glaçons du côté droit de la grille de coupe Tirer le détecteur de niveau vers le bas et vers l avant pour l éloigner de la grille de coupe 7 Retirer les vis de droite et de gauche Soulever la grille de coupe et la sortir REMARQUE Il faut s ...

Страница 24: ...rant électrique 2 Enlever tous les glaçons du bac d entreposage 3 Interrompre l arrivée d eau 4 Enlever les deux vis du panneau de l ouverture d accès inférieure et les deux vis de la grille de la base support du panneau avant Tirer vers l avant pour enlever le panneau de l ouverture d accès inférieure 5 Déconnecter les canalisations d entrée et sortie sur la vanne à eau Laisser l eau s écouler de...

Страница 25: ...branchée Vérifier que le capuchon de vidange est serré et que la pompe de vidange est correctement fixée au bac à eau Y a t il de la glace entre la plaque de l évaporateur et la grille de coupe Vérifier que la machine à glaçons est d aplomb Voir Nivellement Si la machine à glaçons est d aplomb mais que le problème persiste effectuer un programme de nettoyage Voir Nettoyage Productiondeglaçons La m...

Страница 26: ...tion d eau REMARQUE Les techniciens de service ne peuvent pas réparer les problèmes de plomberie à l extérieur de la machine à glaçons Appeler un plombier agréé et qualifié ASSISTANCE OU SERVICE Avant de téléphoner pour assistance ou service veuillez vérifier la section Dépannage Cette vérification peut vous faire économiser le coût d une visite de réparation Si vous avez encore besoin d aide suiv...

Страница 27: ...é dans un pays autre que le pays où il a été acheté CLAUSE D EXONÉRATION DE RESPONSABILITÉ AU TITRE DES GARANTIES IMPLICITES LIMITATION DES RECOURS LE SEUL ET EXCLUSIF RECOURS DU CLIENT DANS LE CADRE DE LA PRÉSENTE GARANTIE LIMITÉE CONSISTE EN LA RÉPARATION PRÉVUE CI DESSUS LES GARANTIES IMPLICITES Y COMPRIS LES GARANTIES APPLICABLES DE QUALITÉ MARCHANDE ET D APTITUDE À UN USAGE PARTICULIER SONT L...

Страница 28: ...ous droits réservés Registered Trademark TM Trademark of Whirlpool U S A Whirlpool Canada LP Licensee in Canada Marque déposée TM Marque de commerce de Whirlpool U S A emploi sous licence par Whirlpool Canada LP au Canada 1 07 Printed in U S A Imprimé aux É U ...

Отзывы: