background image

8

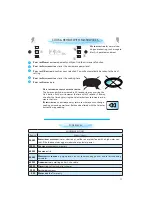
CL

O

CK SETTING

K

EEP


THE


DOOR


OPEN


WHILE


SETTING


THE


C

LOCK

 This 

g

ives you 

5

 minutes to 

complete the settin

g

 of the Clock. 

O

therwise, each step must be accom-

plished within 6

0

 seconds.

W

HEN


THE


APPLIANCE


IS


FIRST


PLUGGED


IN


 it will ask you to set the Clock. 

A

FTER


A


POWER


FAILURE


 the Clock will 

flash and needs to be reset.  

Y

OUR


OVEN


HAS


 a number of functi-

ons which can be adjusted to your 
personal taste. 

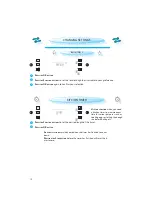
CHANGING SETTINGS

   P

RESS


THE

 M

ANUAL


BUTTON


 until Settin

g

 is shown.

   U

SE


THE

 S

ELECTOR


BUTTONS


 to choose one of the followin

g

 settin

g

s to adjust. 


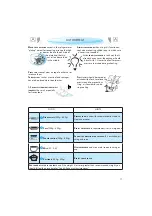
Clock


Sound


EC

O


Bri

g

htness

   P

RESS


THE

 S

TOP


BUTTON


TO


EXIT


 the settin

g

s function and save all your chan

g

es 

when you are done.

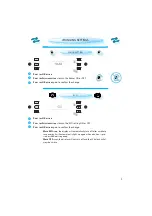
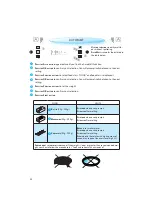
   P

RESS


THE

 OK 

BUTTON


. (The left ri

g

ht hand di

g

its (hours

)

 flicker

)

.

   P

RESS


THE

 S

ELECTOR


BUTTONS


 to set the hours.

   P

RESS


THE

 OK 

BUTTON

 (The two ri

g

ht hand di

g

its (minutes

)

 flicker

)

.

   P

RESS


THE

 S

ELECTOR


BUTTONS


 to set the minutes.

   P

RESS


THE

 OK 

BUTTON


 a

g

ain to confirm the chan

g

e.

T

HE

 C

LOCK


IS


SET


AND


IN


OPERATION

.

I

F


YOU


WISH


TO


REMOVE


THE

 C

LOCK


 from the display once it has been 

set, simply enter the clock settin

g

 mode a

g

ain and press the 

Stop button while the di

g

its flicker.





Содержание AMW 808

Страница 1: ...S RÖVID KEZDÉSI ÚTMUTATÓ INSTALACE NÁVOD VE ZKRATCE INSTALACJA SKRÓCONA INSTRUKCJA OBSŁUGI УСТАНОВКА КРАТКОЕ СПРАВОЧНОЕ РУКОВОДСТВО INŠTALÁCIA ÚVODNÁ PRÍRUČKA INSTALLATION DÉMARRAGE RAPIDE AUFSTELLUNG KURZANLEITUNG INSTALLAZIONE GUIDA RAPIDA INICIO RÁPIDO PARA LA INSTALACIÓN INSTALAÇÃO GUIA DE INICIAÇÃO RÁPIDA INSTALLATION SNABBGUIDE AMW 808 ...

Страница 2: ... instructions DO NOT OPERATE THIS APPLIANCE if it has a damaged mains cord or plug if it is not working properly or if it has been damaged or dropped Do not im merse the mains cord or plug in water Keep the cord away from hot surfaces Electrical shock fire or other hazards may result DO NOT REMOVE THE MICROWAVE INLET PROTECTION PLATES located on the side of the oven cavity wall They prevent grease...

Страница 3: ...hat the child is able to use the appliance in a safe way and understands the hazards of improper use THIS APPLIANCE IS NOT INTENDED FOR use by persons including children with reduced physical sensory or mental capabilities unless used under the supervision of a person responsible for their safety WARNING ACCESSIBLE PARTS MAY BECOME HOT during use young children should be kept away DO NOT USE YOUR ...

Страница 4: ...ent this possibility the fol lowing steps should be taken 1 Avoid using straight sided containers with narrow necks 2 Stir the liquid before placing the container in the oven and let the teaspoon remain in the container 3 After heating allow standing for a short time stirring again before carefully removi ng the container from the oven CAREFUL ALWAYS REFER to a microwave cookbook for de tails Espe...

Страница 5: ...e is able to turn freely before starting the oven CRISP HANDLE USE THE SUPPLIED SPECIAL CRISP HAN DLE to remove the hot Crisp plate from the oven CRISP PLATE PLACE THE FOOD DIRECTLY ON THE CRISP PLATE Always use the Glass turnta ble as support when using the Crisp plate DO NOT PLACE ANY UTENSILS on the Crisp plate since it will quickly become very hot and is likely to cause damage to the utensil T...

Страница 6: ...nds of operation WHEN USING SOME OF THE AUTO FUNCTIONS the oven may stop depending on the chosen program and food class and prompt you to STIR FOOD or TURN FOOD OF THE AUTO FUNCTIONS t th he o o e ven n STIR OR TURN FOOD AUTO FUNCTIONS ONLY THIS IS DONE BY SELECTING A DONENESS LEVEL with the Selector buttons right after you have pressed the Start button NOTE IN AUTO DEFROST MODE THE OVEN CONTINUES...

Страница 7: ...nd the current cavity temperature is displayed Be careful not to touch the cavity inside when re moving food Use oven mittens IF THE TEMPERATURE IS LESS THAN 50 C the 24 hour clock is displayed PRESS THE BACK BUTTON to temporarily view the 24 hour clock when HOT is displayed THE COOLING PROCEDURE can be interrupted without any harm to the oven by opening the door AUTO FUNCTIONS the oven needs FOOD...

Страница 8: ...shown USE THE SELECTOR BUTTONS to choose one of the following settings to adjust Clock Sound ECO Brightness PRESS THE STOP BUTTON TO EXIT the settings function and save all your changes when you are done PRESS THE OK BUTTON The left right hand digits hours flicker PRESS THE SELECTOR BUTTONS to set the hours PRESS THE OK BUTTON The two right hand digits minutes flicker PRESS THE SELECTOR BUTTONS to...

Страница 9: ...ay will automatically turn off after a while to save energy It will automatically light up again when a button is pre ssed or the door is opened WHEN OFF IS SET the display will not turn off and the 24 h clock will al ways be visible CHANGING SETTINGS PRESS THE OK BUTTON PRESS THE SELECTOR BUTTONS to turn the buzzer ON or OFF PRESS THE OK BUTTON again to confirm the change ...

Страница 10: ... set the desired length of the timer PRESS THE OK BUTTON AN ACOUSTIC SIGNAL will be heard when the timer has finished to count down PRESSING THE STOP BUTTON before the timer has finished will reset the ti mer to zero CHANGING SETTINGS BRIGHTNESS PRESS THE OK BUTTON PRESS THE SELECTOR BUTTONS to set the level of brightness suitable to your preference PRESS THE OK BUTTON again to confirm your select...

Страница 11: ...to increase or de crease the time BY PRESSING THE BUTTON you may return to where you can change cooking time and power level Both can be altered with the Selector buttons during cooking USE THIS FUNCTION for normal coo king and reheating such as vegeta bles fish potatoes and meat MICROWAVES ONLY POWER SUGGESTED USE 900 W REHEATING OF BEVERAGES water clear soups coffee tea or other food with a high...

Страница 12: ...zzas and other dough based food It is also good for frying ba con and eggs sausages hambur gers etc THE OVEN AUTOMATICALLY use Microwaves and Grill in order to heat the Crisp plate This way the Crisp plate will rapidly reach its working tem perature and begin to brown and crisp the food ENSURE that the Crisp plate is correctly placed in the middle of the Glass turntable THE OVEN AND THE CRISP PLAT...

Страница 13: ...the wire rack Turn food during cooking ENSURE THAT THE UTENSILS used are heat resistant and ovenproof before gril ling with them DO NOT USE PLASTIC utensils when grilling They will melt Items of wood or paper are not suitable either PREHEAT THE GRILL for 3 5 minutes on High grill power level CHOOSING POWER LEVEL GRILL SUGGESTED USE POWER CHEESE TOAST Fish Steaks Ham burgers HIGH SAUSAGES Grill Spi...

Страница 14: ...e cooking time PRESS THE START BUTTON USE THIS FUNCTION TO cook such food as Gratins Lasagne Poultry and Ba ked potatoes THE MAX POSSIBLE microwave power level when using the Grill Combi is limited to a factory preset level PLACE FOOD on the wire rack or on the glas turntable CHOOSING POWER LEVEL GRILL COMBI SUGGESTED USE GRILL POWER MICROWAVE POWER LASAGNE MID 350 500 W POTATOE GRATIN MID 500 650...

Страница 15: ...ist ties THE SHAPE OF THE PACKAGE alters the de frosting time Shallow packets defrost more quickly than a deep block SEPARATE PIECES as they begin to defrost Individual slices defrost more easily SHIELD AREAS OF FOOD with small pieces of aluminum foil if they start to become warm e g chicken legs and wing tips BOILED FOOD STEWS AND MEAT SAUCES defrost better if stirred during defrosting time WHEN ...

Страница 16: ... select food class FOOD and food class is displayed PRESS THE OK BUTTON to confirm your selection You will automatically be taken to the next setting PRESS THE SELECTOR BUTTONS to set the weight PRESS THE OK BUTTON to confirm your selection PRESS THE START BUTTON USE THIS FUNCTION when reheating ready made food either frozen chilled or room tempered PLACE FOOD onto a microwave safe heat proof dinn...

Страница 17: ... to be placed close to each other PLASTIC FOIL should be scored or pricked with a fork to relieve the pressure and to prevent bur sting as steam builds up du ring cooking 1 2 MINUTES STANDING TIME ALWAYS IMPROVES the result especially for frozen food AUTO REHEAT FOOD HINTS DINNER PLATE 250g 600g PREPARE FOOD in line with recommendations above Heat under cover SOUP 200g 800g REHEAT UNCOVERED in sep...

Страница 18: ...FOOD and food class is displayed PRESS THE OK BUTTON to confirm your selection You will automatically be taken to the next setting PRESS THE SELECTOR BUTTONS to set the weight PRESS THE OK BUTTON to confirm your selection PRESS THE START BUTTON USE THIS FUNCTION for defrosting Meat Poultry Fish Vegetables and Bread Jet Defrost should only be used if the net weight is between 100 g 2 5 kg ALWAYS PL...

Страница 19: ...microwaves and choose 160 W when defrosting JET DEFROST FOOD HINTS MEAT 100g 2 0Kg Minced meat cutlets steaks or roasts TURN FOOD when oven prompts POULTRY 100g 2 5Kg Chicken whole pieces or fillets TURN FOOD when oven prompts FISH 100g 2 0Kg Whole steaks or fillets TURN FOOD when oven prompts VEGETABLES 100g 2 0Kg Mixed vegetables peas broccoli etc TURN FOOD when oven prompts BREAD 100g 1 0Kg Loa...

Страница 20: ...ure AUTO CRISP IS USED ONLY for frozen ready made food FOOD HINTS FRENCH FRIES 200g 600g SPREAD OUT THE FRIES in an even layer on the crispplate Sprinkle with salt if desired STIR FOOD when oven prompts PIZZA thin crust 200g 500g FOR PIZZAS with thin crust PAN PIZZA 300g 800g FOR PIZZAS with thick crust CHICKEN WINGS 200g 600g FOR CHICKEN NUGGETS oil the crispplate and cook with donness set to Lo ...

Страница 21: ...et the weight PRESS THE OK BUTTON to confirm your selection PRESS THE START BUTTON USE THIS FUNCTION TO soften food for easier handling AUTO SOFT IS USED for foods listed in the table below FOOD HINTS BUTTER 50g 100g TURN FOOD when oven prompts STIR also after softening MARGARINE 50g 100g TURN FOOD when oven prompts STIR ALSO after softening ICE CREAM 0 5l 1 0l TURN FOOD when oven prompts SERVE qu...

Страница 22: ... selection PRESS THE START BUTTON USE THIS FUNCTION TO easily melt fo ods without spattering AUTO MELT IS USED for foods listed in the table below FOOD HINTS BUTTER 50g 200g STIR FOOD when oven prompts STIR ALSO after melting MARGARINE 50g 200g STIR FOOD when oven prompts STIR ALSO after melting CHOCOLATE 50g 200g BREAK into smaller pieces STIR FOOD when oven prompts STIR ALSO after melting PLEASE...

Страница 23: ...he door and the door opening DO NOT ALLOW GREASE or food particles to build up around the door DO NOT USE STEAM CLEANING APPLIANCES when cleaning your microwave oven ADDING SOME LEMON JUICE to a cup of water placing this on the turntable and boiling for a few minu tes can eliminate odors inside the oven FOR STUBBORN STAINS boil a cup of water in the oven for 2 or 3 minutes Steam will soften the ma...

Страница 24: ...essary calls for which you will be charged When calling for Service please give the serial number and type number of the oven see Ser vice label Consult your warranty booklet for further advice IF THE MAINS CORD NEEDS REPLAC ING it should be replaced by the original mains cord which is available via our service organization The mains cord may only be replaced by a trained service technician SERVIC...

Страница 25: ...60705 DATA FOR TEST HEATING PERFORMANCE TECHNICAL SPECIFICATION Test Amount Approx time Power level Container 12 3 1 1000 g 12 13 min 650 W Pyrex 3 227 12 3 2 475 g 5 min 650 W Pyrex 3 827 12 3 3 900 g 13 14 min 750 W Pyrex 3 838 13 3 500 g 10 min 160 W SUPPLY VOLTAGE 230 V 50 HZ RATED POWER INPUT 2800 W FUSE 16 A MW OUTPUT POWER 900 W GRILL 1600 W OUTER DIMENSIONS HXWXD 455 X 595 X 560 INNER DIME...

Страница 26: ...26 ...

Страница 27: ...27 ...

Страница 28: ...man health which could otherwise be caused by inappropriate waste han dling of this product THE SYMBOL on the product or on the documents accompanying the product indicates that this applian ce may not be treated as ho usehold waste Instead it shall be handed over to the applica ble collection point for the recy cling of electrical and electro nic equipment DISPOSAL must be carried out in accordan...

Отзывы: