background image

25

How to Purge Air Tubes:

(1). Unscrew and remove caps from 2 and 3-way valves.
(2). Unscrew and remove cap from service valve.
(3). Connect vacuum pump flexible hose to the service valve.
(4). Start vacuum pump for 10-15 minutes until it reaches an absolute vacuum of 10 mm Hg.
(5). With vacuum pump still running close the low pressure knob on vacuum pump manifold. Then stop

vacuum pump.

(6). Open 2-way valve 1/4 turn, then close it after 10 seconds. Check tightness of all joints using liquid

soap or an electronic leak detector.

(7). Turn 2 and 3-way valves stem. Disconnect vacuum pump flexible hose.
(8). Replace and tighten all valve caps.

NOTES:

• Please read this manual carefully before installing and using the appliance.
• Do not let air enter the refrigeration system or discharge refrigerant when moving the air conditioner.
• Earth the air conditioner properly.
• Check the connecting cables and pipes carefully, make sure they are correct and firm before connecting

the power of the air conditioner.

• There must be an air-break switch.
• After installing, the consumer must operate the air conditioner correctly according to this manual, keep

a suitable storage for maintenance and move of the air conditioner in the future.

• Type of fuse used on indoor unit controller is 

Φ

5x20, with rating 2.5A/250V or 3.15A/250V.

• Caution: Mount with the lowest moving parts of indoor unit at Least 2.4m above floor or grade Level.
• Risk of electric shock can cause injury or death: Disconnect all Remote electric power supplies before

servicing.

• When charging refrigerant into the system, make sure to change in liquid state, if refrigerant of the

appliance is R410a. Otherwise, chemical composition of refrigerant (R410a) inside the system may
change and thus affect performance of the air conditioner.

• According to the character of refrigerant (R410a), the pressure of the tube is very high, so be sure to

careful when you install and repair the appliance.

• If the supply cord is damaged, it must be replaced by the manufacturers After-Sales Service

or a qualified technician in order to avoid a hazard.

• The air conditioner must be installed by professional engineer.

Содержание AMD034

Страница 1: ...st be performed by a qualified technician in compliance with the producer s instructions and following local safety norms Do not repair or replace any parts of the appliance unless it is specifically written in the user instructions The grounding of this appliance is compulsory Make sure that the power supply cord is long enough to allow the right connection Do not use any extension cord for power...

Страница 2: ...u will help to prevent potentially negative consequences for the environment and for human health The symbol on the product or on the documents accompanying the product indicates that this appliance should not be treated as household waste but must be given to the appropriate local gathering place where electric and electronic appliances are stored and recycled SAFEGUARDING THE ENVIRONMENT AIR CON...

Страница 3: ...stment Louver 8 Horizontal Adjustment Louver 9 Air Filter 10 Remote Control Outdoor unit 11 Air Intake 12 Pipes and Power Connection Cord 13 Drain Hose Note Condensate water drains at COOLING or DRY operation 14 Air Outlet Images in the user instructions are based on external views of standard models shape and design vary according to the model ON OF F ...

Страница 4: ... lights up during sleep mode Filter monitor indicator 5 It flashes when the filter needs to be cleaned Filter monitor indicator flashes after 240 hours of usage as reminder to clean the filter After filter cleaning press the reset button located on the indoor unit behind the front panel in order to interrupt the flashing of the filter monitor indicator Emergency ON OFF button 6 Used to control the...

Страница 5: ...nsmit signal of the actual room temperature around it to the indoor unit every 10 minutes Therefore please keep the remote controller in a location where it can transmit the signal to the indoor unit properly Press once to set and press again to cancel 10 CLOCK BUTTON Used to set the current time 11 12 TIMER BUTTON Used to set or cancel the timer operation 13 JET BUTTON Used to start or stop the f...

Страница 6: ...es taking more than 3 minutes all presetting will be cancelled and timer will display Zero How to remove the batteries Remove the battery cover in the direction of the arrow Press the positive pole of the battery softly with your fingers then draw the batteries out of the compartment All this should be done by adults children are forbidden to remove the batteries from the remote control in order t...

Страница 7: ...ally FAN button is ineffective in this case 3 Setting temperature Press once to raise temperature setting by 1 raise C Press once to lower temperature setting by 1 lower C Note Heating mode is NOT available for cooling only models 4 Turning on Press button when the appliance receives the signal the RUNNING indicator of the indoor unit lights up During mode changes wait a few seconds and repeat the...

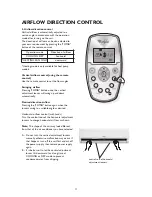
Страница 8: ...essing the SWING button again when the louvers swing to a suitable angle as desired Horizontal airflow control with hands Turn the control rods of the horizontal adjustment louvers to change horizontal air flow as shown Note The shape of the unit may look different from that of the air conditioner you have selected A Do not turn the vertical adjustment louvers manually otherwise malfunction may oc...

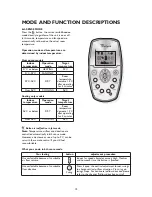
Страница 9: ... Indoor temperature Operation mode Target temperature 21 C or below HEATING 22 C 21 C 23 C FAN ONLY 23 C 26 C DRY Room temperature decrease 1 5 C after operating for 3 minutes Over 26 C COOLING 26 C Indoor temperature Operation mode Target temperature 26 C or below DRY Room temperature decrease 1 5 C after operating for 3 minutes Over 26 C COOLING 26 C ON OFF Your feeling button adjustment procedu...

Страница 10: ...for 3 hours Note In cooling mode if room temperature is 26 C or above set temperature will not change Note Heating is NOT available for cooling only air conditioner JET mode JET mode is used to start or stop fast cooling Fast cooling operates at high fan speed changing the set temperature automatically to 18 C JET mode can be set when the appliance is in operation In JET mode you can set airflow d...

Страница 11: ...se or decrease the time setting by 10 minutes Press the or button for a longer time to increase or decrease the time by 1 hour Note If you don t see the time in 10 seconds after you press TIMER ON button the remote control will exit the TIMER ON mode automatically ii When your desired time displayed on LCD press the TIMER ON button and confirm it A beep can be heard ON stops flashing The TIMER ind...

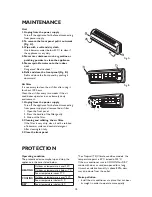
Страница 12: ...y and remove the air filter 1 Open the front panel 2 Press the handle of the filter gently 3 Slide out the filter 2 Cleaning and refitting the air filter If the filter is very dirty clean it with a solution of lukewarm water and neutral detergent After cleaning let it dry 3 Close the front panel Fig A Fig B PROTECTION Operating condition The protective device maybe trip and stop the appliance in t...

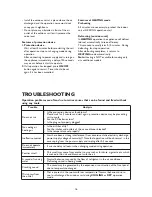
Страница 13: ... Is the protection device or fuse blown Please wait for 3 minutes and start again protection device may be preventing unit to work Are the RC batteries low Is the plug not properly plugged No cooling or heating air Is the air filter dirty Are the intakes and outlets of the air conditioner blocked Is the temperature set properly Ineffective control Has there been a strong interference from excessiv...

Страница 14: ...ccordance with the national wiring standards by authorized service people only Distance from wall should be over 50mm Distance from ceiling should be over 50mm Distance from floor should be over 2000mm Distance from the wall should be over 50mm Air intake distance from the wall should be over 250mm Air intake distance from the wall should be over 250mm Air outlet distance from the wall should be o...

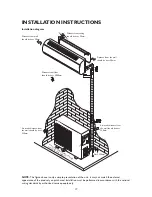
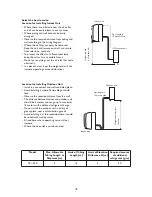
Страница 15: ... Install in a convenient and well ventilated place Avoid installing it where flammable gas could leak Observe the required distance from the wall The distance between Indoor and outdoor unit should be 5 meters and can go up to maximum 15 meters with additional refrigerant charge Do not install the outdoor unit in a dirty or greasy place near a vulcanization gas exit Avoid installing it at the road...

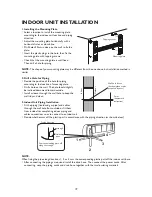
Страница 16: ...ined downward toward outside Install a sleeve through the wall hole to keep the wall tidy and clean 3 Indoor Unit Piping Installation Fit the piping liquid and gas pipe and cables through the wall hole from outside or fit them from inside after completing indoor piping and cables connections so as to connect to outdoor unit Decide whether saw off the plastic part in accordance with the piping dire...

Страница 17: ...ain hose is connected to the drain pipe make sure to be thermally insulated when passing it through the indoor unit When the piping is directed to the right piping power cord and drain pipe should be thermally insulated and fixed at the rear of the unit with a piping fixer A Insert the pipe fixer to the slot B Press to hook the pipe fixer onto the base Thermal insulation Wrapped with vinyl type La...

Страница 18: ...the access door from the unit by loosening the screw Connect the wires to the terminals on the control board individually as follows 2 Secure the power connecting cord on the control board with cable clamp 3 Refit the access door in the original position and tighten the screw 4 Use a recognized circuit breaker for 24K model between the power source and the unit A disconnecting device to adequately...

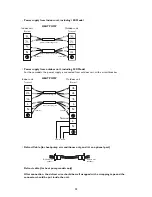
Страница 19: ...ross sectional area Type Normal cross sectional area 7K 9K 12K H05VV F 1 0 1 5mm X3 H07RN F 1 0 1 5mm X3 H05RN F 0 75mm X2 Heat pump To indoor 18K H05VV F RVV 1 5 2 0mm X3 H07RN F 1 5mm X3 H05RN F 0 75mm X2 Heat pump To indoor 24K H07RN F 2 5mm X3 H07RN F 1 5mm X3 Heat pump 1 5mm X4 Cooling only H05RN F 0 75mm X3 Heat pump To outdoor WIRING DIAGRAM Make sure that the colour of wires of the outdoor...

Страница 20: ... should be well wrapped with a wrapping tape and the connector should be put inside the unit Defrost wire indoor Defrost wire outdoor HEAT PUMP power connecting cord 1 power connecting cord Indoor unit Terminal Outdoor unit Terminal Brown Blue Brown Blue Brown Blue Brown Blue Yellow Green Yellow Green N L L 1 L 1 L 3 L 3 L 2 L 2 N N L L HEAT PUMP Power connecting cord 1 Power connecting cord Indoo...

Страница 21: ...e 2 way and 3 way valve Connect the pipes to the 2 way and 3 way valves separately according to the required torque 4 Outdoor Unit Cable Connection see previous page Air purging Air containing moisture remaining in the refrigeration cycle may cause a malfunction on the compressor After connecting the indoor and outdoor units evacuate air and moisture from refrigerant cycle using a vacuum pump as s...

Страница 22: ...f the air conditioner There must be an air break switch After installing the consumer must operate the air conditioner correctly according to this manual keep a suitable storage for maintenance and move of the air conditioner in the future Type of fuse used on indoor unit controller is Φ 5x20 with rating 2 5A 250V or 3 15A 250V Caution Mount with the lowest moving parts of indoor unit at Least 2 4...

Отзывы: