background image

38

HOW TO USE REMOTE CONTROL

Operating Guideline - General Procedures 

1. After the main unit is connected to power, press the ON/OFF 

key on the remote control to start the air conditioner. 
(Note: The guide louver on main unit will be closed 
automatically when the air conditioner is switched off). 

2. Press MODE key to select the desired operating mode. 
3. Press the UP or DOWN key to set the desired temperature. 
4. Press the FAN SPEED key to set the fan speed. AUTO, LOW, 

MEDIUM or HIGH. 

5. Press the SWING key to select the swing mode. 

Operating Guideline - Optional Procedures 

1. Press the SLEEP key to set the sleep mode. 
2. Press TIMER-ON TIMER-OFF, UP and DOWN key to set the 

time for automatic start or stop. 

3. Press the LIGHT key to turn the air conditioner display on or off. 
4. Press the CLOCK key. The CLOCK icon will start to blink and 

you can set the time. 

Description and Function of Remote Control Keys 
Note:
 Be sure to point the remote control towards the signal 
receiver. Check that there is no obstacle between the remote 
control and signal receiver. Do not drop or throw the remote 
control. Do not drop any liquid onto the remote control, or expose 
it to direct sunlight or extremely hot temperatures.

This remote control is for general use and is applicable to multiple 
types (functions) of air conditioner. Please note that if a key is not 
applicable to this air conditioner it will not be described here.

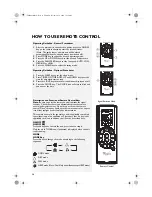
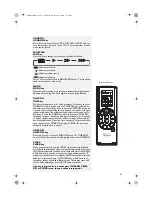
ON/OFF
ON/OFF Key
Press this key once to start the unit, press twice to stop it. 
Only the clock TIMER icon (if activated) is displayed when the unit 
is not running.

MODE
MODE Key
Press this key to change the mode according to the following 
sequence: 

COOL mode 

DRY mode 

FAN mode 

HEAT mode (Note: Cool-Only unit will not accept HEAT mode) 

Signal Emission Head

Remote Control

1

2

3

4

5

2

3
4

1

32602005GB.fm  Page 38  Thursday, December 14, 2006  11:24 AM

Содержание AMC 990

Страница 1: ...6 EC on Waste Electrical and Electronic Equipment WEEE By ensuring this product is disposed of correctly you will help prevent potential negative consequences for the environment and human health which could otherwise be caused by inappropriate waste handling of this product The symbol on the product or on the documents accompanying the product indicates that this appliance may not be treated as h...

Страница 2: ...een indoor and outdoor temperature should be 5 C Appropriate adjustment of the temperature setting serves to reduce consumption When the air conditioner is running do not leave doors and windows open in the room This will prevent loss of effectiveness of the air conditioner Never block the air inlet or outlet of indoor and outdoor unit as this will decrease the effect of the air conditioner or cau...

Страница 3: ...r a long period For 18 23K 230V with a tolerable fluctuation of 23V The compressor is subject to strong vibrations under very low voltages which can damage the refrigerating system Electrical elements are easily damaged by high voltage Ensure that the power supply is suitably protected by a special circuit with air breaker The air conditioner automatically starts or stops according to requirements...

Страница 4: ...2357 2431W Max Power Input 2400 3500 Energy efficiency ratio 3 06 3 67A 3 06 3 21A Energy Class B A B C Air circulation volume m3 h 840 930 Refrigerant and weight R410A 1 7Kg R410A 2 35Kg Noise Indoor Outdoor dB A 44 55 46 55 Climate type T1 T1 Moisture Protection Class IPX4 IPX4 Anti electric shock protection 1 I Weight kg Indoor unit Outdoor unit 13 45 13 75 Dimensions cm WxHxD Indoor unit 1020x...

Страница 5: ...extremely low Defrost The outdoor unit heat exchanger may frost when the outdoor temperature is low humidity is high and the air conditioner has been running for some time resulting in inefficient heating In this case the appliance automatically defrosts and heating is suspended for 6 8 10 minutes Both the indoor fan and outdoor fan are brought to a standstill during auto defrost An indicator ligh...

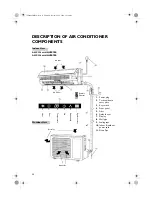
Страница 6: ...l 5 Filter 6 Guide louver 7 Display 8 Wall pipe 9 Sealing tape 10 Indoor outdoor power cord 11 Drain Pipe Signal receiver Dehumidify On Temperature Cool Heat Air outlet Air inlet Remote Control Air outlet Air inlet AMC 996 with INVERTER AMC 998 with INVERTER Indoor Unit 32602005GB fm Page 34 Thursday December 14 2006 11 24 AM ...

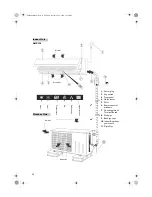
Страница 7: ...t panel 3 Filter 4 Guide louver 5 Receiving windows 6 LED Board 7 Wall pipe 8 Wrapping Tape 9 Indoor outdoor cable 10 Drainage Pipe Air outlet Air inlet Remote Control Air outlet Air inlet AMC 994 Signal receiver Dehumidify On Temperature Cool Heat 32602005GB fm Page 35 Thursday December 14 2006 11 24 AM ...

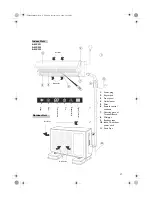
Страница 8: ...lug 2 Key switch 3 Front panel 4 Guide louver 5 Filter 6 Remote control windows 7 Covering plate of Terminal Board 8 Wall pipe 9 Bondage tape 10 Indoor outdoor power cord 11 Drain Pipe Air outlet Air inlet Air outlet Air inlet AMC 990 32602005GB fm Page 36 Thursday December 14 2006 11 24 AM ...

Страница 9: ... control windows 7 Covering plate of Terminal Board 8 Wall pipe 9 Bondage tape 10 Indoor outdoor power cord 11 Drain Pipe Air outlet Air inlet Air outlet Air inlet AMC 991 AMC 992 AMC 993 10 11 Signal receiver Dehumidify On Temperature Cool Heat 32602005GB fm Page 37 Thursday December 14 2006 11 24 AM ...

Страница 10: ...nk and you can set the time Description and Function of Remote Control Keys Note Be sure to point the remote control towards the signal receiver Check that there is no obstacle between the remote control and signal receiver Do not drop or throw the remote control Do not drop any liquid onto the remote control or expose it to direct sunlight or extremely hot temperatures This remote control is for ...

Страница 11: ...IMER ON setting by 1 minute If you keep holding this key down for 2 seconds or longer the decimal point of the minute setting will decrease by one every half second Once the time is properly set press this key again to confirm the TIMER ON setting If TIMER ON is already activated press this key to cancel TIMER OFF TIMER OFF key Press this key once to enter TIMER OFF setup The TIMER OFF icon will b...

Страница 12: ...and the SLEEP icon will appear Pressing again disables the SLEEP function On changing mode or starting stopping the unit the SLEEP function will be cancelled automatically The set temperature will rise max 1 C if the appliance operates in cooling mode for two hours then it will remain constant if room temperature is 26 C or above set temperature will not change The set temperature will rise max 3 ...

Страница 13: ...ontrol does not work normally take the batteries out and reinstall after 30 seconds If it still does not work install new batteries To operate the main unit by remote control point the remote control at the receiving device on the main unit to ensure receiving sensibility To send a message from remote control the symbol will flash for 1 second On receipt of the message the main unit will emit a be...

Страница 14: ...el Place the rotary holder on two ends of the front panel in the holding groove Cover the front panel and clamp it securely as shown by the arrow See Fig 1 a b Clean filter Approx every 3 months Note Clean the air filter more frequently if the air conditioner is used in a dusty environment To avoid injury do not touch the fins of indoor unit with your fingers after removing the filter 1 Removing t...

Страница 15: ...cement 4 Check the mounting frame of the outdoor unit for damage If damaged contact a Whirlpool Authorized Service Center Maintenance after Seasonal Use 1 Disconnect from the power supply 2 Clean the air filter 3 Clean any dust and foreign particles on outdoor unit 4 If the outdoor unit is rusted paint on the rusty spots to prevent expansion 32602005GB fm Page 43 Thursday December 14 2006 11 24 AM...

Страница 16: ...ear a slight crack when the air conditioner is started or stopped This is the sound of friction caused by expansion of the front panel or other parts due to the change of temperature Air conditioner does not run Is there a power failure Is the power plug loose in the socket Has the circuit protection device been tripped Is the voltage too high or too low see page 46 have it tested by a professiona...

Страница 17: ...minutes During defrost water or steam may flow from the outdoor unit In dehumidify mode the fan on the indoor unit may stop to prevent evaporation of condensing water and rise of temperature Moisture on outlet grill If the air conditioner is left running in high humidity moisture may condense on the grill and accumulate there In case of the following events please contact the Whirlpool Authorized ...

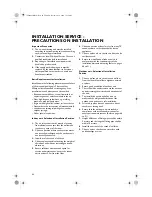
Страница 18: ...or unit can be easily connected 3 Install out of the reach of children 4 Choose a place capable of bearing the weight of the indoor unit without increasing noise and vibrations 5 Ensure sufficient clearance and space for service and maintenance ensure the indoor unit is at least 2 3m from the floor 6 Choose a position at least 1 meter from any TV sound system or other household electric appliances...

Страница 19: ... the AMC 994 AMC 992 will be connected only to a supply with the relevant system impedance no more than Zmax 0 301ohm Grounding Requirement 1 As the air conditioning unit is a Class 1 electrical appliance reliable grounding measures must be taken 2 The yellow and green cable inside the air conditioner is for grounding and must not be used for other purposes or cut Do not tighten with tapping screw...

Страница 20: ... the wall Over 50cm From obstacles From the Wall Over 300cm Air intake side Air intake side Air intake side Over 30cm Over 30cm Over 200cm Above the floor Over 50cm From the wall Over 230cm AMC 990 AMC 991 AMC 992 AMC 993 AMC 994 AMC 996 AMC 998 32602005GB fm Page 48 Thursday December 14 2006 11 24 AM ...

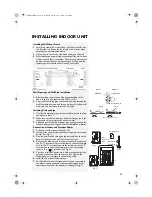
Страница 21: ...Indoor and Outdoor Cables 1 Pull open the front panel See page 42 2 Unscrew the screw fastening the covering plate on terminal board See Fig 1 3 Pass the power cable through a separate cable duct on the back of indoor unit and pull it out from the front 4 Connect the blue wire on the power connection cables to the N 1 terminal of the terminal board connect the black wire to the 2 terminal connect ...

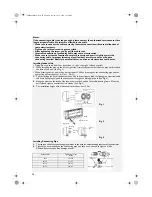
Страница 22: ...ut extra parts 1 2 or 1 2 3 2 Pull the fitting pipe out of the bottom case Use adhesive tape to bind the fitting pipe electrical cable and drain hose properly and then pass them through the fitting pipe hole See Fig 2 3 Hang the claws on the back of the indoor unit to the hook on the wall mounting frame Move the unit left and right to control that it is steady See Fig 3 4 The installation height o...

Страница 23: ...parts When fastening the cable leave some slack for the cable between the connection point and the fixing point Cable Clamp Power Connection Cable Yellow Green Brown Black Blue Handle Handle Cable Clamp Black Blue Yellow Green Power Connection Cable Power Connection Cable Power Connection Cable Blue Blue Black Black Yellow Green Yellow Green Brown Connection block for outdoor Unit Connection block...

Страница 24: ...use soapy water or a leak detector to check for gas leakage at the outdoor and indoor units and pipeline connections 9 If conditions permit use a vacuum pump to pump air in the unit from the valve core Draining of Condensate Water of Outdoor Unit When the air conditioning unit is in the heating mode the condensate water generated at the outdoor unit and the water generated by defrosting drains thr...

Страница 25: ...he unit may break down or components may burn out Has the unit been safely grounded Risk of electrical leakage Are the models of lines in conformity with requirements The unit may break down or components may burn out Are there any obstacles near the air inlet and outlet of the indoor and outdoor units May cause unsatisfactory cooling heating effect Have the length of refrigerating pipe and refrig...

Страница 26: ...are identified by the colour insert or the colour embossed in words on the base of the plug Replacement fuse covers are available from your local electrical store 2 For the Republic of Ireland only The information given in respect of Great Britain will frequently apply but a third type of plug and socket is also used the 2 pin side earth type 3 Socket outlet plug valid for both countries If the fi...

Отзывы: