background image

5019 318 33001

AKR 938

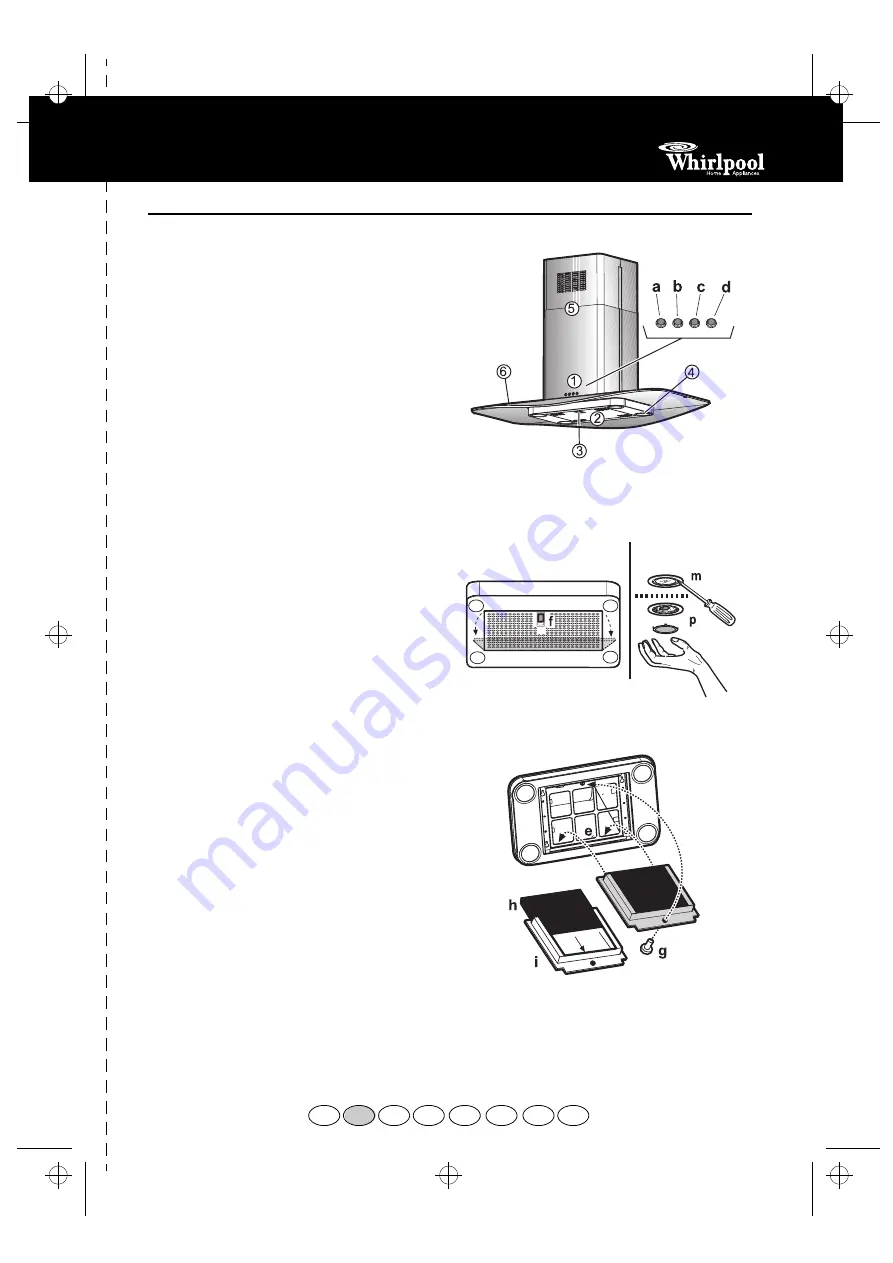
1.

Control panel

a.

Light ON/OFF switch.

b.

Extraction and minimum extraction speed 
ON/OFF switch.

c.

Medium extraction speed switch.

d.

Maximum extraction speed switch.

2.

Grease filter.

3.

Grease filter handle.

4.

Halogen bulbs.

5.

Telescopic flue.

6.

Steam deflector screen.

To clean the grease filter

Wash the grease filter at least once a month.

1.

Disconnect the electrical power supply.

2.

Remove the grease filters - 

Fig. 1

: pull the spring 

release handle (

f

) downwards, then remove the 

filter.

3.

After cleaning the grease filter refit in reverse 
order, making sure the entire extraction surface is 
covered.

Replacing bulbs

1.

Disconnect the electrical power supply.

2.

Use a small screwdriver or any other suitable tool 
to prise off (

m - Fig. 2

) the lamp cover (

p - Fig. 2

).

3.

Replace the burnt-out bulb.
Use 20 W max halogen bulbs only, taking care not 
to touch them with hands.

4.

Close the lighting unit (snap-close).

Carbon filter Fitting and Maintenance

Fitting the carbon filter:
1.

Disconnect the electrical power supply.

2.

Remove the grease filter (

f - Fig. 1

).

3.

Remove the screw and then the filter holder 
(

g - Fig. 3

). 

4.

Fit the carbon filter (

h - Fig. 3

) in the filter holder 

(

i - Fig. 3

).

5.

Refit the filter holder and secure it to the hood 
with the screw (

g - Fig. 3

).

6.

Refit the grease filter.

Carbon filter maintenance:

Unlike traditional carbon filters, this carbon filter can 
be washed and reactivated.
With normal hood use, the filter should be cleaned 
once a month. The best way to clean the filter is in a 
dishwasher at the highest temperature possible, using 
a normal dishwasher detergent. To avoid particles of 
food or dirt settling on the filter during washing and 
giving rise to unpleasant smells, it is advisable to wash 
the filter on its own. After washing, dry the filter in the 
oven at 100° C for 10 minutes  to reactivate it.
The filter will retain its odour-absorbing capacity for 
three years, after which it must be replaced.

FIG. 1

FIG. 2

FIG. 3

F

NL

E

P

D

GR

I

GB

PRODUCT SHEET

31833001.fm5  Page 9  Wednesday, March 28, 2001  4:28 PM

Содержание AKR 938

Страница 1: ...3 mm easily accessible FICHE D INSTALLATION Distance minimale par rapport à la cuisinière 60 cm cuisinière électrique 75 cm cuisinière à gaz mazout ou charbon Pour le montage suivez la numérotation 1Ö2Ö3Ö et les instructions correspondantes Ne branchez pas l appareil tant que l installation n est pas terminée Si l appareil est muni d une fiche branchez la dans une prise conforme aux normes en vigu...

Страница 2: ...ma tomada conforme as normas em vigor e coloque a numa zona acessível Se o exaustor não estiver equipado com uma ficha ligação directa com a rede eléctrica aplique um interruptor bipolar segundo as normas com uma distância dos contactos à abertura não inferior a 3 mm acessível SCHEDA INSTALLAZIONE Distanza minima dai fuochi 60 cm fuochi elettrici 75 cm fuochi a gas gasolio o carbone Per il montagg...

Страница 3: ... AKR 938 5019 318 33001 31833001 fm5 Page 3 Wednesday March 28 2001 4 28 PM ...

Страница 4: ... 5019 318 33001 AKR 938 31833001 fm5 Page 4 Wednesday March 28 2001 4 28 PM ...

Страница 5: ... 5019 318 33001 AKR 938 vordere Hälfte front section partie avant voorste gedeelte sección anterior secção anterior sezione anteriore 1 31833001 fm5 Page 5 Wednesday March 28 2001 4 28 PM ...

Страница 6: ...o hook the hood onto the truss partially tighten 4 screws see illustrations 10 and 12 11 Secure the hood to the truss using two screws this will also help centre the two sections 12 Tighten the 4 screws securing the truss to the hood 13 For extractor versions 13A connect the other end of the exhaust pipe to the flue For filter versions 13F fit deflector F to the truss and secure it to the bracket ...

Страница 7: ...lose Carbon filter Fitting and Maintenance Fitting the carbon filter 1 Disconnect the electrical power supply 2 Remove the grease filter f Fig 1 3 Remove the screw and then the filter holder g Fig 3 4 Fit the carbon filter h Fig 3 in the filter holder i Fig 3 5 Refit the filter holder and secure it to the hood with the screw g Fig 3 6 Refit the grease filter Carbon filter maintenance Unlike tradit...

Отзывы: