background image

11

Control Lock

The Control Lock shuts down the control panel pads (buttons) to 
prevent unintended use of the oven(s).

When the control is locked, only the CLOCK, TIMER SET and 
TIMER OFF pads (buttons) will function.

The Control Lock is preset unlocked, but can be locked.

To Lock/Unlock Control: 

Before locking, make sure the oven, 

Timer and Timed Cooking (COOK TIME on some models) are off. 
Press and hold START for 5 seconds, or until a single tone 
sounds, “LOC” and a picture of a lock appear on the display. 
Repeat to unlock and remove “LOC” from display.

Oven Temperature Control

IMPORTANT:

 Do not use a thermometer to measure oven 

temperature because opening the oven door and element or 
burner cycling may give incorrect readings.

The oven provides accurate temperatures; however, it may cook 
faster or slower than your previous oven, so the temperature 
calibration can be adjusted. It can be changed in Fahrenheit or 
Celsius.

A minus sign means the oven will be cooler by the displayed 
amount. No sign means the oven will be warmer by the displayed 
amount. Use the following chart as a guide.

To Adjust Oven Temperature Calibration:

1.

Press and hold BAKE for 5 seconds until the oven display 
shows the current calibration, for example “0° CAL.”

2.

Press the TEMP “up” or “down” arrow pads (buttons) to 
increase or to decrease the temperature in 10°F (6°C) 
amounts. The adjustment can be set between 30°F (18°C) 
and -30°F (-18°C).

3.

Press START.

To Display Temperatures in °C instead of °F:

Press and hold the BROIL button for 5 seconds. A short tone will 
sound, and the temperature display will switch to °C. Repeat to 
switch back to °F.

OVEN USE

Odors and smoke are normal when the oven is used the first few 
times, or when it is heavily soiled.

IMPORTANT: 

The health of some birds is extremely sensitive to 

the fumes given off. Exposure to the fumes may result in death to 
certain birds. Always move birds to another closed and well 
ventilated room.

Aluminum Foil

IMPORTANT: 

Do not line the oven bottom with any type of foil, 

liners or cookware because permanent damage will occur to the 
oven bottom finish.

Do not cover entire rack with foil because air must be able to 
move freely for best cooking results.

To catch spills, place foil on rack below dish. Make sure foil is 
at least 1 in. (2.5 cm) larger than the dish and that it is turned 
up at the edges.

Positioning Racks and Bakeware

IMPORTANT:

 Never place food or bakeware directly on the oven 

door or bottom. Permanent damage will occur to the porcelain 
finish.

RACKS

NOTES:

Position racks before turning the oven on. 

Do not move racks with bakeware on them. 

Make sure racks are level. 

To move a rack, pull it out to the stop position, raise the front 
edge, then lift out. Use the following illustration and chart as a 
guide.

ADJUSTMENT °F 
(ADJUSTMENT °C)

COOKS FOOD

 5° to 10°F (3° to 6°C)

...a little more

 15° to 20°F (9° to 12°C)

...moderately more

 25° to 35°F (15° to 21°C)

...much more

-5° to -10°F (-3° to -6°C)

...a little less

-15° to -20°F (-9° to -12°C)

...moderately less

-25° to -35°F (-15° to -21°C)

...much less

FOOD

RACK POSITION

Frozen pies, large roasts, turkeys, 
angel food cakes

1 or 2

Bundt cakes, most quick breads, 
yeast breads, casseroles, meats

2

Cookies, biscuits, muffins, cakes, 
nonfrozen pies

2 or 3

1

2

3

4

5

Содержание 9782474A

Страница 1: ...1 for installation and service call 1 800 807 6777 or visit our website at www whirlpool com or www whirlpool com canada CUISINIÈRES ÉLECTRIQUES Guided utilisation etd entretien Au Canada pour assistance composez le 1 800 461 5681 pour installation ou service 1 800 807 6777 ou visitez notre site web à www whirlpool com canada Table of Contents Table des matières 2 9782474A ...

Страница 2: ...TILISATION DE LA TABLE DE CUISSON 27 Commandes de la table de cuisson 27 Éléments 27 Élément de réchauffage 28 Utilisation de la vitrocéramique 28 Lumière fluorescente de la table de cuisson 29 Préparation de conserves à la maison 29 Ustensiles de cuisson 29 COMMANDE ÉLECTRONIQUE DU FOUR 30 Affichage 30 Mise en marche 30 Arrêt 30 Horloge 31 Signaux sonores 31 Minuterie 31 Verrouillage des commande...

Страница 3: ...essages in this manual and on your appliance Always read and obey all safety messages This is the safety alert symbol This symbol alerts you to potential hazards that can kill or hurt you and others All safety messages will follow the safety alert symbol and either the word DANGER or WARNING These words mean Tip Over Hazard A child or adult can tip the range and be killed Connect anti tip bracket ...

Страница 4: ...e the cooktop and surfaces facing the cooktop IMPORTANT SAFETY INSTRUCTIONS Use Proper Pan Size The range is equipped with one or more surface units of different size Select utensils having flat bottoms large enough to cover the surface unit heating element The use of under sized utensils will expose a portion of the heating element to direct contact and may result in ignition of clothing Proper r...

Страница 5: ...f the appliance may become hot enough to cause burns among these surfaces are oven vent openings and surfaces near these openings oven doors and windows of oven doors IMPORTANT SAFETY INSTRUCTIONS SAVE THESE INSTRUCTIONS For self cleaning ranges Do Not Clean Door Gasket The door gasket is essential for a good seal Care should be taken not to rub damage or move the gasket Do Not Use Oven Cleaners N...

Страница 6: ...me models 7 Right rear control knob 8 Right front control knob 12 1 2 4 5 6 8 7 9 10 11 3 1 Surface Cooking Area 2 Anti tip Bracket 3 Warming Zone on some models 4 Model and Serial Number Plate behind left side of storage drawer 5 Removable Storage Drawer 6 Control Panel 7 Hot Surface Indicator Light ceramic glass models only 8 Automatic Oven Light Switch on some models 9 Door Gasket 10 Broil Elem...

Страница 7: ...Single control knob on the left front of the range control panel Push in and turn the control knob to the desired setting in the area marked Dual or Single Bridge Element on some models When using extra large pots or pans you can increase the cooktop s heating area and wattage by turning ON the surface area between the front and rear elements This bridge area works in combination with the right fr...

Страница 8: ...use pitting and permanent marks Do not slide cookware or bakeware across the cooktop Aluminum or copper bottoms and rough finishes on cookware or bakeware could leave scratches or marks on the cooktop Do not cook popcorn in prepackaged aluminum containers on the cooktop They could leave aluminum marks that cannot be removed completely Do not allow objects that could melt such as plastic or aluminu...

Страница 9: ... a flat bottom straight sides a well fitting lid and the material should be of medium to heavy thickness Rough finishes may scratch the cooktop Aluminum and copper may be used as a core or base in cookware However when used as a base it can leave permanent marks on the cooktop or grates Cookware material is a factor in how quickly and evenly heat is transferred which affects cooking results A nons...

Страница 10: ... the time of day 3 Press CLOCK or START Tones Tones are audible signals which indicate that a function has been entered correctly or when a cycle has ended To shut off all tones except the end of timer and error tones 1 Press and hold the STOP TIME button for 5 seconds 2 A short tone will sound when the tones have been changed To turn tones back on repeat step 1 3 Off will be displayed for 3 secon...

Страница 11: ...for 5 seconds A short tone will sound and the temperature display will switch to C Repeat to switch back to F OVEN USE Odors and smoke are normal when the oven is used the first few times or when it is heavily soiled IMPORTANT The health of some birds is extremely sensitive to the fumes given off Exposure to the fumes may result in death to certain birds Always move birds to another closed and wel...

Страница 12: ...F PAN S POSITION ON RACK 1 Center of rack 2 Side by side or slightly staggered 3 or 4 Opposite corners on each rack Make sure that no bakeware piece is directly over another BAKEWARE RESULTS RECOMMENDATIONS Light colored aluminum Light golden crusts Even browning Use temperature and time recommended in recipe Dark aluminum and other bakeware with dark dull and or nonstick finish Brown crisp crusts...

Страница 13: ...n the display 4 Press START The display will count down the time in hours and minutes if the cook time is more than 1 hour and in minutes and seconds if the cook time is less than 1 hour When the stop time is reached the oven will shut off automatically and End will appear on the oven display If on end of cycle tones will sound 5 Press OFF You can do this step at any time to cancel timed cooking T...

Страница 14: ...e sealing in moisture and yielding crustier breads Most foods can be cooked by lowering cooking temperatures 25 F to 50 F 14 C to 28 C and cooking time can be shortened by as much as 30 percent especially for large turkeys and roasts It is important not to cover foods so that surface areas remain exposed to the circulating air allowing browning and crisping Keep heat loss to a minimum by only open...

Страница 15: ... suggested in your recipe To Convection Auto Bake 1 Press CONVECTION AUTO BAKE Set the temperature to the standard non convection cooking temperature for the food being cooked The oven control will automatically adjust the correct convection cooking temperature when cooking starts 2 Press START The oven control will automatically reduce the cooking temperature from the standard cooking temperature...

Страница 16: ...eless rare medium well done Rump Sirloin Tip Roast rare medium well done Meat Loaf 20 25 25 30 30 35 22 25 27 30 32 35 20 25 25 30 30 35 20 25 300 F 149 C 300 F 149 C 300 F 149 C 325 F 163 C 140 F 60 C 160 F 71 C 170 F 77 C 140 F 60 C 160 F 71 C 170 F 77 C 140 F 60 C 160 F 71 C 170 F 77 C 165 F 74 C Veal Rack Position 2 Loin Rib Rump Roast medium well done 25 35 30 40 325 F 163 C 160 F 71 C 170 F ...

Страница 17: ...The oven is preset for a 3 hour 30 minute clean cycle however the time can be changed Suggested clean times are 2 hours 30 minutes for light soil and between 3 hours 30 minutes to 4 hours 30 minutes for average to heavy soil Once the oven has completely cooled remove ash with a damp cloth Do not wipe down any of the inside surfaces until the oven has completely cooled down Applying a cool damp clo...

Страница 18: ...e Cooktop Scraper uses razor blades Store razor blades out of the reach of children Light to moderate soil Paper towels or clean damp sponge Clean while the cooktop is still warm You may want to wear oven mitts while doing so Sugary spills jellies candy syrup Cooktop Scraper Clean while the cooktop is still warm You may want to wear oven mitts while doing so Cooktop Polishing Creme and clean damp ...

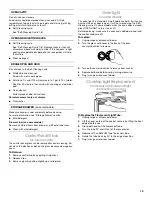
Страница 19: ...e control panel glass can be removed for easier cleaning Do not clean the electronics behind the glass because damage can occur To Remove 1 Remove control knobs by pulling straight out 2 Release clips 3 Remove glass by pulling slightly up and forward OvenLight onsomemodels The oven light is a standard 40 watt appliance bulb It will come on when the oven door is open It will not work during the Sel...

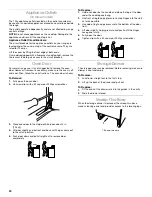
Страница 20: ...nscrew clips with a 2 square or Phillips screwdriver 3 Close oven door to the stop position open about 4 in 10 cm 4 Lift door slightly and pull out and back until hinges come out to the catch position 5 Push door down and pull straight out to remove door completely To Replace 1 Hold oven door by the handle and place the top of the door under the cooktop overhang 2 Use front of leg to apply pressur...

Страница 21: ... models Do the oven indicator lights flash See the Oven Indicator Lights section If the indicator light s keeps flashing call for service See front cover Display shows messages Is the display showing PF There has been a power failure Clear the display See Display s section On some models reset the clock if needed See Clock section Is the display showing a letter followed by a number Depending on y...

Страница 22: ...22 Notes ...

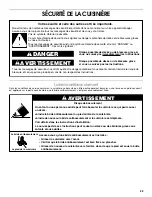
Страница 23: ...de sécurité suivront le symbole d alerte de sécurité et le mot DANGER ou AVERTISSEMENT Ces mots signifient DANGER AVERTISSEMENT Assurez vous de toujours lire tous les messages de sécurité et de vous y conformer à vous et à d autres Voici le symbole d alerte de sécurité vous ne suivez pas immédiatement les instructions blessure et ce Risque de basculement Un enfant ou une personne adulte peut faire...

Страница 24: ... tissu épais IMPORTANTES INSTRUCTIONS DE SÉCURITÉ NE PAS TOUCHER LES ÉLÉMENTS DE SURFACE OU L ESPACE PRÈS DES ÉLÉMENTS Les éléments de surface peuvent être chauds même lorsqu ils ont une teinte foncée Les endroits près des éléments de surface peuvent devenir assez chauds pour causer des brûlures Pendant et après l utilisation ne pas toucher les éléments chauffants et ne pas laisser les vêtements o...

Страница 25: ...CES INTÉRIEURES DU FOUR Les éléments chauffants peuvent être chauds même s ils ont une teinte foncée Les surfaces intérieures d un four deviennent assez chaudes pour causer des brûlures Pendant et après l utilisation ne pas IMPORTANTES INSTRUCTIONS DE SÉCURITÉ toucher ou laisser des vêtements ou autres matériaux inflammables venir en contact avec les éléments chauds ou les surfaces intérieures cha...

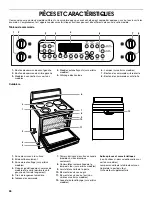
Страница 26: ...nde avant droite 12 1 2 4 5 6 8 7 9 10 11 3 1 Zone de cuisson à la surface 2 Bride antibasculement 3 Zone de rechauffage sur certains modèles 4 Plaque signalétique des numéros de modèle et de série derrière le côté gauche du tiroir de rangement 5 Tiroir de rangement amovible 6 Tableau de commande 7 Témoin lumineux de surface chaude modèles à vitrocéramique seulement 8 Commutateur automatique de la...

Страница 27: ...d aliments qui nécessitent une chaleur très basse comme les sauces le chocolat ou le fromage Élément double sur certains modèles Vous pouvez utiliser l élément double de surface avant gauche de deux façons pour mieux le faire correspondre aux dimensions de vos ustensiles de cuisson Utiliser la surface interne de l élément pour les plus petits ustensiles qui demandent des niveaux moins élevés de pu...

Страница 28: ... chaleur sélectionné Il est normal que la surface de vitrocéramique blanche semble changer de couleur lorsque les zones de cuisson à la surface sont chaudes Lorsque le verre refroidit il reviendra à sa couleur originale Essuyer la table de cuisson avant et après chaque utilisation aidera à la conserver sans taches et fournira un chauffage homogène Voir la section Nettoyage général pour plus de ren...

Страница 29: ... allumer la lumière La lumière peut prendre quelques secondes pour s allumer Préparationdeconservesàlamaison Lors de la préparation de conserves pendant de longues périodes alterner l utilisation des surfaces de cuisson des éléments ou des brûleurs de surface entre les quantités préparées Cette alternance permet aux dernières surfaces utilisées de refroidir Centrer l autoclave sur la grille ou la ...

Страница 30: ...sur le bouton START en deçà de 5 secondes START apparaît à titre de rappel Arrêt Le bouton OFF arrête toutes les fonctions à l exception de l horloge de la minuterie et du verrouillage des commandes Lorsqu on appuie sur le bouton OFF l afficheur indique l heure du jour ou le temps qui reste si la MINUTERIE est utilisée USTENSILE CARACTÉRISTIQUES Aluminium Chauffe rapidement et uniformément Convien...

Страница 31: ...four s éteindra Pour afficher l heure du jour lorsque la minuterie compte à rebours appuyer sur CLOCK horloge Verrouillagedescommandes Le verrouillage des commandes désactive les touches boutons du tableau de commande pour empêcher l utilisation non désirée du des four s Lorsque le tableau de commande est verrouillé seules les touches CLOCK horloge TIMER SET réglage de la minuterie et TIMER OFF ar...

Страница 32: ... chaud doit pouvoir circuler autour de l aliment pour le cuire uniformément de telle sorte qu il faut laisser 2 po 5 cm d espace entre les ustensiles de cuisson et les parois du four Se servir du tableau suivant comme guide Ustensilesdecuisson Le matériau des ustensiles de cuisson affecte les résultats de cuisson Suivre les recommandations du fabricant et utiliser le format d ustensiles recommandé...

Страница 33: ...auffer le four avant d y placer l aliment sauf si la recette le recommande 1 Appuyer sur BAKE cuisson au four Appuyer sur les touches boutons à flèche TEMP haut ou bas pour entrer une température autre que 350 F 175 C Appuyer sur les touches boutons à flèche haut ou bas pour augmenter ou baisser la température en tranches de 5 F 5 C 2 Appuyer sur START mise en marche L afficheur procède à un compt...

Страница 34: ... affichée Appuyer sur les touches boutons TEMP à flèche haut ou bas pour entrer une température autre que 350 F 175 C 2 Appuyer sur COOK TIME durée de cuisson 3 Appuyer sur les touches numériques pour entrer la durée de cuisson Appuyer sur les touches boutons à flèche HR et MIN haut ou bas jusqu à ce que l heure exacte apparaisse sur l afficheur 4 Appuyer sur STOP TIME heure d arrêt 5 Appuyer sur ...

Страница 35: ...convection surcertainsmodèles Dans un four à convection l air chaud que fait circuler le ventilateur distribue continuellement la chaleur plus uniformément que le mouvement naturel de l air dans un four thermique standard Ce déplacement de l air chaud maintient une température uniforme dans tout le four permettant de cuire les aliments plus uniformément en plus de donner des surfaces croustillante...

Страница 36: ...e Lorsque la température réglée est atteinte la température remplace PrE sur l afficheur Lorsque la température réglée est atteinte un signal sonore se fait entendre si activé 4 Appuyer sur OFF arrêt lorsque la cuisson est terminée Autocuissonaufourparconvection surcertainsmodèles L autocuisson au four par convection permet de cuire par convection sans entrer les températures de cuisson par convec...

Страница 37: ...frite parallèle à la porte du four Fermer la porte 1 Sur certains modèles appuyer sur CONVECTION BROIL cuisson au gril par convection Appuyer sur les touches boutons numériques pour entrer une température autre que 500 F 260 C Aliment position de la grille Durée de cuisson en minutes lb 454g Temp du four Temp interne de l aliment Boeuf position de grille 2 Rôti de côte saignant à point bien cuit R...

Страница 38: ...e de cuisson Préparation de la table de cuisson et du tiroir de rangement Enlever les articles de plastique de la table de cuisson car ils peuvent fondre Vider complètement le tiroir de rangement Comment fonctionne le programme IMPORTANT Le chauffage et le refroidissement de la porcelaine sur l acier dans le four peuvent causer une décoloration une perte de fini luisant des fissures minuscules et ...

Страница 39: ...CIER INOXYDABLE sur certains modèles Ne pas utiliser de tampons de récurage savonneux nettoyants abrasifs crème à polir pour table de cuisson tampons en laine d acier chiffons de lavage rudes ou certains essuie tout Des dommages peuvent survenir Frotter dans la direction du grain pour éviter les dommages Nettoyant et poli pour acier inoxydable non compris Voir la section Assistance ou service pour...

Страница 40: ...s et essuie tout ou tampon à récurer en plastique non abrasif Appliquer le nettoyant à vitre sur un chiffon doux ou une éponge et non pas directement sur le tableau CAVITÉ DU FOUR Ne pas utiliser de nettoyants à four Les renversements d aliments devraient être nettoyés lorsque le four se refroidit À des températures élevées les aliments réagissent avec la porcelaine et cette réaction peut causer d...

Страница 41: ...tube de 90 jusqu à sa position originale 7 Brancher la cuisinière ou remettre le courant Prisespourappareilsménagers surcertainsmodèles Les prises de 120V pour appareils ménagers sur la console de commande peuvent être utilisées pour des appareils ménagers portatifs placés sur le comptoir à côté de la cuisinière Les prises fonctionnent indépendamment et ne sont pas affectées par les réglages de la...

Страница 42: ... fonctionne Est ce que le cordon d alimentation est débranché Brancher sur une prise reliée à la terre à trois alvéoles Un fusible est il grillé ou le disjoncteur s est il ouvert Remplacer le fusible ou remettre le disjoncteur en fonction La table de cuisson ne fonctionne pas Le bouton de commande est il réglé correctement Enfoncer le bouton avant de le tourner à un réglage Sur les modèles en vitr...

Страница 43: ...complètement Une fonction a t elle été entrée Voir la section Programme d autonettoyage Sur certains modèles un programme d autonettoyage à mise en marche différée a t il été réglé Voir la section Programme d autonettoyage Une mise en marche différée a t elle été réglée Voir la section Cuisson minutée ou Mise en marche différée selon votre modèle Les résultats de cuisson au four ne sont pas les ré...

Страница 44: ...9782474A 2003 All rights reserved Tous droits réservés 9 03 Printed in U S A Imprimé aux É U ...

Отзывы: