background image

5

It is the customer's responsibility:

To contact a qualified electrical installer.

To assure that the electrical installation is adequate and in 
conformance with National Electrical Code, ANSI/NFPA 70 - 
latest edition, and all local codes and ordinances.

Copies of the standards listed may be obtained from:

National Fire Protection Association
One Batterymarch Park
Quincy, MA 02269

Power Supply Cord

NOTE: Your unit’s device may differ from the ones shown.

This room air conditioner is equipped with a power supply cord 
required by UL. This power supply cord contains state-of-the-art 
electronics that sense leakage current. If the cord is crushed, the 
electronics detect leakage current and power will be 
disconnected in a fraction of a second. 

To test your power supply cord: 

1. Plug the power supply cord into a grounded 3 prong outlet.

2. Press RESET.

3. Press TEST (listen for click; Reset button will trip and pop 

out).

4. Press and release RESET (listen for click; Reset button will 

latch and remain in). The power supply cord 


is ready for 

operation.

NOTES:

The Reset button must be pushed in for proper operation.

The power supply cord must be replaced if it fails to trip when 
the test button is pressed or fails to reset.

Do not use the power supply cord as an off/on switch. The 
power supply cord is designed as a protective device.

A damaged power supply cord must be replaced with a new 
power supply cord obtained from the product manufacturer 
and must not be repaired. 

The power supply cord contains no user serviceable parts. 
Opening the tamper-resistant case voids all warranty and 
performance claims.

INSTALLATION INSTRUCTIONS

Unpack the Air Conditioner

Remove packaging materials

Remove and dispose of/recycle packaging materials.  
Remove tape and glue residue from surfaces before turning 
on the air conditioner. Rub a small amount of liquid dish soap 
over the adhesive with your fingers. Wipe with warm water 
and dry.

Do not use sharp instruments, rubbing alcohol, flammable 
fluids, or abrasive cleaners to remove tape or glue. These 
products can damage the surface of your air conditioner. 

Handle the air conditioner gently.  

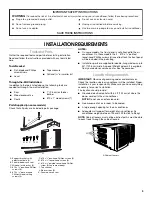
1. Remove the air conditioner from the carton and place it on 

cardboard.

2. On some models, remove the screws from the front panel.

A. Test button
B. Reset button

TEST

TEST

RESET

RESET

B

B

A

A

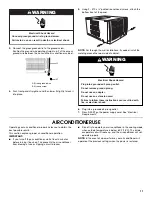
Electrical Shock Hazard

Plug into a grounded 3 prong outlet.

Do not remove ground prong.

Do not use an adapter.

Do not use an extension cord.

Failure to follow these instructions can result in death, 
fire, or electrical shock.

WARNING

WARNING

Excessive Weight Hazard

Use two or more people to move and install 
air conditioner.

Failure to do so can result in back or other injury.

Содержание 66121560

Страница 1: ... accessories or service call 1 800 253 1301 in the U S A ACONDICIONADOR DE AIRE Manualdeusoycuidado Si tiene preguntas respecto a las características funcionamiento rendimiento piezas accesorios o servicio técnico llame al 1 800 253 1301 en los EE UU Table of Contents Índice 2 66121560A ...

Страница 2: ...poner en marcha su acondicionador de aire Control digital 29 Cómo usar el control remoto 30 Cómo poner en marcha su acondicionador de aire Control rotativo Modelos con sólo aire frío 31 Cómo poner en marcha su acondicionador de aire Control rotativo Modelos con aire caliente frío 32 Cómo cambiar la dirección del aire 33 Sonidos normales 33 CUIDADO DE SU ACONDICIONADOR DE AIRE 34 Limpieza del filtr...

Страница 3: ...r cord exits the air conditioner NOTE Do not use an extension cord Free movement of air in room to be cooled A large enough opening for the air conditioner Adequate wall support for weight of air conditioner Air conditioner weighs between 145 and 200 lbs 65 to 96 kg NOTE Cabinet louvers must not be obstructed Air must be able to pass freely through the cabinet louvers IMPORTANT SAFETY INSTRUCTIONS...

Страница 4: ...rd having a grounded 3 prong plug To minimize possible shock hazard the cord must be plugged into a mating grounded 3 prong outlet grounded in accordance with all local codes and ordinances If a mating outlet is not available it is the customer s responsibility to have a properly grounded 3 prong outlet installed by a qualified electrical installer A 30 76 2 cm minimum B 20 50 8 cm minimum A B A 1...

Страница 5: ...ply cord as an off on switch The power supply cord is designed as a protective device A damaged power supply cord must be replaced with a new power supply cord obtained from the product manufacturer and must not be repaired The power supply cord contains no user serviceable parts Opening the tamper resistant case voids all warranty and performance claims INSTALLATION INSTRUCTIONS UnpacktheAirCondi...

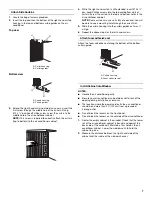
Страница 6: ...al The location where the power cord exits the air conditioner should be no more than 4 ft 122 cm from a grounded 3 prong outlet Do not block the louvers on the front panel Do not block the louvers on the outside of the air conditioner Attach Top Channel NOTE Attach the top channel and the side curtains to the air conditioner cabinet before placing the cabinet in the window 1 Locate the bag of scr...

Страница 7: ... into the curtain guides as far as it will go 6 Repeat the above steps for the left hand curtain Attach foam adhesive seal Attach the foam adhesive seal along the bottom of the bottom curtain guide Install Cabinet into Window NOTES Handle the air conditioner gently Be sure your air conditioner cabinet does not fall out of the opening during installation or removal The location where the power cord...

Страница 8: ...h the hole in the curtain housing and into the lower window sash Front View Top View 2 Insert one of the 10 x round head screws through the hole in the top of the curtain 3 Insert one of the 10 x round head screws through the slotted hole in the bottom of the curtain 4 Repeat for the right hand curtain Attach Support Brackets 1 Attach the support bracket to the cabinet by aligning the holes in the...

Страница 9: ...oner should be no more than 4 ft 122 cm from a grounded 3 prong outlet Do not block the louvers on the front panel Do not block the louvers on the outside of the air conditioner It is the customer s responsibility and obligation to have this product installed by a qualified technician familiar with through the wall room air conditioner installations Option 1 Wood metal or plastic molding When usin...

Страница 10: ...se the insulation to seal opening between the cabinet and the frame 2 Use the existing holes and 6 10 x 1 wood screws not provided to attach the cabinet to the frame NOTE Do not overtighten the screws or the cabinet will distort and provide a poor air seal between the cabinet and the air conditioner 3 Caulk all outside wall openings around the cabinet CompleteInstallation NOTE Handle the air condi...

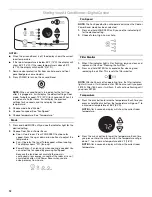
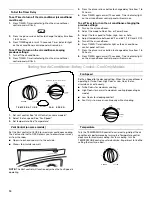
Страница 11: ...on IMPORTANT If you turn off the air conditioner wait at least 3 minutes before turning it back on This prevents the air conditioner from blowing a fuse or tripping a circuit breaker Do not try to operate your air conditioner in the cooling mode when outside temperature is below 65 F 18 C The inside evaporator coil will freeze up and the air conditioner will not operate properly NOTE In the event ...

Страница 12: ...t the fan speed by pressing Fan Speed Because the fan does not circulate the room air continuously less energy is used but the room air is not circulated as often Use Power Saver when you are asleep or away from home Fan Speed NOTE The Fan Speed button will operate only when the Cool or Power Saver mode has been selected 1 Press and hold FAN SPEED until you see the indicator light for the desired ...

Страница 13: ...to 24 hours 8 Press TIMER again or wait 10 seconds Timer indicator light will remain on Display will show current room temperature To clear Timer delay program NOTE Air conditioner can be either on or off Press and hold TIMER for 3 seconds Timer indicator light will turn off To see or change the time remaining in hours 1 Press TIMER once after it has been programmed Display will show remaining tim...

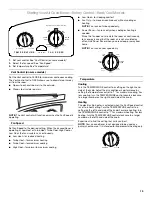
Страница 14: ...t 10 seconds Timer indicator light on the air conditioner control panel will remain on StartingYourAirConditioner Rotary Control CoolOnlyModels 1 Set vent control See Vent Control on some models 2 Select the fan speed See Fan Speed 3 Set temperature See Temperature Vent Control on some models Set the Vent control to CLOSE for maximum continuous cooling The Vent control set to OPEN allows you to dr...

Страница 15: ...m air is not circulated as often Use Power Saver when you are asleep or away from home NOTE Fan runs on Low speed only Temperature Cooling Turn the TEMPERATURE control to a setting on the right hand side of the knob Adjust the air conditioner s performance by setting the Temperature control to 1 for maximum cooling For less cooling turn the TEMPERATURE control counterclockwise to a larger number o...

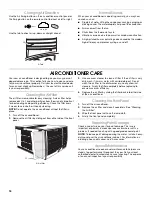
Страница 16: ...ng NOTE Do not operate the air conditioner without the filter in place 1 Turn off the air conditioner 2 Remove the air filter by sliding out from either side of the front panel 3 Use a vacuum cleaner to clean air filter If the air filter is very dirty wash it in warm water with a mild detergent Do not wash the air filter in the dishwasher or use any chemical cleaners Air dry the filter completely ...

Страница 17: ... press and release RESET listen for click Reset button will latch and remain in to resume operation NOTE A damaged power supply cord must be replaced with a new power supply cord obtained from the product manufacturer and must not be repaired Air conditioner seems to run too much The current air conditioner replaced an older model The use of more efficient components may cause the air conditioner ...

Страница 18: ...tter respond to your request Our consultants provide assistance with Features and specifications on our full line of appliances Installation information Use and maintenance procedures Accessory and repair parts sales Specialized customer assistance Spanish speaking hearing impaired limited vision etc Referrals to local dealers service companies and repair parts distributors Our service technicians...

Страница 19: ...your air conditioner order Part Number 4392941 Wide Window Kit A special Wide Window Kit is available for windows 40 101 6 cm to 54 137 2 cm wide Use Kit Number 1162147 SEGURIDAD DEL ACONDICIONADOR DE AIRE Si no sigue las instrucciones de inmediato usted puede morir o sufrir una lesión grave Si no sigue las instrucciones usted puede morir o sufrir una lesión grave Todos los mensajes de seguridad l...

Страница 20: ...iente puesto a tierra a no más de 4 pies 122 cm de donde el cable eléctrico sale del acondicionador de aire NOTA No use un cable eléctrico de extensión Libertad de movimiento del aire en la habitación que desea enfriar Una abertura con la amplitud suficiente para el acondicionador de aire Un soporte adecuado en la pared para el peso del acondicionador de aire El acondicionador de aire pesa entre 1...

Страница 21: ...imo el peligro de posibles choques eléctricos el cable debe ser enchufado en un contacto apropiado de pared de tres terminales conectado a tierra de acuerdo con todos los códigos y reglamentos locales Si no se dispone de un tomacorriente apropiado es responsabilidad del cliente hacer instalar un contacto con tres terminales debidamente puesto a tierra por un instalador eléctrico calificado A 19 50...

Страница 22: ...No use el cable de suministro de energía como un interruptor de encendido y apagado El cable de suministro de energía ha sido diseñado como un dispositivo protector Un cable de suministro de energía dañado debe ser reemplazado por un nuevo cable de suministro de energía obtenido del fabricante del producto y no debe ser reparado El cable de suministro de energíano contiene piezas que pueda arregla...

Страница 23: ...ra durante la instalación o al quitarlo La parte de donde sale el cable eléctrico del acondicionador de aire debe colocarse a no más de 4 pies 122 cm de un tomacorriente de conexión a tierra de 3 terminales No bloquee las rejillas que están en el panel delantero No bloquee las rejillas que están en el exterior del acondicionador de aire Fije el canal superior NOTA Sujete el canal superior y las co...

Страница 24: ...rador de espuma adhesivo Fije el obturador de espuma adhesivo a lo largo de la parte inferior de la ranura inferior de la cortina Instalación del gabinete en la ventana NOTAS Trate el acondicionador de aire con cuidado Asegúrese de que el gabinete del acondicionador de aire no se caiga de la abertura durante la instalación o al quitarlo La parte de donde sale el cable eléctrico del acondicionador ...

Страница 25: ...ravés del orificio en la parte superior de la cortina 3 Inserte uno de los tornillos de cabeza redonda 10 x a través del orificio en la parte inferior de la cortina 4 Repita el procedimiento para la cortina derecha Fije los soportes de apoyo 1 Fije el soporte de apoyo al gabinete alineando los orificios en el soporte con los orificios en el gabinete 2 Con tornillos de cono achatado Philips 10 x fi...

Страница 26: ...xterior del acondicionador de aire Es responsabilidad y obligación del cliente hacer que este producto sea instalado por un técnico calificado familiarizado con instalaciones a través de la pared de acondicionadores de aire de habitaciones Opción 1 Moldura de madera metal o plástico Cuando utilice una moldura de madera metal o plástico el marco de madera debe estar alineado con la pared interior c...

Страница 27: ...es y 6 tornillos para madera 10 x 1 no provistos para fijar el gabinete al marco NOTA No apriete demasiado los tornillos para que el gabinete no se deforme perjudicando el sellado del aire entre el gabinete y el acondicionador de aire 3 Pásele masilla a todas las aberturas exteriores de la pared alrededor del gabinete Completelainstalación RECUERDE Trate el acondicionador de aire con cuidado 1 Ase...

Страница 28: ...MPORTANTE Si usted apaga el acondicionador de aire espere por lo menos 3 minutos antes de volver a ponerlo en marcha Esto evitará que se queme un fusible del hogar o se dispare un disyuntor de circuito a causa del acondicionador de aire No trate de operar su acondicionador de aire en el modo de enfriamiento cuando la temperatura exterior sea menor de 65 F 18 C El serpentín interior del evaporador ...

Страница 29: ...ento Usted puede seleccionar la velocidad de ventilación oprimiendo Fan Speed Velocidad de ventilación Ya que el ventilador no hace circular continuamente el aire de la habitación se consume menos energía pero el aire de la habitación circula con menos frecuencia Utilice el modo de Power Saver cuando esté fuera del hogar o durmiendo Fan Speed Velocidad de ventilación NOTA El botón de velocidad de ...

Страница 30: ...cionador de aire 6 Oprima TIMER La luz indicadora Temporizador destellará La pantalla mostrará las horas restantes antes de que se encienda el acondicionador de aire 7 Oprima el botón de más o menos para cambiar el tiempo de retardo de 1 a 24 horas 8 Oprima TIMER nuevamente o espere 10 segundos La luz indicadora Temporizador permanecerá encendida La pantalla mostrará la temperatura actual de la ha...

Страница 31: ...re permanecerá encendida Para programar el temporizador de manera que el acondicionador de aire se encienda cambiando los ajustes previos 1 Encienda el acondicionador de aire 2 Ajuste el modo a Cool Enfriamiento Fan Ventilación o Power Saver Ahorro de energía 3 Ajuste la velocidad de ventilación a Turbo High Alta Low Baja o Auto Automática 4 Ajuste la temperatura entre 64 F y 86 F 18 C y 30 C 5 Ap...

Страница 32: ...n contraria a las manecillas del reloj Experimente y busque el ajuste que más le convenga Cómoponerenmarchasuacondicionadorde aire Control rotativo Modelos conaire caliente frío 1 Fije el control de respiradero Vea Control del respiradero en algunos modelos 2 Elija la velocidad de ventilación Vea Fan Speed Velocidad de ventilación 3 Fije la temperatura Vea Temperatura Control del respiradero en al...

Страница 33: ...perilla Calentamiento El calentador de tira eléctrica se activa cuando el control de Fan Speed Velocidad de ventilación se coloca en una posición de calor Gire el control de TEMPERATURE Temperatura hacia un ajuste que esté hacia el lado izquierdo de la perilla Para mayor calentamiento gire el control de TEMPERATURE Temperatura hacia 1 para obtener un calentamiento máximo Para un menor calentamient...

Страница 34: ...re es un problema Si es necesario retoque con un esmalte de buena calidad NOTA Para reducir el daño a la pintura durante el invierno instale una cubierta resistente sobre el gabinete del acondicionador de aire Para obtener información sobre cómo pedir una cubierta resistente vea la sección Accesorios Mantenimientoanual Su acondicionador de aire necesita mantenimiento anual para ayudar a asegurar u...

Страница 35: ...se enciende y se apaga demasiado o no enfría calienta la habitación en el modo de enfriamiento calefacción El control de Fan Speed Velocidad de ventilación está puesto en Power Saver Ahorro de energía en algunos modelos Utilice el modo de ahorro de energía únicamente cuando esté fuera de su hogar o durmiendo debido a que el ventilador no hace circular el aire de la sala continuamente Para mayor co...

Страница 36: ...or favor anote la información sobre el número del modelo y el número de serie en el espacio a continuación Anote también la fecha de compra del aparato así como el nombre la dirección y el teléfono de la tienda Número de modelo _____________________________________________ Número de serie ________________________________________________ Fecha de compra _____________________________________________...

Отзывы: