Whirlpool 36'' Freestanding Gas Range Скачать руководство пользователя страница 5

cardboard 
shipping base

5

Now start…

Contact a qualified floor covering installer
for the best procedure for drilling
mounting holes through your type floor
covering.

4.

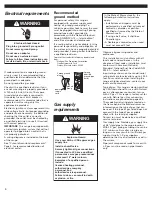
Use the anti-tip bracket

template/instruction sheet to install the
anti-tip bracket. Anti-
tip bracket must be
anchored securely to
the sub floor.

Depending on the
thickness of your
flooring, longer
screws may be
needed to anchor the
bracket to the sub
floor. Longer screws
are available from
your local hardware store.

6.

Remove cardboard shipping

base from under range. Open broiler
door. Use a 3/8" drive ratchet to lower
rear leveling legs one-half turn. Use
slip-joint pliers to lower front leveling
legs one-half turn. 

5.

Check that range is still on

cardboard shipping base to protect floor
covering. Move range close to final
location.

rear
leveling leg

front
leveling leg

Flexible metal appliance connector: If
local codes permit, a new CSA design-
certified, 1/2" or 3/4" I.D., flexible metal
appliance connector is recommended for
connecting range to the gas supply line.
A 1/2" male pipe thread nipple is needed
for connection to pressure regulator
connection fitting. Do not kink or damage
the flexible metal tubing when moving
the range. 

manual shutoff valve

“open” position

gas supply

to range

Shutoff valve: The supply line must be
equipped with a manual shutoff valve.
This valve should be located in the same
room as the range and should be in a
location that allows ease of opening and
closing. The valve is for turning on or
shutting off gas to the range. Do not
block access to shutoff valve.

Pressure regulator: The gas pressure
regulator supplied with this range must
be used. The inlet pressure to the
regulator should be as follows for proper
operation:

NATURAL GAS:

Minimum pressure: 5 inches WCP 
Maximum pressure: 14 inches WCP

L.P. GAS:

Minimum pressure: 11 inches WCP 
Maximum pressure: 14 inches WCP

Contact local gas supplier if you are not
sure about the inlet pressure.

Line pressure testing above 1/2 psi gauge
(14" WCP) — The range and its individual
manual shutoff valve must be
disconnected from the gas supply piping
system during any pressure testing of
that system at test pressures greater than
1/2 psig (3.5 kPa).

Rigid pipe connection: Requires a
combination of pipe fittings to obtain an
in-line connection to the range. All strains
must be removed from the supply and
fuel lines so range will be level and in
line.

Line pressure testing at 1/2 psi gauge 
(14" WCP) or lower — The range must be
isolated from the gas supply piping
system by closing its individual manual
shutoff valve during any pressure testing
of that system at test pressures equal to
or less than 1/2 psig (3.5 kPa).

Copies of the standards listed may be obtained
from:

* CSA International

8501 East Pleasant Valley Road
Cleveland, Ohio 44131-5575

1.

Do not use oven door handle to lift

or move the range. 

2.

Remove oven racks and parts

package from inside oven. Remove
shipping materials, tape and protective
film from range.

3.

Keep cardboard shipping base

under range to prevent damage to floor
covering.

WARNING

Excessive Weight Hazard

Use two or more people to move and
install range.

Failure to do so can result in back or
other injury.

WARNING

Tip Over Hazard

A child or adult can tip the range and
be killed.

Connect anti-tip bracket to rear
range foot.

Reconnect the anti-tip bracket, if the
range is moved.

Failure to follow these instructions can
result in death or serious burns to
children and adults.

Содержание 36'' Freestanding Gas Range

Страница 1: ...MPORTANT Read and save these instructions Part No 98014964 98014964 30 76 2 cm Freestanding Gas Range with standard clean oven Quick Reference Table of Contents Pages 2 3 3 4 4 5 5 7 8 9 10 11 11 Before you start Product dimensions Cutout dimensions requirements Electrical requirements Gas supply requirements Installation steps Gas conversions Moving the range If range does not operate If you need...

Страница 2: ...binet opening dimensions shown must be used Given dimensions are minimum clearances To eliminate the risk of burns or fire by reaching over heated surface units cabinet storage space located above the surface units should be avoided If cabinet storage is to be provided the risk can be reduced by installing a range hood that projects horizontally a minimum of 5 inches beyond the bottom of the cabin...

Страница 3: ... 0 015 0 4 mm stainless steel 0 024 0 6 mm aluminum or 0 020 0 5 mm copper 30 76 2 cm min clearance between the top of the cooking platform and the bottom of an unprotected wood or metal cabinet Check location where range will be installed The range should be located for convenient use in the kitchen Recessed installations must provide complete enclosure of the sides and rear of range All openings...

Страница 4: ...allation must conform with American National Standard National Fuel Gas Code ANSI Z223 1 latest edition Input ratings shown on the model serial rating plate are for elevations up to 2 000 feet For assistance when installing the range at higher elevations contact your local service company Type of gas This range is design certified by CSA International for use with Natural gas or after proper conve...

Страница 5: ...h this range must be used The inlet pressure to the regulator should be as follows for proper operation NATURAL GAS Minimum pressure 5 inches WCP Maximum pressure 14 inches WCP L P GAS Minimum pressure 11 inches WCP Maximum pressure 14 inches WCP Contact local gas supplier if you are not sure about the inlet pressure Line pressure testing above 1 2 psi gauge 14 WCP The range and its individual man...

Страница 6: ...bright orange and ignites the gas No sparking occurs The glow bar remains on while the burner operates 7 Making sure the anti tip bracket is installed Look for the anti tip bracket securely attached to floor Slide range back so rear range foot is under anti tip bracket anti tip bracket range foot 8 If installing the range in a mobile home you must secure the range to the floor Any method of securi...

Страница 7: ...or proper flame The flame should be 1 2 1 3 cm long with inner cone of bluish green and outer mantle of dark blue and should be clean and soft in character No yellow tips not enough air blowing or lifting too much air of flame should occur If oven flame needs adjusting a Turn the oven off Wait for the oven burner to cool down b Open oven door and remove oven racks oven tray flame spreader and set ...

Страница 8: ...in the back right hand corner of the broiler compartment 4 Remove burner grates burner caps burners and screws Lift cooktop NOTE There is no cooktop support rod 5 Cooktop burners a Check that all control knobs are in the OFF position and remove the knobs b Remove the control panel See Step 17a Page 7 c Lift front of bracket and push tube and bracket assembly back off orifice Do not remove the pres...

Страница 9: ... 4 screws Reinstall the control knobs IMPORTANT If not done in Step 8 check the LO flame adjustment See Check operation section Step 19 Page 7 Do not remove the pressure regulator 3 Pressure regulator Remove the cap from the pressure regulator Turn the cap over so that N or NAT is visible Replace the cap burner burner cap screw viewed from inside broiler compartment d Locate Natural gas orifice sp...

Страница 10: ... tip bracket is installed Look for the anti tip bracket securely attached to floor Slide range back so rear range foot is under anti tip bracket anti tip bracket range foot 6 Check that range is level 7 Reconnect gas line to range and check for leaks 8 Plug in range or reconnect power WARNING Tip Over Hazard A child or adult can tip the range and be killed Connect anti tip bracket to rear range fo...

Страница 11: ... of your telephone directory under Appliances Household Major Service and Repair or Call the Customer Interaction Center The toll free number is listed in your Use and Care Guide When you call you will need The range model number The range serial number Both numbers are listed on the model serial rating plate located on the frame behind the broiler door Maintain the quality built into your range b...

Страница 12: ...Part No 98014964 2004 Whirlpool Corporation Benton Harbor Michigan 49022 Printed in Mexico 2 2004 ...

Отзывы: