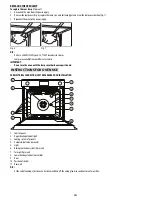
Whirlpool 207 Скачать руководство пользователя страница 9

GB8

Appearance of 

 on the display:

Once the set time has elapsed, an acoustic signal is heard and 

 appears on the display. 

The oven will switch off automatically. 
To change the cooking time, use button 

“-”

 or 

“+”

. Return to point 3 chapter “Selecting the cooking time”.

1.

Turn knob (1) to “0”.

The time of day appears again on the display.
To increase the cooking time, use button 

“-”

 or 

“+”

.

Selecting the end of cooking time

Using this function it is possible to preset the end of cooking time. The maximum programmed cooking time is 23 hours and 59 minutes.
1.

Proceed as described in points 1 and 2 chapter “Selecting the cooking time”

2.

Press “set” to set the end of cooking time: the indicator 

 next to the symbol 

 lights up. 

3.

Set the end of cooking time using button 

“-”

 or 

“+”

.

4.

Press “ok” to confirm the end of cooking time.

The oven will turn on automatically at the end of cooking time minus cooking time: the 

 indicators on the display above the symbols 

 will light up. 

Minute minder

The timer can only be set when the oven is not in use and allows a maximum setting of 6 hours.

To set the minute minder:

1.

Leave knob (1) on 

“0”

. The display shows the time of the day.

2.

Press “set”. The indicator 

 next to the symbol 

 lights up. 

Use buttons

“-”

 or 

“+”

 to set the desired time.

3.

Press “ok” to confirm the selection.

Once the set time has elapsed:

An acoustic signal sounds and 

 flashes on the display.

Press “ok”: the acoustic signal stops. The time of day appears again on the display.

Door lock 

:

1.

With knobs (1) and (5) set to “

0

”, press buttons “ok” and - at the same time for 3 sec. The indicator 

 next to the symbol 

 lights up.

2.

The oven functions will not operate while the door lock is activated.

3.

To deactivate the lock, repeat the sequence described in point 1.

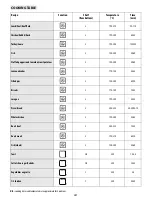
FUNCTION DESCRIPTION TABLE

FUNCTION

DESCRIPTION

OFF

-

LAMP

To switch on the oven light. 

DEFROSTING

Ideal for thawing frozen food at room temperature.

The food should be placed in the oven in its wrapping to avoid it from drying out. 

FORCED AIR

To cook (without preheating) foods that require the same cooking temperature on one or more levels 
(e.g.: fish, vegetables, sweets), without transferring odours from one foodstuff to the other

GRILL

To grill steak, kebabs and sausages, to cook vegetables au gratin and to toast bread.

Preheat the oven for 3 - 5 min.

The oven door must be kept open during the cooking cycle.

When cooking meat, pour a little water into the drip tray (on the bottom level) to reduce smoke and fat 
spatters.

Ideally the meat should be turned during cooking.

Содержание 207

Страница 1: ...User and maintenance manual Apply the label from warranty here ...

Страница 2: ...with it During andafter use donot touch the heatingelements or interiorsurfacesoftheappliance riskofburns Do notallow theappliance to comeinto contact with cloths or other flammable materials until all the components have cooled sufficiently At the end of cooking exercise caution when openingthe appliance door lettingthe hot air or steam exit graduallybefore accessing the oven When the appliance d...

Страница 3: ...o atmospheric agents Disposal of packing material The packingmaterial is 100 recyclable andismarked with the recycle symbol The various parts of thepackingmust therefore be disposed of responsiblyand in full compliance with local authorityregulations governingwaste disposal Scrapping the product This appliance is marked in compliance with European Directive 2002 96 EC Waste Electrical andElectroni...

Страница 4: ...nges or metallic scrapers or scourers Overtime these can ruin enamelled surfaces and the oven door glass After every use allow theoven to cool then clean it preferablywhile it is still warm in order to remove built updirt and stains causedbyfoodresidues e g food with a high sugarcontent Use proprietaryoven detergents and follow themanufacturer s instructions to the letter Clean the door glass with...

Страница 5: ... Lower the two catches 4 Close the door MOVING THE TOP HEATING ELEMENT SOME MODELS ONLY 1 Remove the side accessory holder grilles Fig 3 2 Pull the heating element out a little Fig 4 and lower it Fig 5 3 To reposition the heating element lift it up pulling it slightly towards you be sure it comes to rest on the lateral supports MAINTENANCE WARNING Use protective gloves Ensure the oven is cold befo...

Страница 6: ...vice IMPORTANT Do not use the oven until the lamp cover has been repositioned FOR ELECTRICAL CONNECTION SEE THE PARAGRAPH ON INSTALLATION 1 Control panel 2 Upper heating element grill 3 Cooling system if present 4 Dataplate not to be removed 5 Light 6 Baking ventilation system if present 7 Turnspit if present 8 Lower heating element notvisible 9 Door 10 Position of shelves 11 Rear wall N B At the ...

Страница 7: ...atingthatabsorbs fatspatters Itisadvisableto do anautomatic cleaningcycleaftercookingparticularlyfattyfood see CLEANING Turnspit Fig 5 Use the turnspit as indicatedon Fig 9 Also check Recommendeduse and tips section for advice Grill Pan Set Fig 6 The set comprises a wire shelf 6a and an enamelled recipient 6b This set mustbe placed on the wire shelf 3 and usedwith the Grill function Grease filter ...

Страница 8: ...o cancel any selection turn knob 1 to 0 Alternatively press ok to switch the oven off maintaining the previously selected functions Selecting the cooking time Selectthecookingtime availablewithanyfunction exceptforthespecialfunctions to turntheovenonforaspecifiedperiodoftime Attheendofthespecifiedtime the oven will switch off automatically The maximum programmed cooking time is 6 hours 1 Set the f...

Страница 9: ... The indicator next to the symbol lights up Use buttons or to set the desiredtime 3 Press ok to confirm the selection Once the set time has elapsed An acoustic signal sounds and flashes on the display Press ok the acoustic signal stops The time of dayappears again on the display Door lock 1 With knobs 1 and 5 set to 0 press buttons ok and at the same time for 3sec The indicator next to the symbol ...

Страница 10: ...sh 2 180 200 50 60 Stuffed peppers and tomatoes roast potatoes 2 180 200 50 60 Leavened cakes 2 170 180 45 55 Filled pies 2 180 200 60 90 Biscuits 2 170 180 35 45 Lasagna 2 190 200 45 55 Pizza Bread 2 200 225 40 50 15 18 Whole chicken 2 190 200 55 65 Roast beef 2 200 225 35 45 Roast meats 2 190 210 60 70 Fish whole 2 180 200 50 60 Toast 3 4 250 1 5 2 5 Cutlets Sausages Kebabs 3 4 250 35 45 Vegetab...

Страница 11: ...st fillings cheesecake or fruit pies usethe CONVECTION BAKE function if present If the base of the cake is soggy lower the shelfand sprinkle the bottom of the cake with breadcrumbsorbiscuit crumbs before addingthe filling Meat Use any kind of oven tray or pyrex dish suited to the size of the piece ofmeatbeingcooked For roast joints it isbest to add some stock to the bottom of the pan basting the m...

Страница 12: ...Printed in Italy 10 2009 5019 610 01081 B Whirlpool is a registered trademark of Whirlpool USA GB ...

Отзывы: