background image

2-23

© 1997 Whirlpool Corporation

Cooking Products Service Manual
Original   March, 1997                4322167

     Page 2-23

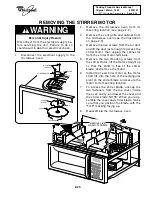
REMOVING THE STIRRER MOTOR

WARNING

Personal Injury Hazard

Disconnect from the electrical supply be-
fore servicing the unit. Failure to do so
could result in death or electrical shock.

2.

Remove the microwave oven from its
mounting location (see page 2-2).

3.

Remove the vent grille and cabinet from
the microwave oven (see the illustration
on page 2-3).

4.

Remove the five screws from the air duct
and lift the duct just enough to access the
stirrer motor, then unplug the connector
from the stirrer motor terminals.

5.

Remove the two mounting screws from
the stirrer motor, lift the motor straight up
so that the shaft is free of the stirrer
blade, and remove the motor.

6.

Install the new stirrer motor so the motor
shaft fits into the hole of the rectangular
pivot on the stirrer blade, and secure the
motor to its mounting location.

7.

To access the stirrer blade, unsnap the
two fasteners from the top cover inside
the oven cavity, and lower the cover and
the stirrer blade. NOTE: When you reas-
semble the cover and stirrer blade, make
sure that you position the blade with the
“TOP” marking facing up.

8.

Reassemble the microwave oven.

REMOVE FIVE

AIR DUCT SCREWS

1.

Disconnect the electrical supply to the
microwave oven.

TOP

STIRRER MOTOR

CONNECTOR

MOUNTING

SCREWS

STIRRER

BLADE

COVER

FASTENERS

TOP

Содержание 1997 "E"

Страница 1: ...March 1997 SERVICE MANUAL for the 1997 E Models OVER THE RANGE MICROWAVE OVEN HOOD COMBINATION Printed in U S A LIT4322167 ...

Страница 2: ...CAL CODES THIS UNIT SHOULD BE INSTALLED IN ACCORDANCE WITH THE NATIONAL ELECTRICAL CODE ANSI NFPA NO 70 1990 OR LATEST EDITION OR C22 1 CANADIAN ELECTRI CAL CODE PART 1 This Microwave Service Manual is for authorized WHIRLPOOLSM service technicians only Because of the high voltage and the critical nature of the door closure system for the microwave oven Whirlpool recommends that customers DO NOT s...

Страница 3: ...2 11 Removing The Convection Thermistor 2 12 Removing The Cavity Thermal Fuse 2 14 The Operating Control System 2 15 Removing The Oven Light Socket 2 15 Removing The Control Circuit Board The Turntable Indicator Circuit Board 2 16 Removing The Fan Motor 2 17 Removing The Power Cord 2 18 Removing The Blower Motor Capacitor 2 19 Removing The Convection Heating Element 2 20 Removing The Gas Sensor 2 ...

Страница 4: ...ement 3 8 Motors 3 9 Programming Checks 3 10 Charts 3 11 Checking The Microwave Power Output 3 14 Checking For Microwave Energy Leakage 3 15 Component Testing 3 18 Control Circuit Board Checklist 3 23 Primary Monitor Secondary Switch Checkout Procedure 3 24 Tech Tips 4 1 Wiring Diagrams 4 1 Strip Circuits 4 3 Specifications 4 6 Model Serial Number Explanation 4 15 Whirlpool Microwave Hood Warranty...

Страница 5: ...ring Elec trical wires may be concealed behind the wall covering Failure to do so could result In fire electri cal shock or other personal injury WARNING National Fire Protection Association Batterymarch Park Quincy Massachusetts 02269 This service manual is intended for factory service technicians only We recommend that customers DO NOT service their own units because of the complexity and risk o...

Страница 6: ...safety interlock switches Do not attempt to defeat them Un der no circumstances should you try to oper ate the oven with the door open PRECAUTIONS TO BE OBSERVED BEFORE AND DUR ING SERVICING TO AVOID POSSIBLE EXPOSURE TO EXCESSIVE MICROWAVE ENERGY 1 Do not operate or allow the oven to be operated with the door open 2 Make the following safety checks on all ovens to be serviced before activating th...

Страница 7: ...lock system IF THE FUSE IS BLOWN THE MONITOR PRIMARY INTERLOCK AND SECONDARY INTERLOCK SWITCHES MUST ALSO BE REPLACED BE SURE THEY ARE PROP ERLY CONNECTED NOTES For proper repair and assembly of the oven door refer to pages 2 4 and 2 5 Interlock switches are not adjustable indi vidually For proper repair and adjustment of the interlock switches refer to page 2 8 WARNING DISCONNECT FROM POWER SUPPL...

Страница 8: ... for Microwave Ovens A properly operating door and seal assembly will normally register small emissions but they must be no greater than 4 mw cm2 to allow for measurement uncertainty NOTE Enter leakage readings in space BE FORE and AFTER on the service document All microwave ovens exceeding the emission level of 4 mw cm2 must be reported to Dept of Service for microwave ovens immediately and the o...

Страница 9: ...the control board and per form the functions shown below Relay 4 controls the speed of the blower motor through the contol panel The base thermal fuse will also turn the blower motor on to its low speed if the temperature reaches 133 F The schematic configuration for relay 4 is shown in the following diagram The relay is explained in further detail on the following page RELAY 4 BASE THERMAL FUSE L...

Страница 10: ...ITOR RD RD C HIGH When the low speed fan is selected by the user at the control panel relay 3 and the normally closed N C contacts of relay 4 complete the circuit to the low speed windings of the blower motor and turn it on N L1 20A LINE FUSE CAVITY THERMAL USE MAGNETRON THERMAL FUSE BK RD BK RELAY 4 W BL PK W LOW VOLTAGE TRANSFORMER BLOWER MOTOR RD RELAY 3 MICROCOMPUTER BOARD 3 1 9 CAPACITOR RD R...

Страница 11: ...Thermal Fuse The Operating Control System Oven Light Socket Control Circuit Board Turntable Indicator Circuit Board Fan Motor Power Cord Blower Motor Capacitor Convection Heating Element Gas Sensor Stirrer Motor Turntable Motor Cooktop Light Socket The High Voltage Components Magnetron Rectifier Capacitor Transformer Refer to the section on the following pages for the component you wish to service...

Страница 12: ...om the tabs then slide the power cord out of the cabinet and remove the cabinet Proceed to the section for the component you wish to service IMPORTANT NOTE Most of the microwave components can be serviced without remov ing the unit or its cabinet They can be ac cessed by removing the vent grille and the control panel Before removing the unit or its cabinet first check the procedure for the com pon...

Страница 13: ...ice Manual Original March 1997 4322167 Page 2 3 POWER CORD POWER CORD COVER BASE PLATE CONNECTORS CABINET TAB SLOTS CABINET SCREW VENT GRILLE SCREWS 2 CABINET SCREWS VENT GRILLE BASE PLATE SCREWS 6 COOKTOP LIGHT ASSEMBLY WIRING SLOTS Removing The Cabinet ...

Страница 14: ...cal shock 2 Remove the two screws from the top of the cabinet for the vent grille and remove the grille see the illustration on page 2 3 3 Open the oven door all the way then lift the door pins out of the hinge holes and remove it 4 Install the new oven door and the vent grille on the microwave oven 1 Disconnect the electrical supply to the microwave oven HINGES PINS LIFT DOOR PINS OUT OF HINGE HO...

Страница 15: ...lustration on the pre vious page 4 To remove the oven door choke use a putty knife along the edges and pry the choke out from around the inside window frame OVEN DOOR PRY OUT CHOKE 5 To replace the latches and door glass assembly remove the two mounting screws from the end of the glass frame then push the top and bottom edges of the door out and unsnap the locking tabs from the frame and remove th...

Страница 16: ...ille and remove the grille see the illustration on page 2 3 3 Remove the screw from the top center tab of the control panel then lift the panel so that the bottom tabs are out of the slots and pull it forward 4 Turn the panel over and disconnect the three harness connectors from the board then set the control panel aside TURN PANEL OVER CONTROL PANEL CONTROL PANEL SCREW BOTTOM TABS BOTTOM SLOTS 1 ...

Страница 17: ... for the vent grille and remove the grille see the illustration on page 2 3 3 Remove the control panel from the micro wave oven see page 2 6 4 From inside the control panel opening unsnap and open the fuseholder halves 5 Remove the line fuse from the fuseholder and pull the wire connectors off the ends 6 Install the new line fuse and reassemble the microwave oven CONTROL PANEL OPENING LINE FUSE FU...

Страница 18: ...the switch from the housing as shown 6 One at a time pull the wire connectors off the defective switch and reconnect them to the same terminals on the replacement switch 7 Snap the new switch into place on the switch housing 8 Mount the interlock switch assembly to the chassis flange with two screws 9 Close the housing cover and secure it with its mounting screw MAKING ADJUSTMENTS 1 Plug in the mi...

Страница 19: ...AND REMOVE SWITCH FROM HOUSING NOTE THESE POSTS HOLD THE SWITCH IN PLACE ON THE HOUSING AND ARE STATIONARY ALL OTHER SWITCHES SECONDARY INTERLOCK SWITCH INSET 1 INSET 2 WHITE H V Transformer SMALL WHITE Monitor Switch LARGE WHITE Power Cord SMALL WHITE Oven Lamp WHITE Turntable Motor RED H V Transformer WHITE Secondary Switch Blue CN2 Pin 3 PINK CN2 Pin 1 SECONDARY INTERLOCK SWITCH INTERLOCK MONIT...

Страница 20: ...the top of the cabinet for the vent grille and remove the grille see the illustration on page 2 3 3 Remove the control panel from the micro wave oven see page 2 6 4 Remove the mounting screws from the base thermal fuse and remove it 5 Unplug the connectors from the terminals of the base thermal fuse 6 Install the new base thermal fuse and reassemble the microwave oven CONTROL PANEL OPENING YELLOW ...

Страница 21: ...cabinet from the microwave oven see the illustration on page 2 3 4 Unplug the line cord connector and re move the line cord 5 Unplug the connector from the terminals of the fan motor 6 Remove the five screws from the air duct 7 Lift the air duct and position it so that you can access the magnetron thermal fuse then remove the mounting screw and unplug the connectors from its terminals 8 Install th...

Страница 22: ...n it so that you can access the pulley cover underneath 5 Remove the screws from the circulation pulley cover and the bracket then re move the cover and the attached brack ets from the top of the oven Do not re move the brackets from the cover 6 Remove the screw from the convection thermistor and remove the thermistor 7 Cut the two white wires not the ther mistor wires coming from the control boar...

Страница 23: ... Page 2 13 REMOVE FIVE AIR DUCT SCREWS PHILLIPS SCREW SENSOR COVER CONVECTION THERMISTOR WHITE WIRES CAUTION WHEN REPLACING THE THERMISTOR DO NOT CUT AND SPLICE THE WHITE WIRES OR AN IMPROPER SIGNAL WILL BE SENT FROM THE THERMISTOR TO THE MICROCOMPUTER BOARD BRACKETS CIRCULATION PULLEY COVER ...

Страница 24: ... and cabinet from the microwave oven see the illustration on page 2 3 4 Remove the five screws from the air duct 5 Unplug the connectors from the terminals of the cavity thermal fuse then lift the left side of the air duct and remove the cavity thermal fuse NOTE There are no mount ing screws holding the cavity thermal fuse in place 6 Install the new cavity thermal fuse in its mounting hole and rea...

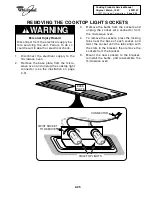
Страница 25: ...3 Remove the vent grille and cabinet from the microwave oven see the illustration on page 2 3 4 Remove the mounting screw from the light cover and remove the cover 5 Remove the bulb from the oven light socket 6 Cut the wires near the old light socket body 7 Push the locking tab and turn the socket and remove it from the bracket 8 Remove 1 2 of insulation from the cut wire ends of the black and whi...

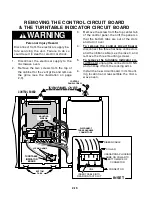
Страница 26: ...ottom tabs are out of the slots and turn it over 4 To remove the control circuit board disconnect the three harness connectors and the ribbon cable see the inset and remove the three mounting screws 5 To remove the turntable indicator cir cuit board unplug the connector at CN5 and unsnap it from the locking arms 6 Install the new circuit board in its mount ing location and reassemble the micro wav...

Страница 27: ... oven 2 Remove the microwave oven from its mounting location see page 2 2 3 Remove the vent grille and cabinet from the microwave oven see the illustration on page 2 3 FAN BLADE PRESS ON WASHER AIR DUCT CONNECTOR FAN MOTOR MOUNTING SCREW 4 Pull the fan blade and press on washer off the fan motor shaft 5 Unplug the connector from the fan motor terminals 6 Remove the two mounting screws from the fan...

Страница 28: ... electrical supply to the microwave oven 2 Remove the microwave oven from its mounting location see page 2 2 3 Remove the vent grille and cabinet from the microwave oven see the illustration on page 2 3 4 Unplug the connector on the old power cord from the air duct connector and in stall the new power cord 5 Reassemble the microwave oven POWER CORD CONNECTOR POWER CORD LOCKING ARM AIR DUCT CONNECT...

Страница 29: ... grille and cabinet from the microwave oven see the illustration on page 2 3 4 Remove the five screws from the air duct 5 Cut the wires near the body of the blower motor capacitor 6 Remove 1 2 of insulation from the cut wire ends of the red harness wires and then splice them to the wires of the new ca pacitor with two wire nuts 7 Install the new blower motor capacitor to the air duct and reassembl...

Страница 30: ...ove the cover and attached brackets from the top of the oven Do not remove the brackets from the cover 6 Remove the screw from the gas sensor and position the sensor out of the way 7 Unhook the drive belt from the circulation fan pulleys and set it aside 8 Remove the phillips screw from the con vection thermistor that is located on the top plate Remove the thermistor and position it out of the way...

Страница 31: ...7 Page 2 21 REMOVE FIVE AIR DUCT SCREWS CONVECTION THERMISTOR TOP PLATE MOUNTING SCREWS BRACKETS CIRCULATION PULLEY COVER TOP PLATE CONVECTION HEATING ELEMENT YELLOW WIRES UNCLIP ELEMENT HERE HEATING ELEMENT HEATING ELEMENT MOUNTING SCREWS VIEWED FROM UNDER TOP PLATE GAS SENSOR SENSOR COVER ...

Страница 32: ...2 2 3 Remove the vent grille and cabinet from the microwave oven see the illustration on page 2 3 4 Remove the five screws from the air duct then lift the duct and postion it so you can access the gas sensor 5 Remove the screw from the gas sensor board and remove it from the sensor cover then unplug the connector from the con trol board 6 Install the new gas sensor board and then reassemble the mi...

Страница 33: ...er motor terminals 5 Remove the two mounting screws from the stirrer motor lift the motor straight up so that the shaft is free of the stirrer blade and remove the motor 6 Install the new stirrer motor so the motor shaft fits into the hole of the rectangular pivot on the stirrer blade and secure the motor to its mounting location 7 To access the stirrer blade unsnap the two fasteners from the top ...

Страница 34: ...ight connector see the illustration on page 2 3 4 Unplug the connector and remove the two mounting screws from the turntable mo tor then remove the motor from the bot tom of the microwave oven 5 Mount the new turntable motor and reas semble the microwave oven 1 Disconnect the electrical supply to the microwave oven 2 From inside the oven cavity lift the turn table rest off the shaft of the turntab...

Страница 35: ...nector from the microwave oven 4 To remove the sockets press the locking tabs near the base of each socket and twist the socket until the tabs align with the slots in the bracket then remove the sockets from the bracket 5 Mount the new sockets to the bracket reinstall the bulbs and reassemble the microwave oven 1 Disconnect the electrical supply to the microwave oven 2 Remove the base plate from t...

Страница 36: ...be fore working inside the oven Failure to do so could result in death or electrical shock The components for service in this section include the Magnetron High Voltage Rectifier High Voltage Capacitor High Voltage Transformer The locations of the high voltage components are shown below All of the high voltage com ponents are accessible through the front con trol panel cutout However the cabinet m...

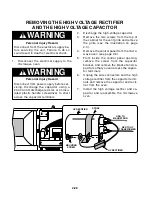
Страница 37: ...stic handle screwdriver to short across the capacitor terminals 2 Discharge the high voltage capacitor 3 Remove the microwave oven from its mounting location then remove the vent grille and the cabinet from the oven see pages 2 2 and 2 3 4 Remove the control panel from the micro wave oven see page 2 6 5 From inside the control panel opening support the magnetron with one hand then remove the four ...

Страница 38: ...ischarge the high voltage capacitor 3 Remove the two screws from the top of the cabinet for the vent grille and remove the grille see the illustration on page 2 3 4 Remove the control panel from the micro wave oven see page 2 6 5 From inside the control panel opening remove the screw from the capacitor bracket and remove the bracket and ca pacitor so that you can access the capaci tor terminals 6 ...

Страница 39: ...ndle screwdriver to short across the capacitor terminals 2 Discharge the high voltage capacitor 3 Remove the two screws from the top of the cabinet for the vent grille and remove the grille see the illustration on page 2 3 4 Remove the control panel from the micro wave oven see page 2 6 5 Disconnect the filament wires from the magnetron then disconnect the three re maining wires from the terminals...

Страница 40: ...2 30 NOTES ...
Страница 41: ...onnel should not attempt service without a thorough review of test procedures and safety information contained in this manual PRECAUTIONS TO BE OBSERVED BEFORE AND DURING SERVICING TO AVOID POSSIBLE EXPOSURE TO EXCESSIVE MICROWAVE ENERGY A Do not operate or allow the oven to be operated with the door open B Make the following safety checks on all ovens to be serviced before activating the magnetro...

Страница 42: ...HE FUSE IS BLOWN THE MONITOR PRIMARY AND SECONDARY INTERLOCK SWITCHES MUST BE REPLACED BE SURE THEY ARE PROPERLY CONNECTED Precautions to Avoid Possible Exposure to Excessive Microwave Energy DO NOT attempt to operate the oven with the door open since open door operation can result in harmful exposure to microwave energy It is important not to defeat or tamper with the safety interlocks DO NOT pla...

Страница 43: ...or VP 533A OF Secondary Interlock Switch SZM V01 FA 32 Interlock Monitor Switch SZM Vl6 FA 62 or VP 532A OF Oven Lamp Switch SZM V6 FA 31 or VP 331A OD It is neither necessary nor advisable to attempt measurement of high voltage Attaching the adaptor ground terminal to the wall receptacle cover screw does not ground the appliance unless the cover screw is metal and not insulated and the wall recep...

Страница 44: ...d cavity thermal fuses are located inside the high voltage section of the oven These two ther mal fuses are normally closed and will open at a set temperature to disable the oven Both of these fuses are resettable Magnetron Thermal Fuse Opens 228 F 109 C Resets 140 F 60 C Cavity Thermal Fuse Opens 230 F 110 C Resets 140 F 60 C Base Thermal Fuse Closes 133 F 56 C Resets 104 F 40 C BASE THERMAL FUSE...

Страница 45: ...r is located below the air duct at the indicated location It is in use any time the blower vent motor is oper ating The capacitor helps to maintain a con stant voltage to the blower motor so that it runs more efficiently TESTING 1 Set the ohmmeter to the R x 10K scale 2 Measure across the capacitor terminals The ohmmeter should indicate several ohms then gradually return to infinity ...

Страница 46: ...ide of the sensor cover The sensor consists of two circuits housed on a small microcomputer board that is supplied with a current to keep it heated The sensor heat conductivity will vary depending upon the humidity of the oven Changing humidity conditions due to the cook ing process within the oven cavity causes a difference in potential between these two cir cuits This difference is monitored by ...

Страница 47: ...ion thermistor is located under the circulation pulley cover and is used during the convection operation of the oven When the temperature increases the resistance of the thermistor decreases The thermistor re sistance is monitored by the microcomputer As the oven temperature rises and falls the TESTING 1 Set the ohmmeter to the R x 10K scale 2 Remove the 6 pin connector from the control circuit bo...

Страница 48: ...he circulation pulley cover and the top plate The heating element heats the air that is distributed into the oven cavity by the convection fan It operates on 120 VAC and is controlled by the convection thermistor TESTING 1 Set the ohmmeter to the R x 1 scale 2 Measure across the heating ele ment terminals You should measure between 40 Ω and 90 Ω 68 F CONVECTION THERMISTOR BRACKETS CIRCULATION PULL...

Страница 49: ...TOR FAN MOTOR TURNTABLE MOTOR MOTORS Blower Motor Removes smoke and odors from the kitchen cooking area through outside venting or recirculation Stirrer and Turntable Motors Distribute microwave energy evenly during microwave cooking Fan Motor Cools the magnetron and circulates air through the oven during microwave cooking ...

Страница 50: ...y connected you will see the following display TOUCH PANEL CONTINUITY TEST 1 Unplug the microwave oven s power sup ply cord 2 Open the oven door 3 Plug the power cord back into the AC receptical You should see the following display if any of the interlock switches are closed f 2 f 1 ...

Страница 51: ...nterlock switches 4 Open wiring between the above components Oven will not go into Cook cycle when the door is closed 1 Check control board 2 Use separate 15 to 20 ampere circuit 1 Control board 2 Low line voltage should be at least 108 volts AC 3 Thermal fuse 4 Thermal fuse on magne tron 5 Circuit is overloaded Oven goes into Cook cycle but does not complete the cycle Heat is produced in the oven...

Страница 52: ...condary inter lock The power source fuse blows when the door starts to open 1 High voltage trans former 2 Secondary circuit of the high voltage transformer is shorted 3 High voltage capacitor is shorted 4 Shorted wiring between the above components 1 Check the high voltage transformer 2 Check the high voltage transformer PROBLEM POSSIBLE CAUSE 3 Check the high voltage capacitor 4 Use an ohmmeter t...

Страница 53: ...oard 1 Use separate 15 to 20 ampere circuit PROBLEM POSSIBLE CAUSE Oven cooks too slowly 1 Line voltage is too low should be between 108 and 132 volts AC 2 User error 1 Use separate 15 to 20 ampere circuit 2 Instruct user regarding proper cooking times 3 Check magnetron 2 Check control board 1 Shorted relay 2 Control board Oven cooks on HIGH when a lower cook power is se lected 1 Check the control...

Страница 54: ...g properly and may need to be checked by a qualified technician CHECKING THE MICROWAVE POWER OUTPUT TEST PROCEDURE OR CORRECTION 1 No power at wall plug Console will not display data or has incorrect data 1 Check fuse or breaker box 2 Replace line fuse 3 Check thermal fuse 4 Check magnetron ther mal fuse 5 Check interlock safety switches Replace if de fective 6 Check control board PROBLEM POSSIBLE...

Страница 55: ...nd seal assembly will normally register small emissions but they must be no greater than 4 mw cm2 to allow for measurement uncertainty NOTE Enter leakage readings in the space BEFORE and AFTER on the service docu ment All microwave ovens exceeding the emission level of 4 mw cm2 must be reported to Dept of Service for microwave ovens immediately and the owner should be told not to use the micro wav...

Страница 56: ... occur To measure for oven leakage 1 Pour 275 25cc of water into a 600 cc graduated beaker 2 Place the beaker into the center of the microwave oven 3 Set the energy leakage monitor to 2 450 MHz and use it according to the manufacturer s recommended test pro cedure to obtain the correct results 4 Measure the microwave radiation with an electromagnetic radiation monitor Hold the probe perpendicular ...

Страница 57: ...mmediately be fore the water is added to the vessel After addition of the water to the vessel the load is immediately placed on the center of the shelf which is in the lowest position and the microwave power switched on The time in seconds for the temperature of the water to rise by a value of 10 C 2 is measured The initial and final water tem peratures are selected so that the maximum difference ...

Страница 58: ...a Filament winding to chassis a Normal readings Less than 1 ohm a Normal infinity High Voltage Transformer with wire leads unplugged a 0 3 to 0 5 ohms b 65 to 120 ohms c 0 2 to 0 4 ohms a Normal infinity b Normal infinity NOTE Replace the magnetron if the checks and all of the high voltage component tests are good but the unit still does not heat a load COMPONENT TESTING FILAMENT WINDING SECONDARY...

Страница 59: ...hmmeter to the R x 10 k scale and measure the resistance across the capacitor terminals a Normal The meter indi cates several ohms then gradually returns to in finity b Abnormal The meter indicates infinity or zero ohms a short immedi ately a Normal The meter indi cates several ohms b Abnormal The meter indicates infinity or zero ohms a short Forward Continuity Set the ohmmeter to the R x 1 scale ...

Страница 60: ...meter to the R x 1 scale and measure the resistance between the normally closed N C and the common C termi nals of the switch b Abnormal The meter indicates infinity a Normal The meter indi cates continuity or zero ohms Fan Motor with leads discon nected Blower Motor with leads dis connected Set the ohmmeter to the R x 1 scale and measure the a High speed windings blue and black wires b Low speed ...

Страница 61: ...minals 5 6 b Abnormal Infinity or zero ohms a short Convection Thermistor Set the ohmmeter to the R x 1 scale and measure across the terminals Convection Heating Element with leads disconnected a Normal 9 to 40 ohms 68 F 2 b Abnormal Infinity or zero ohms a short Set the ohmmeter to the R x 1 scale Remove the 3 pin connector from the circuit board and measure the resistance between a Red white wir...

Страница 62: ...minal num ber in the side bar pin 8 3 Set the ohmmeter to the R x 1 scale a Touch the ohmmeter leads between pins 5 and 8 on the ends of the FPC connector b Press the CLOCK keypad 1 2 3 4 5 6 7 8 9 10 11 12 13 FPC CONNECTOR TOP BEVERAGE DEFROST CLOCK 6 0 7 1 8 2 9 3 4 5 FAN FROZEN ENTREE POPCORN TIMER SET TURNTABLE WARM HOLD BAKED POTATO REHEAT TIMER OFF ADD MINUTE LIGHT COOK POWER COOK TIME COOK ...

Страница 63: ...he power level as shown in the chart in the right col umn and check the relay op eration for the ten power lev els NOTE During the operat ing time set for each level the relay will close short for the time specified in the chart and then open for another speci fied amount of time When the open time elapses the cycle begins again until the cooking time elapses and the oven turns off 0 0 OPEN CLOSED...

Страница 64: ...hes when the microwave oven door is open and closed SWITCH TESTING DOOR OPEN DOOR CLOSED Primary Interlock Disconnect the 3 pin connector CN3 from the control module Check from the pink wire pin 1 to the blue wire pin 3 Secondary Interlock Disconnect the wires at the Secondary Interlock Switch Check from the common terminal white wires to the normally open terminal white wires Monitor Disconnect t...

Страница 65: ... BK BK BK BK LOW HI C Y RD STIRRER MOTOR TURNTABLE MOTOR FAN MOTOR BLOWER VENT MOTOR MONITOR SWITCH SECONDARY INTERLOCK SWITCH W W C NO C NC BL BL 3 2 1 3 2 1 1 2 3 1 2 3 4 5 4 BK HIGH VOLTAGE TRANSFORMER HIGH VOLTAGE CAPACITOR RECTIFIER W W RD RD RD w w w BR BR W RD W RD FA F MAGNETRON PK RD BL BR YL BK BK W 1 3 5 7 9 11 13 15 CONTROL MODULE MICROCOMPUTER BOARD CAVITY THERMAL FUSE 110 C 230 F MAG...

Страница 66: ... SWITCH COOKTOP LIGHTS RD W RD W OVEN LIGHT W BL C NC NO BK BL BR YL YL W W BR BASE THERMAL PROTECTOR W PK RD BL YL BK LOW HI C YL RD BLOWER MOTOR FAN MOTOR TURNTABLE MOTOR BL MONITOR SWITCH SECONDARY INTERLOCK SWITCH BR RD W W C NO C NC BL BL RD RD PK BK HIGH VOLTAGE TRANSFORMER HIGH VOLTAGE CAPACITOR RECTIFIER BL BR PK BL TEMP PROBE RD W RD W RD FA F MAGNETRON PK RD BL BR YL BK W PK BL BR PK BL ...

Страница 67: ...TRANSFORMER MICROCOMPUTER BOARD 1 3 1 UNIT IS PLUGGED IN CLOCK IS WORKING RELAY 1 L1 20A LINE FUSE CAVITY THERMAL FUSE MAGNETRON THERMAL FUSE BK RD BK RD BR RD BK OVEN LIGHT W BL N LOW VOLTAGE TRANSFORMER MICROCOMPUTER BOARD 3 1 5 3 BLOWER MOTOR IS ON LOW N L1 20A LINE FUSE CAVITY THERMAL FUSE MAGNETRON THERMAL FUSE BK RD BK RELAY 4 W BL PK W LOW VOLTAGE TRANSFORMER BLOWER MOTOR RD RELAY 3 MICROCO...

Страница 68: ...E W BL Y Y LOW VOLTAGE TRANSFORMER W BLOWER MOTOR RD MICROCOMPUTER BOARD 3 1 11 CAPACITOR RD C HIGH N L1 20A LINE FUSE CAVITY THERMAL FUSE MAGNETRON THERMAL FUSE BK RD BK RELAY 4 W BL BK LOW VOLTAGE TRANSFORMER BLOWER MOTOR RD MICROCOMPUTER BOARD 3 1 13 CAPACITOR Y RD HIGH C N L1 20A LINE FUSE CAVITY THERMAL FUSE MAGNETRON THERMAL FUSE BK BK BK BK PH1 COOKTOP LIGHTS W W LOW VOLTAGE TRANSFORMER MIC...

Страница 69: ...RMER MICROCOMPUTER BOARD 5 BR RD RD BK W W RELAY 1 RELAY 5 RELAY 2 RD SECONDARY SWITCH 7 3 1 HV SECTION 7 MICROWAVE COOKING IS ON 8 CONVECTION COOKING IS ON N L1 15A LINE FUSE CAVITY THERMAL FUSE MAGNETRON THERMAL FUSE BK BK BK RD RELAY 1 OVEN LIGHT W W LOW VOLTAGE TRANSFORMER PK RELAY 9 YL W MICROCOMPUTER BOARD OVEN LIGHT SWITCH SECONDARY INTERLOCK SWITCH RELAY 7 CIRCULATION MOTOR RD W BK RD BR Y...

Страница 70: ...ave Stirring Stirring fan disk Rectification Rectification voltage doubler half wave Door Sealing Choke System Safety Devices Magnetron Thermal Fuse Opens 228 F 109 C resets 140 F 60 C Cavity Thermal Fuse Opens 230 F 110 C resets 140 F 60 C Base Thermal Fuse Closes 133 F 56 C resets 104 F 40 C Line Fuse 15 ampere Door Interlock Switches Primary Interlock Switch Secondary Interlock Switch Interlock...

Страница 71: ...ee Category Beverage Yes Non Sensored Two Settings Yes Non Sensored Two Settings No Frozen Entree Yes Two Settings Yes Two Settings Yes Sensor Cook Vegetable Yes Non Sensored Three Catagory Yes Non Sensored Three Catagory Yes Sensored Three Catagory Auto Roast No No No Warm Hold 5 Power 99 Min 99 Sec Max 5 Power 99 Min 99 Sec Max 5 Power 99 Min 99 Sec Max Add Minute Yes Yes Yes Probe Temp No No No...

Страница 72: ...ator DEF Annunciator DEFR Annunciator Sensor Cook Indication No No SENSOR Annunciator Convection Cook Indication No No No Convection Preheat Indication No No No Combination Cook Indication No No No Auto Cycle Indication AUTO Annunciator AUTO Annunciator AUTO Annunciator Auto Start Indication No No No User Enter Indication ENTER Annunciator ENTER Annunciator ENTER Annunciator Start Indication Flash...

Страница 73: ... None Cooking Guide Label Yes Yes Yes Door Swing Left Hand Hinge Side Left Hand Hinge Side Left Hand Hinge Side Handle Latch Textured Pull to Open Textured Pull to Open Textured Pull to Open Seals Three Stage Capacitive Reflective Absorbive Three Stage Capacitive Reflective Absorbive Three Stage Capacitive Reflective Absorbive Color White Almond Black MICROWAVE SYSTEM Distribution Top Feed Top Fee...

Страница 74: ...FICATIONS Electrical 120V Single Phase 60 Hz 1500 Watts For Use With 15 or 20 Amp Circuit 120V Single Phase 60 Hz 1500 Watts For Use With 15 or 20 Amp Circuit 120V Single Phase 60 Hz 1500 Watts For Use With 15 or 20 Amp Circuit Domestic Use Only Yes Yes Yes Agency Approvals FCC DHHS U L Listed FCC DHHS U L Listed FCC DHHS U L Listed Approximate Shipping Weight 64 lbs 64 lbs 64 lbs Approximate Net ...

Страница 75: ...gory No No Auto Roast No Yes Non Sensored w Probe 6 Category Yes Non Sensored w Probe 6 Category Warm Hold 5 Power 99 Min 99 Sec Max 5 Power 99 Min 99 Sec Max 5 Power 99 Min 99 Sec Max Add Minute Yes Yes Yes Probe Temp No Yes Yes Personal Choice Yes No No Convection Cooking Cycles Convection Bake No Yes Yes Convection Broil No Yes Yes Combination Cooking Cycles Combination Bake No Yes Yes Combinat...

Страница 76: ... DEFR Annunciator DEFR Annunciator Sensor Cook Indication SENSOR Annunciator SENSOR Annunciator SENSOR Annunciator Convection Cook Indication No CONV Annunciator CONV Annunciator Convection Preheat Indication No PREHEAT Annunciator PREHEAT Annunciator Combination Cook Indication No COMB Annunciator COMB Annunciator Auto Cycle Indication AUTO Annunciator AUTO Annunciator AUTO Annunciator Auto Start...

Страница 77: ... Yes Yes Door Swing Left Hand Hinge Side Left Hand Hinge Side Left Hand Hinge Side Handle Latch Textured Pull to Open Textured Pull to Open Textured Pull to Open Seals Three Stage Capacitive Reflective Absorbive Three Stage Capacitive Reflective Absorbive Three Stage Capacitive Reflective Absorbive Color White Black White MICROWAVE SYSTEM Distribution Top Feed Bottom Feed Using Motor Driven Ant Bo...

Страница 78: ... 20 Amp Circuit 120V Single Phase 60 Hz 1500 Watts For Use With 15 or 20 Amp Circuit 120V Single Phase 60 Hz 1500 Watts For Use With 15 or 20 Amp Circuit Domestic Use Only Yes Yes Yes Agency Approvals FCC DHHS U L Listed FCC DHHS U L Listed FCC DHHS U L Listed Approximate Shipping Weight 64 lbs 79 lbs 79 lbs Approximate Net Weight 58 lbs 69 lbs 69 lbs Carton Dimensions 33 7 16 W x 19 5 16 H x 19 1...

Страница 79: ...CTION G GRILL CRISPER H OTR HOOD COMBO K KITS S STIRRER FAN T TURNTABLE MODEL VARIATIONS 0 9 CUBIC FEET 04 4 CU FT 10 1 0 CU FT 06 6 CU FT 12 1 2 CU FT 07 7 CU FT 13 1 3 CU FT 08 8 CU FT 14 1 4 CU FT 09 9 CU FT 16 1 6 CU FT FEATURE LEVEL 0 30 KIT IF KIT 2 22 KIT IF KIT 4 24 KIT IF KIT 5 SENSORED MODEL 7 27 KIT IF KIT FEATURE CODE C CSA APPROVED X FEATURE NOT DEFINED YEAR OF INTRODUCTION D 1996 E 1...

Страница 80: ...nce with local electrical codes D Any labor costs during the limited warranty E Replacement parts or repair labor costs for units operated outside the United States F Pickup and delivery This product is designed to be repaired in the home G Repairs to parts or systems caused byunauthorizedmodificationsmade to the appliance WHIRLPOOL DOES NOT ASSUME ANY RESPONSIBILITY FOR INCIDENTAL OR CONSEQUENTIA...

Отзывы: