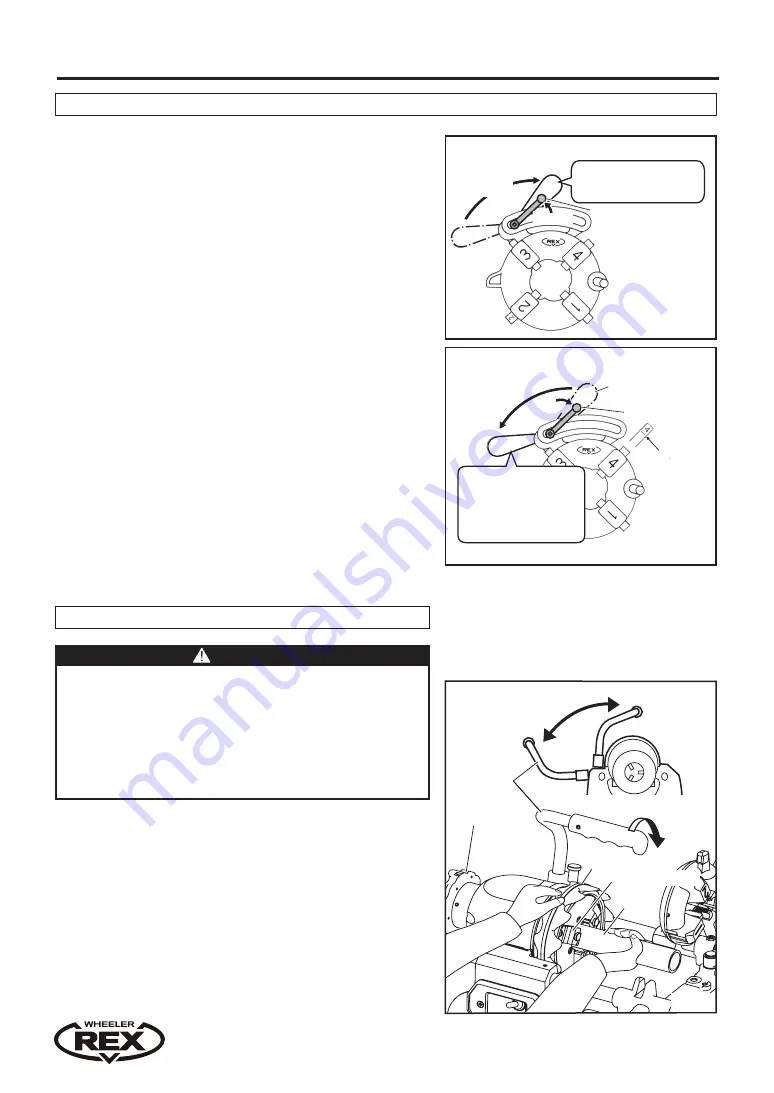
Lever nut
Loosen
Eccentric handle
Position for removing
/ replacing dies
Knock to
the right
Knock to
the right
Pull down
Dies size
- Position when cutting
threads
- Position when matching
the dimensions for
cutting threads.
Lever nut
Eccentric handle
Loosen
9
Fig. 15
GETTING READY / OPERATION GUIDE
Fig. 13
Fig. 14
Removing the dies
Replacing the dies
6. Manual-open die head (There is no need to remove the die head from the machine).
Removing the dies
(1) Knock the eccentric handle to the right, loosen the lever nut and
push the eccentric handle over to the far left. (Fig. 13) In this
position, dies No. 3 and No. 4 can then be removed.
(2) Raise the die head and you can remove dies No. 1 and No. 2.
Replacing the dies
(1) Remove the die head.
(2) Lower the die head and replace dies No.3 and No.4 in the same
way. Insert each die until the notch is engaged. (Fig.14)
(3) Raise the die head and insert replacement dies No.1 and No.2
until the notch is engaged.
* Ensure that the number on the dies corresponds to the number
on the die head; if dies are inserted incorrectly, cutting will be
impaired.
* Dies are made as a matched set of four, so be sure to use them
as such and replace them all at the same time. Do not attempt
to replace just one or two of the set as cutting will be adversely
affected.
(4) Pull the eccentric handle back in the opposite direction, left of
the arrow. The dies will move towards the centre of die head.
* If the eccentric handle does not move into position properly,
move the dies up and down a little while pushing and pulling the
eccentric handle gently and try again.
(5) Adjust according to your desired thread cutting size (see
‘Threading’).
Ensure the handle is lowered when the machine is in use. (Pg. 6, Fig. 2)
7. Setting up the pipe / Removing the pipe
WARNING
- Do not install or remove a pipe when the machine is still switched
on, when operating the machine, or just after you switch it off. If you
do, you may get entangled in moving parts, leading to accident or
injury. Restart work after you make sure the machine has come to
a complete standstill.
- When installing or removing the pipe, remove the plug from the
power outlet or the machine could suddenly start up leading to
injury or accident.
(1) Open the hammer chuck and rear chuck wider than the size of
the pipe to be threaded, inserting the pipe from the rear chuck
side where possible. (Fig. 16) (Note: In the case of short pipes,
insert from the chuck side).
(2) Close the rear chuck and, holding the pipe in your right hand,
close the hammer chuck with your left hand to place a grip
lightly on the pipe and make sure the chuck jaw inserts engage
the pipe properly. Pull the hand-wheel sharply towards you to
lock.
(3) A sharp jerk in the opposite direction will release the pipe
once you have finished threading. Next, remove the pipe after
releasing the rear chuck.
DOWN
Scroll
Hand wheel
Hammer chuck
Pipe
Handle
DOWN
STOP
Содержание 8991
Страница 2: ......
Страница 23: ......
Страница 24: ...Product specifications are subject to change without prior notice 8V370 WH2 8991 1809D0100 Manufacturer ...


