background image

page 2 - 3

Aura8ip / Jan 2012

A u r a 8 i p   G U R U   G U I 

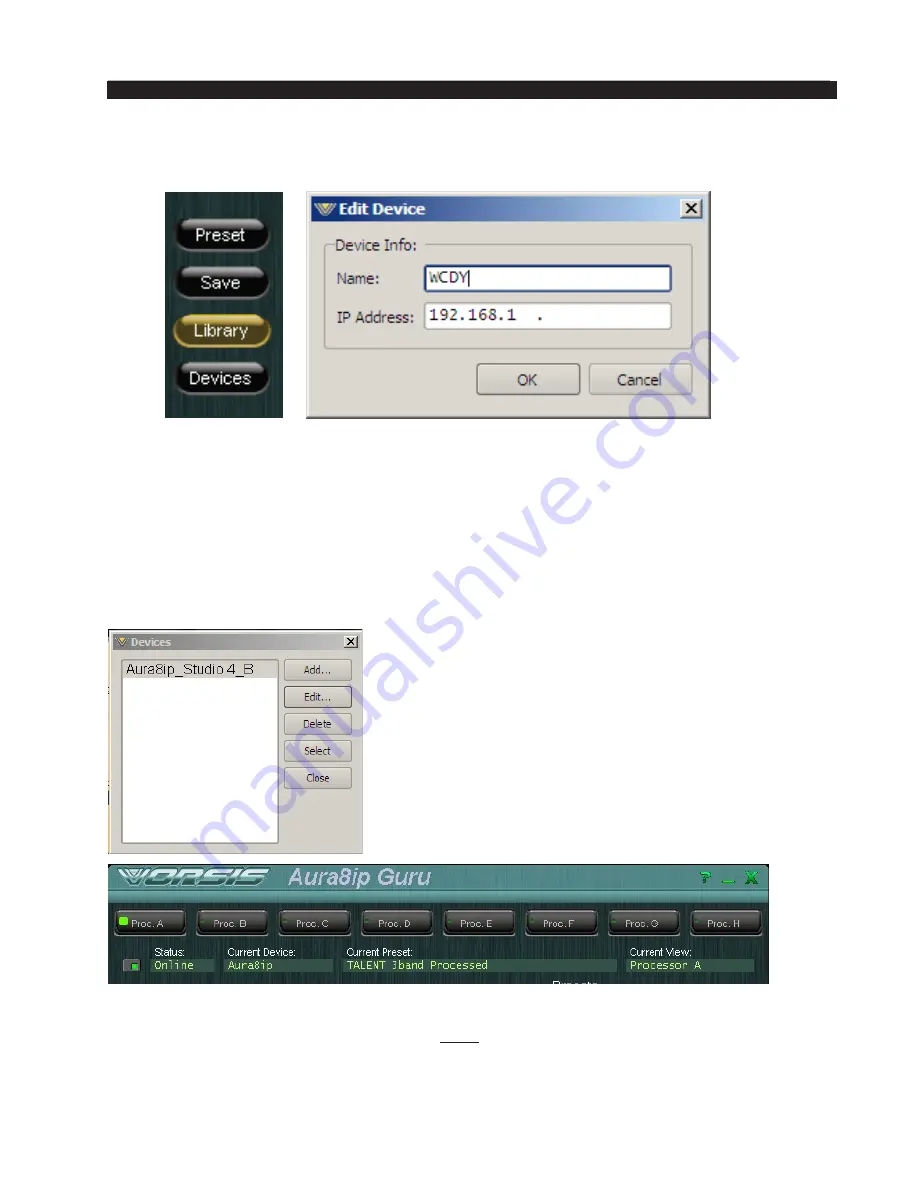
Next, start the Aura8ip GUI software and use the following procedure to configure 

it to be able to connect and control the Aura8ip processor. 

• On the right hand side of the GUI, click on the 

Devices button, then click the 

Add...

 button; the above dialog will open.

• Insert a name for the Aura8ip. This is the name that will be displayed at the 

top of the GUI to inform the user which processor he is currently connected to.

• Next enter the IP address of the Aura8ip, keeping in mind that if the address has 

not been changed from the Factory Default, that IP address is 

192.168.87.101

.

• Click the 

OK button to close the dialog.

• Highlight the newly configured device and click the 

Select button.

If there is a network connection between the 

GUI’s host PC and the Aura8ip processor, and the 

PC is configured to be on the 

same network subnet 

as the processor, the Online button at the top left 

of the GUI may be clicked to connect to the pro-

cessor. When the GUI is online to the processor 

and controlling it, the green indicator inside the 

button will be illuminated and the Status window 

will display “Online.”

IP Address Note: Unless special routing has been configured by the IT depart

-

ment the controlling PC and the Aura8ip must be on the same network subnet. As 

an example, if the Aura8ip has an IP address 192.168.87.1, then the PC’s IP address 

must be configured to be 

between

 the addresses 192.168.87.1 and 192.168.87.254, 

noting that the Aura8ip and the host PC cannot share the same IP address.

Содержание AURA 8IP

Страница 1: ...600 Industrial Drive New Bern N C 28562 tel 252 638 7000 fax 252 637 1285 email wheatstone com Technical Manual Aura8ip Vorsis Embedded Processing Blade ...

Страница 2: ...Technical Manual Wheatstone Corporation January 2012 Aura8ip Vorsis Embedded Processing Blade ...

Страница 3: ...600 Industrial Drive New Bern North Carolina 28562 tel 252 638 7000 fax 252 637 1285 Aura8ip Vorsis Embedded Processing Blade 2012 Wheatstone Corporation ...

Страница 4: ...rd prong are provided for your safety If the provided plug does not fit into your outlet consult an electrician for replacement of the obsolete outlet 10 Protectthepowercordfrombeingwalkedonorpinchedparticularlyatplugs convenience receptacles and the point where they exit from the apparatus 11 Only use attachments accessories specified by the manufacturer 12 Unplug this apparatus during lightning ...

Страница 5: ... pour votre sécurité Si la fiche fournie ne rentre pas dans votre prise consultez un électricien pour le remplacement de la prise obsolète 10 Protéger le cordon d alimentation en évitant qu il ne soit piétiné ou écrasé notamment au niveau des fiches et le point de sortie de l appareil 11 N utiliser que les fixations et accessoires spécifiés par le fabricant 12 Débrancher cet appareil pendant les o...

Страница 6: ...Selecting the Processing Channel 2 4 Adjusting the Controls 2 4 Input Level 2 4 Left Right Channel Balance 2 4 High Pass Filter 2 4 Output Level dBFS 2 5 Taking Presets 2 5 Guru s Six Adjust Sound Controls 2 6 AGC Drive 2 6 Compression 2 6 Punch 2 7 Loudness 2 7 Mid High EQ 2 7 Low Warm EQ 2 7 Why Six Controls and Not One 2 7 How Do the Tweakers Work 2 7 What Causes a Guru Tweaker to Stop Before R...

Страница 7: ...d L R Outputs 3 11 Makeup Gain 3 12 Parametric EQ 3 13 A Word About Our Limiters 3 15 Multiband Limiter 3 15 Threshold 3 16 Limiter Attack 3 16 Limiter Release 3 16 Output Trim 3 17 Multiband Limiter Options 3 17 MB Lim Soft 3 17 Bass Enhance 3 17 Look Ahead Final Peak Limiter 3 17 Final Lim Drive 3 17 Attack 3 17 Release 3 17 Delayed Release Control 3 18 Look Ahead Limiter Special Option Checkbox...

Страница 8: ...evices 3 22 Quick Save 3 23 Title Bar Region 3 24 Status 3 24 Devices 3 24 Presets 3 24 Accessing Menu Option 3 25 File Menu Items 3 25 About 3 25 Choose Skin 3 25 Exit 3 25 Hardware Menu Items 3 25 Devices 3 25 On Line Mode 3 25 Login Password 3 25 Version 3 25 Preset Menu Items 3 25 Take 3 25 Save 3 25 Library 3 25 ...

Страница 9: ...M A T I O N General Information Chapter Contents Introduction 1 2 Preset Transitions 1 3 Aura8ip Audio Processing Overview 1 4 Installing the Aura8ip Blade 1 5 Energizing the Aura8ip Blade 1 5 I O Connections 1 6 Cable Considerations 1 6 Connectors 1 6 ...

Страница 10: ...s built into it The Vorsis processing features of the Aura8ip are unique to this unit and deserve their own documentation which follows here Use this document to learn all about the processing capabilities the Aura8ip has and how to control them with the included GUI application The WheatstoneAura8ip Vorsis Embedded Processing Blade hosts eight discrete multiband audio processors Because Aura8ip m...

Страница 11: ...e eight processing instances shares a library of up to 80 presets stored on the Aura8ip hardware Several dozen Factory presets supplied with the unit provide good starting points that have been tuned for a variety of needs Presets stored on any Aura8ip may be shared with any other Aura8ip on the network Preset Transitions As with all Vorsis audio processors changing from one preset to another does...

Страница 12: ...diagrams show the internal structure of the Aura8ip Process ing Blade The first graphic shows how four of the eight processors are equipped with analog I O and four are equipped with digital I O when run in stand alone mode and all eight are equipped with Wheatnet IPaudio inputs and outputs when run in networked mode ...

Страница 13: ...d be used to mount the unit If only two screws are being used they must be used in the bottom holes in order to provide proper support Though Aura8ip does not add much heat load to the rack that it is installed in good engineering practice suggests that it should never be mounted directly above a large source of heat such as a power supply or RF amplifier Strong electromagnetic fields should also ...

Страница 14: ...l recovery issues on long runs Like in the RF world using the proper impedance cable is critical to obtaining the best and most reliable performance Check with your favorite cable manufacturer to ensure that the cable you have chosen will work for you Connectors All connections other thanAC power are made thru rear panel DB 25 connectors and or RJ 45 connectors The DB 25 crimp style connector pins...

Страница 15: ... 2 4 High Pass Filter 2 4 Output Level dBFS 2 5 Taking Presets 2 5 Guru s Six Adjust Sound Controls 2 6 AGC Drive 2 6 Compression 2 6 Punch 2 7 Loudness 2 7 Mid High EQ 2 7 Low Warm EQ 2 7 Why Six Controls and Not One 2 7 How Do the Tweakers Work 2 7 What Causes a Guru Tweaker to Stop Before Reaching 0 or 10 2 8 Guru GUI Caveats 2 8 Understanding the Differences Between Factory Legacy and Guru Pre...

Страница 16: ...the Guru Software The Guru software is provided on a software CD shipped with the product and once installed grants easy access to Aura8ip s vast sound processing capabilities Installing the software is easily done using the following procedure Insert the Aura8ip software CD into a Windows computer Click the Start button Click the Run option Click the Browse option Browse My Computer to locate the...

Страница 17: ... Highlight the newly configured device and click the Select button If there is a network connection between the GUI s host PC and theAura8ip processor and the PC is configured to be on the same network subnet as the processor the Online button at the top left of the GUI may be clicked to connect to the pro cessor When the GUI is online to the processor and controlling it the green indicator inside...

Страница 18: ...e if a factory preset is in use and the input levels are too low the multiband AGC could stay in its gated mode when it shouldn t reducing the effectiveness of the processing Conversely if input levels are too high distortion can result on audio peaks Input levels are correct when the Input meters are just nudging the 12dBFS Ref mark on the Input meter scale see left Setting up to operate with inp...

Страница 19: ... maximum peak indications just in case Taking Presets Aura8ip is equipped with over two dozen Factory Presets and we recommend listening to each preset with typical programming to find the one that best meets your needs Select the preset closest to the desired sound texture and use the six processing tweakers of the Guru GUI to dial it in if necessary WhentheGUI sPresetbuttonispressedadialog will ...

Страница 20: ...te for customers to download and presets can easily be installed into any Aura8ip via the GUI s built in Preset Management feature Guru s Six Adjust Sound Controls The six controls in the Guru GUI make adjusting the sound of process ing far easier than using the more than 90 controls assigned to Aura8ip s pro cessing The Guru GUI has six tweak ers four slider controls for adjusting processing text...

Страница 21: ...ed to be a simplified user interface After selecting a Factory preset the user would turn the less more control up or down to change density and loudness Customers told us that one knob didn t allow them the kind of control they really wanted They told us didn t want to need to know processing s technical terms but they did want more than one knob maybe a couple of knobs that could turn after taki...

Страница 22: ...ber also that each Var has its own pre determined minimum and maximum limits Imagine now that the Guru tweaker is being moved up towards 10 and all eight Var sliders are following along It should be obvious that Var 7 is going to reach its upper limit long before the other Vars and it might also reach its limit before the Guru tweaker does What happens As soon as one of the eight Vars reaches its ...

Страница 23: ...t simply recall the preset again using the Guru GUI and the error should disappear Additional Notes on Aura8ip and Network to GUI Connectivity Aura8ip utilizes both TCP IP and UDP to communicate with the remote GUI TCP IP utilizes Port 55901 and the first available UDP port in the range of 60001 to 60010 during communications sessions TCP IP The TCP protocol is used for controlling the Aura8ip and...

Страница 24: ... 9 Threshold 3 9 AGC Attack Release 3 9 Compressor Attack Release 3 10 Compressor Ratio 3 10 Gate Offset 3 11 Processing Band L R and L R Outputs 3 11 Makeup Gain 3 12 Parametric EQ 3 13 A Word About Our Limiters 3 15 Multiband Limiter 3 15 Threshold 3 16 Limiter Attack 3 16 Limiter Release 3 16 Output Trim 3 17 Multiband Limiter Options 3 17 MB Lim Soft 3 17 Bass Enhance 3 17 Look Ahead Final Pea...

Страница 25: ...duction 3 19 Output Metering 3 20 Sidebar Region 3 20 Preset 3 20 Locking Presets 3 21 Library 3 22 Devices 3 22 Quick Save 3 23 Title Bar Region 3 24 Status 3 24 Devices 3 24 Presets 3 24 Accessing Menu Option 3 25 File Menu Items 3 25 About 3 25 Choose Skin 3 25 Exit 3 25 Hardware Menu Items 3 25 Devices 3 25 On Line Mode 3 25 Login Password 3 25 Version 3 25 Preset Menu Items 3 25 Take 3 25 Sav...

Страница 26: ...terband coupling individual band mix levels stereo enhancement etc Nothing is hidden and to eliminate paging back and forth between processing sections everything is logically presented on one page per Aura8ip processing instance This section of the manual will address all of the available adjustments and help famil iarize you with what the adjustments do Selecting the Processor Instances There ar...

Страница 27: ...selected processor instance Here the input levels and left right balance can be adjusted and there are also options for reversing the phase of both left and right channels Abs Phase swapping channels L R Reverse summing the left and right input to mono Mono Sum L R and turning on and off the phase rotator The input level range is adjustable between 36dB to 12dB with a set ting of 0dB referencing a...

Страница 28: ...ng of presets AGC and Compressor Controls Part 1 To the right of the Input control column is the column of Master adjust ments for the multiband AGC These adjustments include AGC Master Drive with a range of 12 to 6 dB the AGC Backoff control explained next Band Coupling Gate Threshold Gate Delay Gate Mode and lastly controls for the Number of Bands of processing desired and the Crossover frequenc...

Страница 29: ...g gain more than or faster than the AGC Moving the AGC Backoff setting away from 0dB is one of the places in the pro cessing structure where additional density and loudness may be gained Basically you have the ability to not only add or take away compression via the bypass option but you have the ability to dial in the audibility of that compression in any way desired Note that if the AGC Backoff ...

Страница 30: ...n may be defeated by adjusting the Gate Thresh control towards 80dB which will then disable it and cause the Gate Thresh display to indicate OFF The Gate Delay setting tells the AGC how long to wait after the audio falls below the Gate Thresh before it freezes the gain The control range is 50ms to 500ms Setting the Gate Delay control to times greater than about 100ms loosens up its action which he...

Страница 31: ...d mode the Band 1 2 crossover will be found somewhere in the range between 120Hz and 400Hz There is no Band 2 3 crossover setting when the processing is in two band mode because in that mode there is no Band 3 In Broadband mode there are no crossover settings because there is no crossover to adjust Crossovers The purpose of a crossover Xover is to separate the audio spectrum into different frequen...

Страница 32: ...r processing the audio If the AGC is defeated then this control will govern the behavior of the compressor Like many other controls the Threshold control is calibrated in dFBS And like the Gate Threshold discussed previously the Threshold control operates with a peak program reference level of 20dBFS What this means is that if the onset of AGC gain control action should begin 20dB below average pr...

Страница 33: ...ow the output level to only increase by 1dB even though the input level increased by 20dB a 10 1 change The correct setting of the Compression Ratio control is highly subjective just like many other controls in any audio processor However our experience is that a Compression Ratio setting of between 2 1 and 6 1 is the most useful with a setting halfway between at 4 1 a good all around tradeoff Hig...

Страница 34: ...ve Gate Threshold for Band 3 making its gate operate sooner At first glance the Gate Offset controls may not seem to have much range but remember that 6dB is half and 6dB is twice whatever the 0dB gating level is Processing Band L R and L R Outputs L R Out L R Out Each processing band has a pair of output level controls L R Out L R Out that serve as mix controls allowing the processing s output sp...

Страница 35: ... L R Output controls for tasteful stereo enhancement would be Band 1 0dB Band 2 3dB Band 3 1 5dB Of course reducing these controls has the opposite effect reducing stereo separation Makeup Gain All of Aura8ip s processing is accomplished by feed forward control algorithms Feed forward control has the advantage that it doesn t rely on errors in the compressor s output signals as do feed back algori...

Страница 36: ...pression with a 10 1 ratio is only around 3dB Parametric EQ The Aura8ip is equipped with a flexible equalizer section which may be used to sweeten the spectral balance The equalizer provides a graphical representation of the equalizer s contribution to the audio by creating shaded areas in the graph represent ing the mathematical result of an overlapping equalizer sections The equalizer may be pla...

Страница 37: ...ttle gain management The correct placement for the equalizer is both highly subjective and highly dependent upon the particular application For most applications we recommend op erating with the EQ Post Dynamics box unchecked There are three ways to adjust the EQ 1 The sliders below the graphical area may be used to adjust the frequency boost or cut and the bandwidth Q if available in the band of ...

Страница 38: ... to be used to add their own signature to the audio they are there merely to prevent audio from exceeding a predetermined peak level In more conventional designs the limiters are sometimes found to be equipped with gates return to zero functions temporary holds and even interband coupling These limiters typically need these functions to make up for deficiencies in the preceding AGC or compressor t...

Страница 39: ... controls how rapidly the limiter will act to control audio peaks We made the range of this control 0 3ms to 100ms however we recommend operating with settings between 0 3 and 10ms With settings slower than this peak control will be sloppier and though the multiband limiter attack setting isn t critical slowish attack times will make the final peak limiter work harder Limiter Release Lim Release T...

Страница 40: ...hout creating intermodulation distortion or muddiness It enhances the sound of bass when heard on small bass shy speakers and adds richness to the sound without adding noticeable distortion Look Ahead Final Peak Limiter The final section of processing is the Lookahead Limiter with its defeatable lookahead function In studio applications the final limiter can probably be defeated However if the aud...

Страница 41: ... Delayed Release When this box is checked the final limiter is utiliz ing the Delayed Release algorithm as governed by the Delayed Release control setting as explained earlier When this box is not checked only the primary Release time algorithm is in effect Look Ahead When this box is checked a small amount of lookahead is appliedtothefinallimiter allowingittoreacttoanupcomingaudiopeakjust as it a...

Страница 42: ...ation for when 0dBFS is reached If and when signal peaks reach 0dBFS there are no more digital bits available to define the audio signal which results in hard clipping and severe distortion The Input meter shown at left is indicating good input levels peaks are at but not above 12dBFS good operating practice Gain Reduction Meters Multiband AGC Compressor and Limiter The AGC Compressorgainreduction...

Страница 43: ...audio codecs it is best to keep their maximum Input level at 3dBFs or even slightly lower The reason for this is that when the codec removes energy from the audio which it must do in order to encode the audio the peak audio levels inside the codec algo rithm increase because information has been removed information that was required in order to maintain the original peak levels Now the designers o...

Страница 44: ...ve button is pressed a warning dialog will ap pear It is important to remember to save any preset deemed important before taking another because any unsaved settings will be lost once the new preset is loaded There is no warning dialog When saving a preset and unless selected otherwise the preset will be saved into the next available empty slot on the hardware Alternatively by nudging the preset n...

Страница 45: ... installed Simple Windows style drag and drop mouse actions are utilized when moving presets back and forth between the PC and the hardware Note that if the Pro GUI is not online to the hardware no presets will appear in the left hand pane simply because when the Pro GUI is not online it has no way to retrieve the list The Library dialog is also the place where presets can be added and deleted fro...

Страница 46: ...e several ways to use the QSAVE feature one popular way is to compare the sound of a factory preset to changes made to that preset by a user without having to first save it as a user preset To do this follow these steps 1 Recall the factory or user preset that you wish to adjust 2 Ensure that QSave A is highlighted If it is not press its button to highlight it 3 Press the B A button This will copy...

Страница 47: ...ttempted When the Status window indicates Trying the Pro GUI is in the process of establish ing a connection to a remote Aura8ip device As long as the status is Trying the device has been found but full communications has not been established When the Status window indicates Online the Pro GUI is in command of the con nected device Devices This window indicates what device has been selected for co...

Страница 48: ... Aura8ip Control Panel Please note that most of the hardware related items cannot be reported unless the Pro GUI is online to the hardware this is where the data must come from Sub menu choices include Devices opens the Devices dialog box which allows the creation editing selec tion and deletion of Vorsis processor devices that are known to the Pro GUI On Line Mode toggles between ONLINE and OFFLI...

Отзывы: