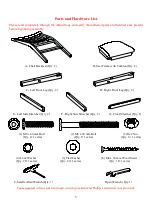
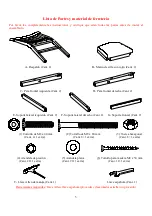
Whalen HEN9PCH Скачать руководство пользователя страница 6

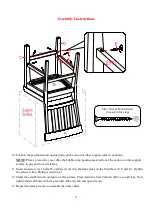
Assembly Instructions 
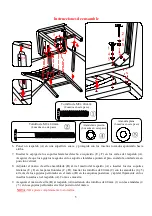


10.


Position the assembled unit upside down on the carton or other support surface, as shown.  


NOTE: Place a protective cover (like the bubble wrap packing material) over the carton or other support 
surface to prevent from scratching. 
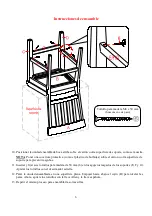
 

11.


Insert and screw six 50 mm Wood Screws (6) into the slant holes on the Stretchers (E, F and G). Tighten 
the screws with a Phillips screwdriver. 


12.


Stand the assembled unit upright on a flat surface. Press down the Seat Cushion (B) to even all legs. Now, 
tightly fasten all bolts with the provided Allen wrench and open wrench. 


13.


Repeat the same process to assemble the other chairs. 


M4 x 50 mm Wood Screw  

(6 used in this step) 


Содержание HEN9PCH

Страница 1: ...bly or if parts are missing DO NOT return this item to the store where it was purchased Please call our customer service number and have your instructions and parts list ready to provide the model nam...

Страница 2: ...ake sure all bolts and screws are tightly fastened before the unit is used 6 Check that all bolts and screws are tight at least every 3 months or as needed 7 Use the long end of the Allen wrench to fa...

Страница 3: ...ty 2 D Right Front Leg Qty 2 E Left Side Stretcher Qty 2 F Right Side Stretcher Qty 2 G Front Stretcher Qty 2 1 M8 x 40 mm Bolt 2 M8 x 80 mm Bolt 3 Hex Nut Qty 4 1 extra Qty 8 1 extra Qty 8 1 extra 4...

Страница 4: ...el all the legs so that they do not wobble Once adjusted go back and tighten while making sure that the unit remains level 4 Insert the tenon of one Front Stretcher G into the mortise of the Left Fron...

Страница 5: ...ert both Side Stretchers E and F into the Front Legs C and D respectively Insert the 80 mm Bolts 2 with the Washers 4 and 5 through the drilled holes on the Seat Frame B at rear corner blocks and loos...

Страница 6: ...t from scratching 11 Insert and screw six 50 mm Wood Screws 6 into the slant holes on the Stretchers E F and G Tighten the screws with a Phillips screwdriver 12 Stand the assembled unit upright on a f...

Страница 7: ...re care It is best to keep your furniture in a climate controlled environment Extreme temperature and humidity changes can cause fading warping shrinking and splitting of wood It is advised to keep fu...

Страница 8: ......

Страница 9: ...parte est faltante no retorne este producto a la tienda donde lo compr Por favor llame a nuestro departamento de ayuda al cliente teniendo su instructivo y lista de partes para proveer el modelo nombr...

Страница 10: ...que todos los tornillos esten bien apretados antes de utilizar al unidad 6 Compruebe que todos los pernos tornillos y tuercas estan apretados por lo menos cada 3 meses o seg n sea necesario 7 Use la p...

Страница 11: ...Soporte lateral izquierdo Cant 2 F Soporte lateral derecho Cant 2 G Soporte frontal Cant 2 1 Tornillo de M8 x 40 mm 2 Tornillo de M8 x 80 mm 3 Tuerca hexagonal Cant 4 1 extra Cant 8 1 extra Cant 8 1...

Страница 12: ...sido ajustada y nivelar las patas para que no se tambaleen Una vez ajustada apriete mientras se asegura que la unidad esta nivelada 4 Insertar la espiga de un soporte frontal G en la entrada de la pa...

Страница 13: ...os soportes laterales E y F en las patas frontales C y D Insertar los tornillos de 80 mm 2 con las arandelas 4 y 5 a trav s de los agujeros perforados en el marco B en las esquinas posteriors y apreta...

Страница 14: ...ir rasgu os 11 Insertar y fijar seis tornillos para madera de 50 mm 6 en los agujeros rasgados de los soportes E F y G Apretar los tornillos con el desarmador estrella 12 Parar la unidad ensamblada en...

Страница 15: ...ratura extrema y cambios de humedad pueden causar cambios como partes pandas molduras que se contraigan o que la madera se raje Es recommendable mantener la unidad lejos del sol directo ya que puede d...

Страница 16: ......

Отзывы: