


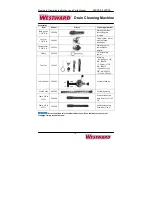
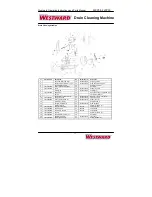


7
Westward Operating Instructions and Parts Manual
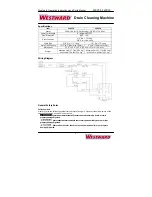
22XP38, 22XP39
Drain Cleaning Machine
Assembly
and
Disassembly
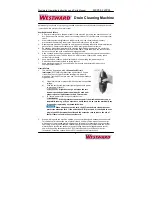
Turn
Rotation
Switch
to
OFF
and
unplug
before
assembly
and
disassembly.
Quick
Assembly
Handle
Mounting
The
handle
is
bound
to
the
frame
but
is
not
mounted.
To
assemble
the
Handle,
take
off
the
two
sets
of
handle
‐
locking
bolts
and
knobs
from
the
frame.
Slide
the
two
ends
of
the
handle
into
the
two
openings
on
the
frame.
Then,
use
handle
‐
locking
blots
and
handle
‐
locking
knobs
to
tighten
them.
Toolbox
Mounting
to
the
Handle
The
tool
box
can
be
attached
to
the
machine
by
simply
aligning
the
two
slots
on
the
box
with
the
two
poking
latches
on
the
frame
and
sliding
the
tool
box
downward
to
allow
the
two
latches
to
slip
into
the
slots.
Wheel
Mounting
To
assemble
the
wheels,
push
the
axle
through
the
holes
at
the
bottom
of
the
frame,
mount
the
wheels
on
the
Axle
and
then
use
one
flat
washer
and
one
nut
on
each
side
to
attain
the
wheel
on
the
axle.
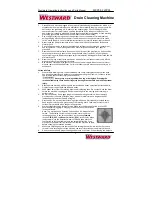
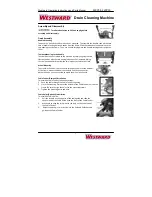
Cable
Feeder
(Optional)
Installation
To
install
the
Cable
Feeder,
follow
these
steps:
1.
Push
the
cable
through
the
Cable
Feeder’s
opening.
2.
Place
the
mounting
bracket
at
the
bottom
of
the
Cable
Feeder
unit
on
the
frame.
Be
sure
to
align
the
holes
for
the
mounting
screws.
3.
Tighten
the
mounting
bolts
and
nuts.
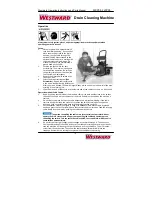
Cable
Guide
(Optional)
Installation
To
install
the
Cable
Guide
1.
Pull
the
lock
pin
on
the
adapter
of
the
cable
guide
and
slide
the
adapter
end
of
the
Cable
Guide
onto
the
front
of
the
Cable
Feeder.
2.
Make
sure
to
align
the
lock
pin
with
the
hole
on
the
short
tube
of
the
Cable
Feeder.
3.
Release
the
lock
pin
to
let
it
slide
into
the
hole
and
hold
the
cable
guide
on
the
Cable
Feeder.


