background image


21A466  

Westward Operating Instructions and Manual 

6.5A Orbital Jig Saw


cause serious injury. Never hold the workpiece 
with your hand. 


Keep your hands and fingers 

away from between the motor housing and the 
blade holder. Do not reach underneath the 
workpiece while the jigsaw is running. 


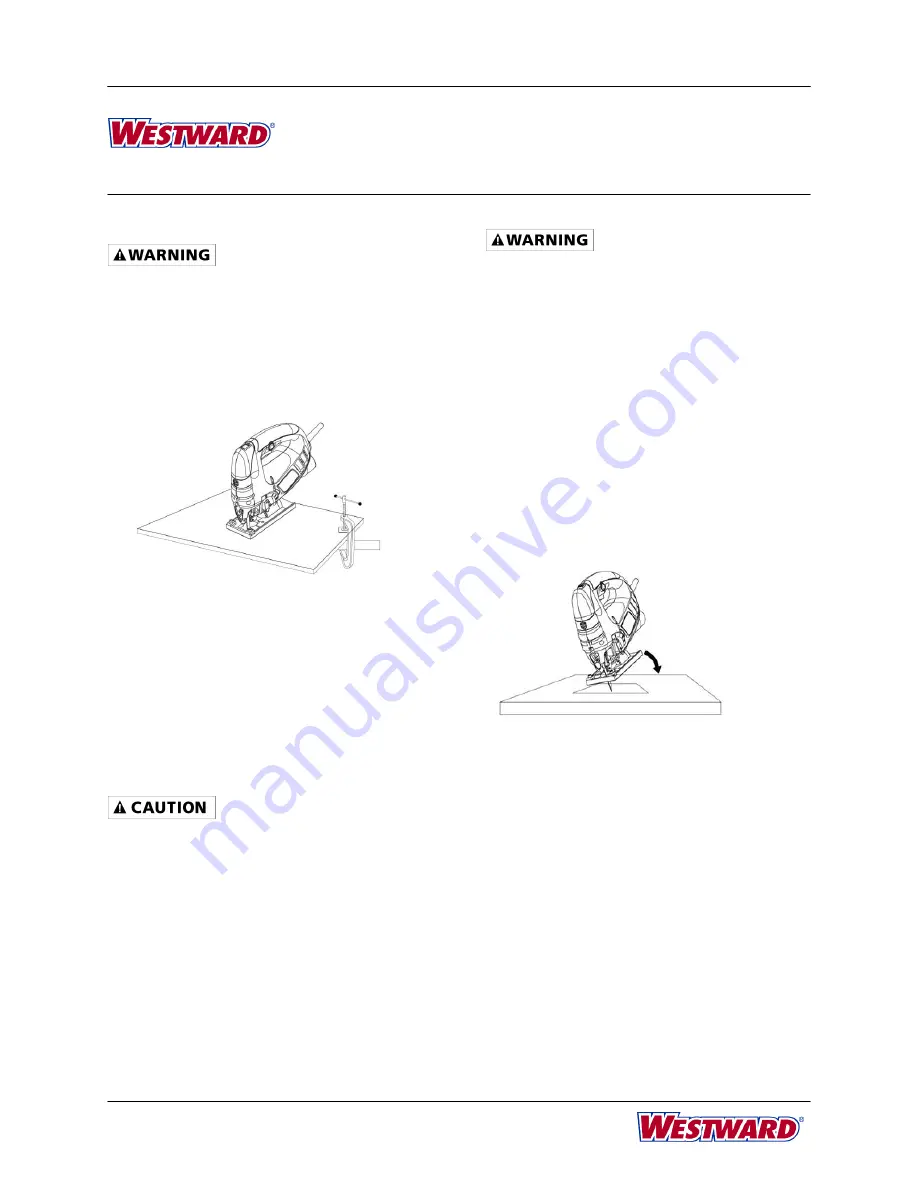
3.  Rest the front of the jigsaw base on the 

workpiece and align cutting edge of the blade 
with the cutting line on your workpiece (Fig. 10). 
Make sure the power cord is out of your way and 
not in the path the blade will follow.  


4.  Firmly grip the jigsaw, make sure that the blade is 

not in contact with the surface to be cut, and start 
the jigsaw


5.  Once the jigsaw has reached the desired speed, 

gradually bring the moving blade into contact with 
the workpiece at the appropriate location.  

 
NOTE: 

Apply enough downward pressure to keep the 

jigsaw steady and only enough forward pressure to 
keep the blade cutting freely.  


Do not force the jigsaw. Use only 

enough force to keep the blade cutting. Excessive 
pressure on the blade will cause it to bend and 
twist, which may result in breakage. 


BEVEL CUTTING 


Bevel cutting angles may be adjusted up to 45° 
towards the left or right. To adjust the bevel angle, 
refer to Fig. 4, 5 & 6. 
  
Once the cutting angle has been verified, proceed 
with the cutting activity as outlined in "GENERAL 
CUTTING" above.  


PLUNGE CUTTING 


To avoid loss of control, broken 

blades, or damage to the workpiece, always use 
extreme caution when making plunge cuts. It is 
not recommended to plunge cut anything other 
than wood. Wherever possible, drill a pilot hole 
3/8" (9.5 mm) or larger in the area to be cut and 
start cutting with the blade in the pilot hole. This 
will avoid the need to plunge cut. 


NOTE: Use only blades with 7 teeth per inch for 
plunge cutting. 


1.  To plunge cut an inside hole, clearly mark the 

cutting line on the workpiece.  

 
2.  Set the bevel angle at 0°, then lock the base 

plate.  

 
3.  Tilt the jigsaw forward until it rests on the front 

edge of the base plate. Make sure that the blade 
is not touching the surface to be cut (Fig. 11).  


NOTE: 

Make sure the saw blade is inside the area to 

be cut.  
 
4.  Start the jigsaw and slowly lower the blade onto 

the workpiece while making sure the front of the 
saw base remains in contact with the workpiece. 
Allow the blade to slowly cut through the wood.  

 
5.  Continue lowering the blade into the workpiece 

until the jigsaw base rests flat on the workpiece. 
Continue sawing toward the cutting line and 
complete the cut.  

 
METAL CUTTING 


Many types of metal can be cut with your jigsaw. 
When cutting any kind of material, be careful not to 
twist or bend the blades. If the blade chatters or 
vibrates excessively, use a finer toothed blade. If the 
blade heats excessively, reduce the speed of cutting. 

Fig. 10 


Fig.11 

Содержание 21A466

Страница 1: ...ith carrier Certification This symbol designates that this tool is listed with U S requirements by ETL Testing Laboratories Inc Conforms to UL Std 60745 1 and 60745 2 11 Certified to CAN CSA STD C22 2...

Страница 2: ...operated corded power tool or battery operated cordless power tool WORK AREA SAFETY Keep work area clean and well lit Cluttered or dark areas invite accidents Do not operate power tools in explosive...

Страница 3: ...persons unfamiliar with the power tool or these instructions to operate the power tool Power tools are dangerous in the hands of untrained users Maintain power tools Inspect the tool for binding of mo...

Страница 4: ...ely held in the blade holder Loose blades may be violently thrown Never touch the blade during or immediately after use The blade is too hot to be touched by bare hands Never use dull or damaged blade...

Страница 5: ...n the blade locking lever 1 Fig 1 2 Insert the appropriate blade 2 into the blade slot 3 as far as it will go NOTE Make sure the rear edge of the blade is nested in the blade guide roller 4 3 Release...

Страница 6: ...b To set the bevel angle at intermediate angles do not slide the base forward 5 Once the desired bevel angle is obtained lock the base by tightening base pivot screws 6 Make a test cut in a scrap pie...

Страница 7: ...ATERIALS YOU CAN CUT This jigsaw is a versatile tool that allows you to cut many different types of materials Some of these materials include Wood products such as lumber hardwood plywood composite bo...

Страница 8: ...ting activity as outlined in GENERAL CUTTING above PLUNGE CUTTING To avoid loss of control broken blades or damage to the workpiece always use extreme caution when making plunge cuts It is not recomme...

Страница 9: ...olvents and may be damaged by their use Use a clean cloth to remove dirt dust oil grease etc Do not allow brake fluids gasoline petroleum based products penetrating oils etc to come into contact with...

Страница 10: ...10 21A466 Westward Operating Instructions and Manual 6 5A Orbital Jig Saw For Repair Parts call 1 800 323 0620 24 hours a day 365 days a year...

Страница 11: ...l 1 15 Large gear assembly 1 16 6 circlip for main shaft 1 17 6 washer 1 18 Needle roller bearing 1 19 Balance block 1 20 Pendulum plate 1 21 Bearing seat assembly 1 22 Bearing 629 1 23 Brush box 2 24...

Страница 12: ...ousing soft grip 1 Not available as a repair part Warranty LIMITED ONE YEAR WARRANTY Should this product fail to perform to satisfaction due to a defect or poor workmanship within ONE YEAR from the da...

Страница 13: ...e el tr nsito Compruebe si hay piezas sueltas faltantes o da adas El da o durante el env o debe ser presentado con el portador Certification Este s mbolo indica que esta herramienta est en la lista co...

Страница 14: ...Para evitar descargas el ctricas o incendios reemplace el cable de alimentaci n inmediatamente si est desgastado roto o da ado de alguna manera Informaci n de seguridad de Herramienta El ctrica Lea t...

Страница 15: ...viles Si se proporcionan dispositivos para la conexi n de extracci n y recolecci n de polvo aseg rese de que est n conectados y se utilicen correctamente El uso de recolecci n de polvo puede reducir l...

Страница 16: ...st aserrando Nunca ponga las manos cerca o debajo de la superficie de corte Es m s seguro sostener el material y la herramienta con las dos manos Nunca coloque la pieza de trabajo en las superficies d...

Страница 17: ...FILO Desconecte siempre la herramienta de la fuente de alimentaci n antes de instalar quitar un filo o ajustar la sierra de calar de alguna manera 1 Para instalar un filo en la sierra caladora empuje...

Страница 18: ...ig 3 3 Deslice la base hacia la parte posterior de la sierra caladora y alinea el ngulo de bisel de marca de ndice 4 con el ngulo de inclinaci n deseada en la base 4 Deslice la base hacia adelante par...

Страница 19: ...ora 1 Para encender la sierra caladora presione el interruptor del disparador 1 Fig 8 2 Para apagar la sierra caladora suelte el interruptor del disparador BOT N DE BLOQUEO La sierra caladora est equi...

Страница 20: ...nsa la parte frontal de la base de la sierra caladora en la pieza de trabajo y alinea el filo con la l nea de corte en la pieza de trabajo Fig 10 Aseg rese de que el cable de alimentaci n est fuera de...

Страница 21: ...y utilice aceite cuando est cortando acero para mantener el filo fresco con el fin de prolonger la vida til del filo Sujeta todo el trabajo con firmeza y vi tan cerca como sea possible del punto de su...

Страница 22: ...10 21A466 Westward Instrucciones de operaci n y manual 6 5A Sierra Caladora Orbital Para Reparar Piezas llame 1 800 323 0620 24 horas al d a 365 d as al a o...

Страница 23: ...Cojinete de engranajes 1 16 6 circlip para eje principal 1 17 6 lavadora 1 18 Rodamiento de agujas 1 19 Balance de bloqueo 1 20 P ndulo de la placa 1 21 Cojinete de eje de asiento 1 22 Eje629 1 23 Caj...

Страница 24: ...recubierta de izquierda agarre suave 1 No est disponible como parte de reparaci n Garant a GARANTIA LIMITADA DE UN A O Si este producto no llevar a cabo para la satisfacci n debida a un defecto o una...

Страница 25: ...es les pi ces manquantes ou endommag es R clamation de dommages d exp dition doit tre d pos e aupr s du transporteur Certification Ce symbole indique que cet outil est approuv avec les exigences am ri...

Страница 26: ...ur Pour viter tout choc ou incendie remplacez le cordon d alimentation imm diatement s il est us coup ou endommag de quelque fa on Informations de S curit sur l Outil de Puissance Lire toutes les info...

Страница 27: ...et les gants loign s des pi ces mobiles Les v tements amples dls bijoux ou les cheveux longs peuvent tre happ s par les pi ces mobiles Si les dispositifs sont pr vus pour le raccordement de dispositif...

Страница 28: ...des lunettes de s curit une protection auditive et un masque anti poussi re Utilisez seulement dans des zones bien ventil es L utilisation des dispositifs de s curit personnelle et travailler dans un...

Страница 29: ...plus efficace et s curitaire de cet outil Symb le d avertissement Lire le manuel d instruction Portez la protection des yeux Portez la protection des oreilles Construction Classe II Portez la protect...

Страница 30: ...lame pour assurer qu elle soit proprement verrouill e dans le porte lame RETIRER LA LAME Pour retirer une lame il suffit de pousser vers le haut sur le levier de verrouillage de la lame et retirer la...

Страница 31: ...ir 1 Fig 5 NOTE Le bouton de r glage orbital cliquera sur chacune des quatre positions Faites glisser le bouton orbital l g rement vers l avant ou vers l arri re jusqu ce qu il se verrouille en place...

Страница 32: ...t les lames de coupe pour le bois dents grossiers Utilisez la lame appropri e pour votre application L emballage sur la lame indiquera le type de mat riaux chaque lame est con ue pour couper Pour des...

Страница 33: ...u 0 puis verrouillez la plaque de base 3 Inclinez la scie sauteuse en avant jusqu ce qu il repose sur le bord en avant de la plaque de base Assurez vous que la lame ne touche pas la surface d couper F...

Страница 34: ...e endommag s par leur utilisation Utilisez un chiffon propre pour enlever la salet la poussi re l huile la graisse etc Ne pas permettre aux liquides de frein l essence aux produits base de p trole aux...

Страница 35: ...11 21A466 Mode d Emploi du Westward SCIE SAUTEUSE ORBITALE 6 5A Pour R parer les Pi ces Appelez 1 800 323 0620 24 heures par jour 365 jours par an...

Страница 36: ...clip pour l arbre principal 6 1 17 Rondelle 6 1 18 Roulement rouleau aiguille 1 19 Bloc de balance 1 20 Plaque de pendule 1 21 Ensemble du siege de roulement 1 22 Roulement 629 1 23 Bo te de brosse 2...

Страница 37: ...nal 1 53 Bo tier gauche poign e souple 1 Non disponible comme une pi ce de r paration Garantie GARANTIE LIMIT E D UN AN Si ce produit choue fonctionner la satisfaction due un d faut ou une malfa on da...

Отзывы: