background image

16

INSTALLATION

INSTALLATION INSTRUCTIONS

WARNING

WARNING

This must be read! The laws, ordinances, directives and 
standards in force in the country of use are to be followed 
(safety regulations, proper recycling in accordance with 
the regulations, etc.)

TIPS & INFORMATION

 IMPORTANT

Installation may only be carried out by a qualified 
electrician. The minimum distances to other appliances 
and units are to be observed.

Anti-shock protection must be provided by the 
installation, for example drawers may only be installed 
with a protective floor directly underneath the appliance.

The cut surfaces of the worktop are to be protected 
against moisture using a suitable sealant. The sealant seals 
the appliance to the work top with no gap. Do not use 
silicon sealant between the appliance and the work top. 
Avoid installing the appliance next to doors and under 
windows. Otherwise hot cookware may be knocked off 
the rings when doors and windows are opened.

WARNING

WARNING

Risk of injury from electrical current.

•    The electrical mains terminal is live. 

•    Make electrical mains terminal free of voltage. 

•    Follow connection schematic. 

•    Observe electrical safety rules. 

•   Ensure anti-shock protection by installing correctly. 

•    The appliance must be connected to the electrical 

supply by a qualified electrician. 

•    Loose and inappropriate plug and socket connections 

can make the terminal overheat. 

•    Have the clamping connections correctly installed by 

a qualified electrician. 

•   Use strain relief clamp on cable.

WARNING

WARNING

The surface temperature exceeds 95°C. To avoid a 
hazard, underbench access must be restricted.

Electrical Connection

Before connecting, check that the nominal voltage of 
the appliance, that is the voltage stated on the rating 
plate, corresponds to the available supply voltage. Also 
check the power rating of the appliance and ensure 
that the wire is suitably sized in accordance with local 
wiring rules to suit the appliance power rating. The rating 
plate is located on the lower casing of the hob. Means 
for disconnection must be incorporated in the fixed 
wiring in accordance with local wiring rules. The hob is 
to be connected to the mains using a device that allows 
the appliance to be disconnected from the mains at all 
poles with a contact opening width of at least 3 mm, eg. 

automatic line protecting cut-out, earth leakage trips or 
fuse. If this appliance’s mains cable is damaged, it must 
be replaced by a special cable (type H05BB-F Tmax 
90°C; or higher). The connection must be carried out as 
shown in the diagram. The connecting links should be 
fitted according to the appropriate connection diagram. 
The earth lead is connected to terminal. The earth lead 
must be longer than leads carrying electric current. 

The 

cable connections must be made in accordance with 
regulations and the terminal screws tightened securely.


Finally, the connecting cable is to be secured with the 
mains cable cleat and the covering closed by pressing 
firmly (lock into place). Before switching on for the first 
time, any protective foil or stickers must be removed from 
the glass ceramic surface.

WARNING

WARNING

Once connected to the mains supply check that all 
cooking zones are ready for use by briefly switching each 
on in turn at the maximum setting.

•    A duplicate rating label is supplied with this unit. For 

easy identification of this unit after installation, stick it 
to a readily available surface adjacent to the cooktop.

Sticking on the seal

•    Clean the worktop around the cutout area. 

•    Stick the single-sided adhesive sealing tape provided 

on the underside of the hob around the outside edge 
ensuring that it is not stretched. The two ends of 
the tape should join in the middle of one side. After 
trimming the tape (allow it to overlap by 2-3 mm), 
press the two ends together.

Содержание WHC644BA

Страница 1: ...USER MANUAL CERAMIC COOKTOPS WHC644BA WHC744BA WHC944BA WHC934BA ...

Страница 2: ...and other working environments Farm houses By clients in hotels motels and other residential type environments Bed and breakfast type environments Please ensure you read the instruction manual fully before you call for service or a full service fee could be applicable Record model and serial number here Record model and serial number here Model number Serial number PNC CONGRATULATIONS Important sa...

Страница 3: ...o not use an external timer or a separated remote control system to operate the appliance Only use the appliance for domestic cooking tasks Do not use the appliance as a work or a storage surface Do not put or keep very flammable liquids and materials or fusible objects made of plastic or aluminium on or near the appliance Other than the connection point in the terminal block do not let the electr...

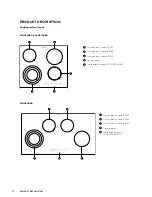
Страница 4: ...1 Single cooking zone 1200W 2 Single cooking zone 1800W 3 Single cooking zone 1200W 4 Control panel 5 Triple cooking zone 2300 1600 800W 1 Single cooking zone 1200W 2 Single cooking zone 1200W 3 Single cooking zone 1800W 4 Control panel 5 Triple cooking zone 2300 1600 800W 1 2 3 4 5 1 2 3 4 5 ...

Страница 5: ...5 PRODUCT DESCRIPTION WHC934BA 1 Triple cooking zone 2300 1600 800W 2 Single cooking zone 1200W 3 Single cooking zone 1800W 4 Control panel 1 2 3 4 ...

Страница 6: ...pliance 2 Sets all operating zones to a keep warm setting 3 A heat setting display It shows the heat setting 4 It selects the cooking zone 5 Cooking zones indicators of timer It shows for which zone you set the time 6 The timer display It shows the time in minutes 7 It increases or decreases the heat setting 8 It increases or decreases the time 9 It activates the outer rings on the triple zone ele...

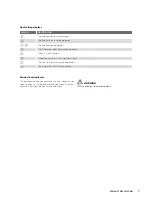
Страница 7: ...tion operates There is a malfunction A cooking zone is still hot residual heat The Lock Child Safety device operates The Automatic Switch Off operates Residual heat indicator The induction cooking zones make the heat necessary for cooking directly in the bottom of the cookware The glass ceramic is hot from the heat of the cookware WARNING WARNING Risk of burns from residual heat ...

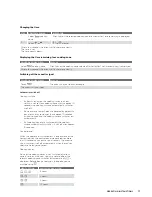
Страница 8: ...matched to the size of the cookware TRIPLE COOKING ZONE SENSOR PANEL POWER INDICATOR To switch on the middle ring Touch for 1 2 seconds One power indicator is lit To switch on the outside ring Touch for 1 2 seconds Two power indicators are lit To switch off the outside ring Touch for 1 2 seconds The second power indicator goes out To switch off the middle ring Touch for 1 2 seconds The first power...

Страница 9: ...ild safety device Start the hob with Do not set the heat settings Touch for 4 seconds The symbol comes on The child safety device is switched on Switching off the child safety device Start the hob with Do not set the heat settings Touch for 4 seconds The symbol comes on Stop the hob with The child safety device is switched off TIPS INFORMATION IMPORTANT The child safety device can only be switched...

Страница 10: ... applicable TIPS INFORMATION IMPORTANT If a cooking zone is switched off the timer function set is also switched off TIPS INFORMATION IMPORTANT If the pilot light is flashing more slowly the heat setting can be set or modified TIPS INFORMATION IMPORTANT If other timer functions are set after a few seconds the shortest remaining time of all the timer functions is displayed and the corresponding pil...

Страница 11: ...set for a cooking zone within approx 10 seconds the cooking surface automatically switches itself off If one or more sensor fields are covered by objects a pan cloths etc for longer than approx 10 seconds a signal sounds and the cooking surface switches off automatically If all cooking zones are switched off the cooking surface automatically switches it self off after approx 10 seconds Control pan...

Страница 12: ...or copper bottoms can leave discolourations on the glass ceramic surface which are difficult or impossible to remove ENVIRONMENTAL TIPS ENVIRONMENT Energy saving Always place cookware on the cooking zone before it is switched on Switch cooking zones off before the end of the cooking time to take advantage of residual heat If possible always place lids on the pans Bottom of pans and cooking zones s...

Страница 13: ... glass ceramic or stainless steel1 Fat splashes Yes Cleaner for glass ceramic or stainless steel1 Shiny metallic discolouration Yes Cleaner for glass ceramic or stainless steel1 1 Scrapers and cleaners for glass ceramic and stainless steel can be purchased in specialised shops 1 Place a scraper on the glass ceramic surface at an angle 2 Remove residues by sliding the blade over the surface 3 Wipe ...

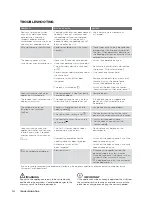
Страница 14: ...cloths etc that are lying on the control panel Switch the appliance on again The lock is switched on Switch off the lock See the section Locking unlocking the control panel Acoustic signal sounds when appliance is switched off The control panel is wholly or partly covered by objects Remove objects The residual heat indicator is not displaying anything The cooking zone was only on for a short time ...

Страница 15: ...ce or the shop where you purchased the product Packaging material The packaging materials are friendly to the environment and can be recycled The plastic components are identified by marking PE PS etc Discard the packaging materials as household waste at the waste disposal facilities in your municipality MODEL WHC644BA WHC744BA WHC944BA WHC934BA PNC 949 163 175 949 163 174 949 163 173 949 163 176 ...

Страница 16: ...check the power rating of the appliance and ensure that the wire is suitably sized in accordance with local wiring rules to suit the appliance power rating The rating plate is located on the lower casing of the hob Means for disconnection must be incorporated in the fixed wiring in accordance with local wiring rules The hob is to be connected to the mains using a device that allows the appliance t...

Страница 17: ...NING WARNING Surface temperatures of base exceed 95 C under bench access must be restricted by use of non combustible barrier on installation WHC644BA WHC744BA 560 1 600 R5 490 1 WHC944BA 880 1 R5 490 1 600 min 50mm min 500mm ...

Страница 18: ...18 ASSEMBLY WHC934BA 825 1 R5 360 1 min 25mm min 20mm 600 min 25mm ASSEMBLY CONTINUED ...

Страница 19: ... or incorrect power supply v incomplete or improper installation vi incorrect improper or inappropriate operation vii insect or vermin infestation viii failure to comply with any additional instructions supplied with the Appliance b the Appliance is modified without authority from Electrolux in writing c the Appliance s serial number or warranty seal has been removed or defaced d the Appliance was...

Страница 20: ...r phone or email our customer care team or visit our website TOP SERVICE Top Service encompasses the after sales service provided by The Electrolux Group to consumers including delivery home service and spare parts Westinghouse We are part of the Electrolux family Share more of our thinking at www electrolux com and WESTINGHOUSE are trademarks of Westinghouse Electric Corporation Used under licens...

Отзывы: