


WARNING:
1. This product is not a toy and contains small parts. Close supervision is necessary when
this unit is used near children.
2. To reduce the risk of electrical shock, do not put the unit in water or other liquids. Do
not place or store appliance where it can fall or be pulled into a tub or sink.
3. To clean, use a soft dry cloth.
NOTE:
This equipment has been tested and found to comply with the limits for a Class B Digital
Device, pursuant to Part 15 of the FCC Rules. These limits are designed to provide
reasonable protection against harmful interference in a residential installation. This
equipment generates, uses, and can radiate radio frequency energy and, if not installed
and used in accordance with the instructions, may cause harmfull interference to radio
communications. However, there is no guarantee that interference will not occur during
installation. If this equipment does cause harmful interference to radio or television
reception, which can be determined by turning the equipment off and on, the user is
encouraged to try to correct the interference by one or more of the following measures:
- Reorient or relocate the receiving antenna.
- Increase the distance between the equipment and receiver.
- Connect the equipment to an outlet on a circuit different from that which the receiver
is connected.
- Consult the dealer or an experienced radio/TV technician for help.
This equipment complies with Part 15 of the FCC Rules. Operation is subject to the
following two conditions:
1) This device may not cause harmful interference.
2) This device must accept any interference received, including interference that may
cause undesired operation.
WARNING:
Changes or modifications to this unit not expressly approved by the party responsible for
compliance could void the user’s authority to operate the equipment.
RF EXPOSURE:
This equipment complies with FCC radiation exposure limits set forth
for an uncontrolled environment.
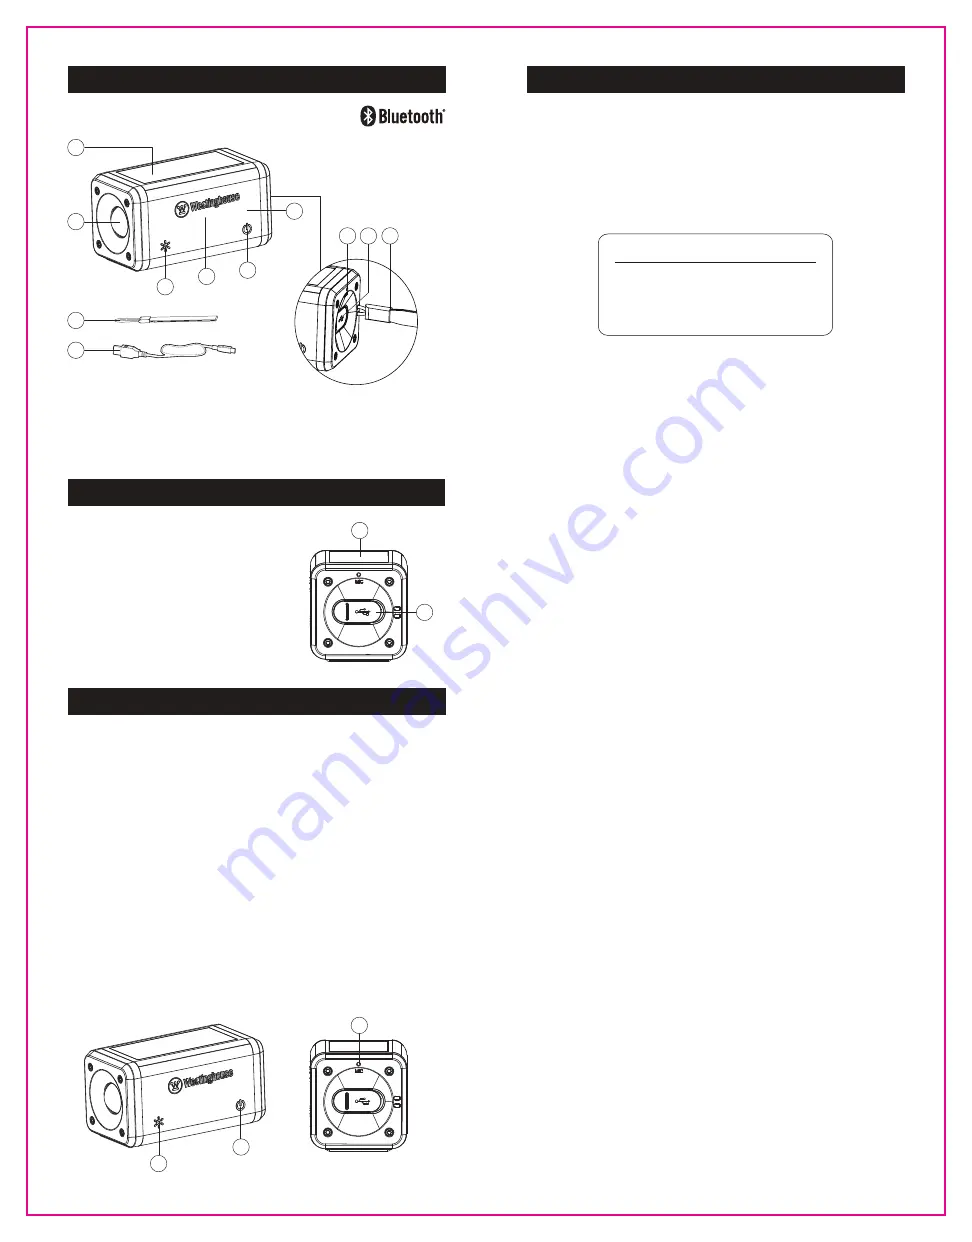
PARTS AND SPECIFICATIONS
OPERATING INSTRUCTIONS
OPERATING INSTRUCTIONS
8.5"
11
"
®
HOW TO PAIR WITH A SMART DEVICE:
1. Press power button (E) for 2 seconds to turn on speaker and initiate bluetooth pairing
mode.
2. Activate bluetooth on your smart device and find device named “
Westinghouse SR80
”.
Press to pair.
3. Once paired, select audio from your device and play through the solar LED light speaker.
4. Press power button (E) quickly to pause or play music.
5. Press power button (E) two times quickly to disconnect the bluetooth .
6. Press power button (E) for 2 seconds to turn off speaker.
NOTE:
Adjust the volume and select music with your smart device.
HOW TO OPERATE FLASH LIGHT :
There are two ways to turn on the flash light:
1. Press light button (C) for 2 seconds to turn on the flash light for high light output
(100LM). Press again, a 2nd time, for low light output (50LM), press a 3rd time for strobe
light and a 4th time to turn off.
2. Press power button (E) for 2 seconds, then press the flash light button (C) to power on
the light.
NOTE:
Do not look directly at the light.
®
®
HOW TO OPERATE THE MICROPHONE (G):
When the bluetooth of the smart device connected the light, microphone (G) can be used
for hands-free calling. Short press the power button (E) to answer the call and long press
the power button (E) for 2 seconds to reject the call.
®
A
B
D
F
G
CHARGING INSTRUCTIONS
CHARGING METHOD:
1) USB charging port (H)
Press the power button (E) and hold for 2
seconds to turn light OFF. Use USB cable (J)
to connect the external 5V power supply to
charge the light. (2 hours minimum needed
to fully charge light.)
2) Solar panel (A) charging
Press the power button (E) and hold for 2
seconds to turn light OFF. Place solar
panel (A) in direct sunlight and allow to
charge 18-20 hours for a full charge.
I
H
EN | 3
EN | 2
C
E
J
I
Solar Panel
A-
Flash Light
B-
Flash Light Button
C-
3W Bluetooth Speaker
D-
®
Power Button
E-
LED Indicator
F-
Microphone
G-
USB Charging Port
H-
Lanyard
I-
Micro USB Cable
J-
A
H
MULTI-COLOR LED INDICATOR (E) INSTRUCTIONS:
1)
RED LIGHT
indicates solar LED light is charging. USB plug or solar charging.
The red light will remain on until solar LED light is fully charged and turn off.
2)
BLUE LIGHT
indicates Bluetooth status. Turn on the Bluetooth speaker and once in
search mode or pairing mode the blue light flashes. After the smart device is connected
with the speaker, the blue light will stop flashing. When music is playing, the blue light
remains on.
NOTE:
The solar LED light has an automatic reconnection feature. When the solar LED
light is connected to the smart device and then restarted, if the previously connected
device is in the connection range, the product will automaticlly connect with the previously
connected smart device first. In this case, if you want to connect with
a (new) smart device,
the smart device that is connected to the solar LED light needs to be disconnected first.
Double click the power button (E), then the solar LED light can be connected with a (new)
smart device.
LOW BATTERY TIPS.
When the light experiences a low battery, it will voice a warning "low battery
,
please
charge". Immediately charge with USB plug provided, or place light outside in direct
sunlight. If product is not charged in time, product will shut off. Please keep the speaker
in a dry environment when using USB charging.
NOTE:
Bluetooth speaker (F) and flash light (B) can operate independently
®
RUN TIME
Speaker
6.5 HOURS
Flash light
5 HOURS
Speaker & Flash light 3 HOURS
NOTE:
Do not allow an open USB charging port to get exposed to water or any other
liquids keep USB charging port closed when not in use.
G
C
E
NOTE:
This product includes a built-in lithium battery and cannot be replaced.
WARNING:
Do not dispose of lithium batteries in municipal waste streams or by fire as
batteries may explode. Do not open, short circuit, or destroy batteries. Dispose of
batteries in accordance with Local, State, and Federal regulations. Do not mix old and new
batteries. Do not mix alkaline, standard (carbon-zinc), or rechargeable (nickel cadmium,
nickel metal hydride or lithium ion) batteries .