1
ETL-ES-Cassidy-WH16
Owner's Manual
Manual del usuariO
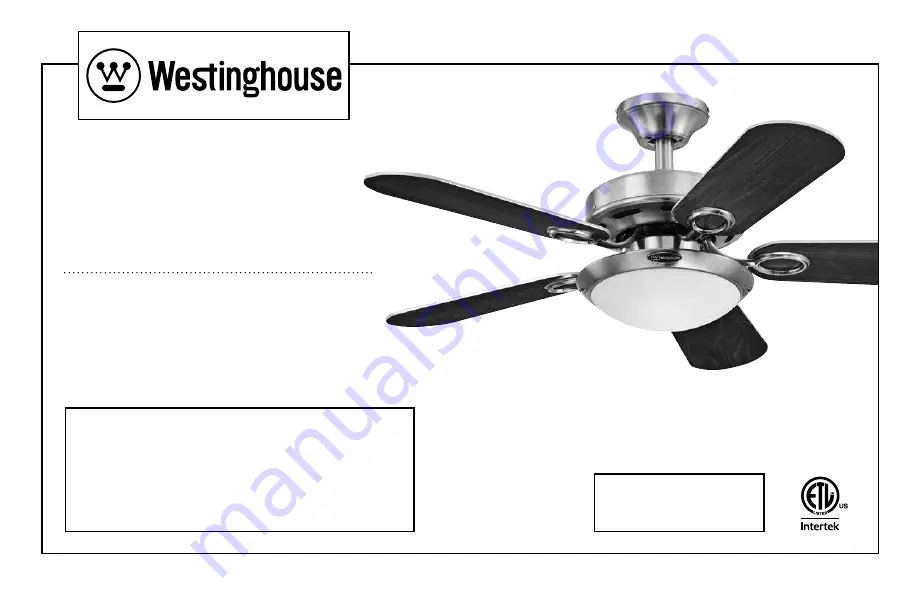
Cassidy
Please write model number here for future reference: / Por favor, incluya el número del modelo aquí para futura referencia:
net weight: 12.11 lBs
Peso neto:
5.50 KGs
Страница 1: ...assidy WH16 Owner s Manual Manual del usuario Cassidy Please write model number here for future reference Por favor incluya el n mero del modelo aqu para futura referencia NetWeight 12 11 LBS Peso Net...
Страница 2: ...usingonlythehardwaresuppliedwiththeoutletbox Fanisonlytobemountedtoanoutletboxmarked AcceptableforFanSupport 11 WARNING Toreducetheriskoffireorelectricshock donotusethisfanwithanysolidstatefanspeedcon...
Страница 3: ...leforFanSupport Aceptableparasoportarventiladores 11 ADVERTENCIA Parareducirelriesgodeincendiosochoquesel ctricos nouseesteventiladorconundispositivodecontroldevelocidaddeestados lidoparaventilador ou...
Страница 4: ...requerir una varilla vertical m s larga se vende por separado FLUSH MOUNT INSTALLATION INSTALACI N ALTECHO For low ceilings Para techo bajos Features Caracter sticas Note For sloped ceiling installati...
Страница 5: ...NOTE Combo Blade finishes vary depending upon model ALETAS DE DOBLE CARA Lasaletasdelrotordedoblecarapresentandossuperficiesconunacabadodealtacalidad Invirtiendo lasaletasUd puedeproducirunefectodecor...
Страница 6: ...fan to wobble 2 pREPARING for installation Antes de la instalaci n Quite el envoltorio e inspeccione detenidamente el ventilador para verificar que todas las piezas est n incluidas Apague la alimenta...
Страница 7: ...hetwomatingholes 2 onthecanopy Loosen donotremove thescrewsinthematingslots 1 onthecanopy Rotatethemountingbracketandremove fromthecanopy Quitelostornillosdelosdosagujeroscoincidentes 2 deldosel Afloj...
Страница 8: ...If flush mount option is selected proceed to page 9 step 6 OPCI N DE INSTALACI N AL TECHO Si elige la opci n de montaje al techo proceda a la p gina 9 paso 6 NORMAL DOWNROD OPTION If installing downro...
Страница 9: ...llosdemontajeal techoylasarandelasdepresi nincluidas Aprietelostornillosasegur ndolos 7 Forflushmountoption raisefanassemblyandplaceontohookfrommounting bracketintoaclosedholeonthecanopy Thiswillallow...
Страница 10: ...edequeelagujerodelavarillaverticalyelde lahorquilladelavarillaverticalest nalineados Instaleelpasadortransversaldelahorquilla 1 pas ndoloporlahorquillaylavarillavertical Inserteelpasadordefijaci n 2 e...
Страница 11: ...f no pre drilled hole exists in the extended downrod tighten the set screw against the downrod to secure the downrod ball Vuelva a instalar el pasador en la varilla vertical m s larga y deslice la bol...
Страница 12: ...lmotoratrav sdelavarillavertical conjuntodeldoseleinsertelavarillaverticalenlahorquilladelamisma Aseg resedequeelagujero delavarillaverticalyeldelahorquilladelavarillaverticalest nalineados Instaleelp...
Страница 13: ...ionesdecableado 13 Carefully lift fan assembly onto mounting bracket Rotate fan until notch on downrod ball 1 engages the ridge on the mounting bracket 2 This will allow for hands free wiring Levante...
Страница 14: ...ventilador vivo Interruptor de la luz vivo Verde de tierra DelVentilador De La Casa conectar conectar conectar conectar Conecte el cable azul s lo si conecta un juego de luces al ventilador Control d...
Страница 15: ...dosel directamente abajo y en l nea con los dos tornillos del soporte de montaje 3 Eleve el dosel permitiendo que los dos tornillos se deslicen dentro de las ranuras Gire el dosel hasta que ambos tor...
Страница 16: ...aspl sticasdeembalajeparasosteneralmotorydesc rtelas Fije elconjuntodelasaletasalmotorusandolasjuntasreductorasdesonidodelmotor 1 lostornillosparaelmotor 2 ylasarandelas 3 incluidos Aprietelostornillo...
Страница 17: ...whitetowhiteandblueto black Attachlightkittotheswitchhousingusingthreescrews fromlaststep Installlightbulbs included Quitalelostornillosdelalojamientodelinterruptor guardalosparaelproximopaso conecte...
Страница 18: ...geramente de ambas cadenas en la pieza de uni n Light fixture installation Instalaci n del artefacto luminoso 21 Locate the indentations on the neck of the glass and align with the protrusions on the...
Страница 19: ...arm air off the ceiling area as shown in illustration B This allows you to set your heating unit on a lower setting without affecting your comfort NOTE Turn off and wait for fan to stop before changin...
Страница 20: ...e ascendente aleja el aire caliente del rea del ventilador de techo como lo indica la ilustraci n B Esto le permite ajustar la calefacci n a un nivel m s bajo sin que afecte su comodidad NOTA Apague e...
Страница 21: ...f the wobble Check for wobble after each step 1 Check that all blades are screwed firmly into blade holders 2 Check that all blade holders are tightened securely to motor 3 Make sure that canopy and m...
Страница 22: ...deber aneliminarlamayor adelosproblemasdeoscilaci n Verifiquelaoscilaci ndespu sdecadapaso 1 Verifique que todas las aletas est n firmemente atornilladas a los soportes de las aletas 2 Verifique que...
Страница 23: ...tch 6 Light Control Switch 7 Capacitor 8 Hardware Pack No Descripci n 1 Soporte de montaje 2 Soporte para aleta 3 Aleta 4 Pantalla de vidrio 5 Interruptor de control de velocidad para ventilador 6 Int...
Страница 24: ...ng Philadelphia PA 19154 1029 U S A www westinghouselighting com WESTINGHOUSE and INNOVATION YOU CAN BE SURE OF are trademarks of Westinghouse Electric Corporation Used under license by Westinghouse L...