Westinghouse 3/4 HP Скачать руководство пользователя страница 10

QKGA010 10
 

ENGLISH

Operation

TESTING AND OPERATION


- Remove sink stopper. Turn on a medium flow of cold water.

TIPS FOR SUCCESSFUL OPERATION


- Turn switch to ON position; your motor is turning at full speed 

and ready to use .


- Be sure disposer is empty before using your dishwasher so 

it may drain properly .


- You may want to leave the stopper in the drain when not in 

use to prevent utensils and foreign objects from falling into 
the disposer .


- Your disposer is ruggedly built to give you many years of 

trouble free service . It will handle all normal food wastes, 
but it will NOT grind or dispose of such items as plastic, tin 
cans, bottle caps, glass, china, leather, cloth, rubber, string, 
clam and oyster shells, aluminum foil or feathers .


- Slowly insert food waste into disposer (table scraps, peelings, 

rinds, seeds, pits, small bones and coffee grounds) . To speed 
up food waste disposal, cut or break up large bones, rinds 
and cobs. Large bones and fibrous waste require considerable 
grinding time and are more easily thrown away with other 
trash . Do not be alarmed that the disposer slows down while 
grinding . The disposer is actually increasing torque (grinding 
power) and is operating under normal conditions .


- Before turning disposer off, let water and disposer run for 

approximately 15 seconds after shredding or grinding stops . 

This assures that all waste is throroughly flushed through trap 

and drain .


- It is not recommended to use hot water while running disposer . 

Cold water will keep waste and fats solid so disposer can flush 
away particles .

NOTE:


The anti-jam swivel impellers make a clicking sound as they initially swing 

into place. This indicates normal operation.

Care and Maintenance

DO NOT ATTEMPT TO LUBRICATE YOUR DISPOSER!

The motor is permanently lubricated . The disposer is self cleaning and scours its internal parts with each use . NEVER put lye or chemical drain 

cleaners into the disposer, as they cause serious corrosion of metal parts . If used, resulting damage can be easily detected and all warranties 
are void . Mineral deposits from your water can form on the stainless steel turntable, giving the appearance of rust . DO NOT BE ALARMED, the 
stainless steel turntables used will not corrode .

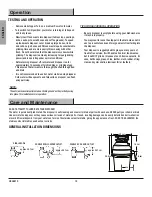
GENERAL INSTALLATION DIMENSIONS

SINGLE BOWL

approx 25 .7 cm

DOUBLE BOWL CENTER OUTLET

approx 25 .7 cm

DOUBLE BOWL END OUTLET

approx 25 .7 cm

22 cm

14 .5 cm

38 .8 cm

18 cm

11 .9 cm

Содержание 3/4 HP

Страница 1: ...2588 QKGA010 HIGH TORQUE GARBAGE DISPOSER 3 4 HP OWNER S MANUAL NOTE This product may require approval of the relevant regulators and or the sewerage system operator Waste disposal must be installed a...

Страница 2: ...waste disposer use long handled tongs or pliers If the disposer is magnetically actuated non magnetic tools should be used 6 When not operating a disposer leave the drain cover stopper in place to red...

Страница 3: ...llation or use of this product We will not be held liable for inconvenience caused by loss of use of this product costs incurred for labour or materials removal and installation of replacement units o...

Страница 4: ...ool Cushion Mount Bottom Supporting Ring B C E D G Part Description Quantity A Stopper 1 B Removable splash guard 1 C Includes Sink flange Rubber sink flange gasket Flange ring Ring tool 1 1 1 1 D Inc...

Страница 5: ...e tube will provide additional leverage for turning the mounting ring see Fig 2 Some disposers may require the removal or loosening of nuts from the mounting screws see Fig 3 Some disposers may requir...

Страница 6: ...Fig 6 Use duct tape or place a heavy object on top of the sink flange to keep it in place Stretch the flange ring and insert the ends securely into the ring tool Keep your fingers away from the ends...

Страница 7: ...ed to the discharge elbow correctly see Fig 9a Connect the discharge elbow to the disposer see Fig 9 Slot Tab Elbow Gasket Groove Discharge Elbow Fig 9a Fig 9 REMOVING KNOCKOUT PLUG SKIP THIS STEP IF...

Страница 8: ...e see Fig 12 Make sure the cushion mount is properly in place Line up the disposer under the mounting assembly Lift and guide the disposer so that all three tabs of the bottom supporting ring engage t...

Страница 9: ...the appropriate household current only WARNING Improper connection of the equipment grounding conductor can result in a risk of electric shock Check with a qualified electrician or serviceman if you a...

Страница 10: ...rinding The disposer is actually increasing torque grinding power and is operating under normal conditions Before turning disposer off let water and disposer run for approximately 15 seconds after shr...

Страница 11: ...ripped The reset button is red and is located on the front end of the disposer Push the button in until it clicks and remains depressed If the reset button has not been tripped check for a shorted or...

Страница 12: ...y A B E F Sink Flange Gasket Supporting Plate Top Supporting Ring with 3 screws Flange Ring Cushion Mount C D Ring Tool Part Description Code Quantity A Stopper QHG108 1 B Removable splash guard QHG11...

Страница 13: ...antry Dublin 9 Ireland 61 2 968 127 62 cs conglomkb com service available Monday Friday from 6 30 am 3 pm AEDT www conglomkb com Made in China and WESTINGHOUSE are trademarks of Westinghouse Electric...

Отзывы: