background image


18 

Accessories 

Optionally Westfalia offers 

–  a telescope and undercarriage kit, article number 69 48 44 

–  a replacement shrub/hedge blade, article number 69 48 51 and 

–  a replacement grass shear blade, article number 69 48 36.


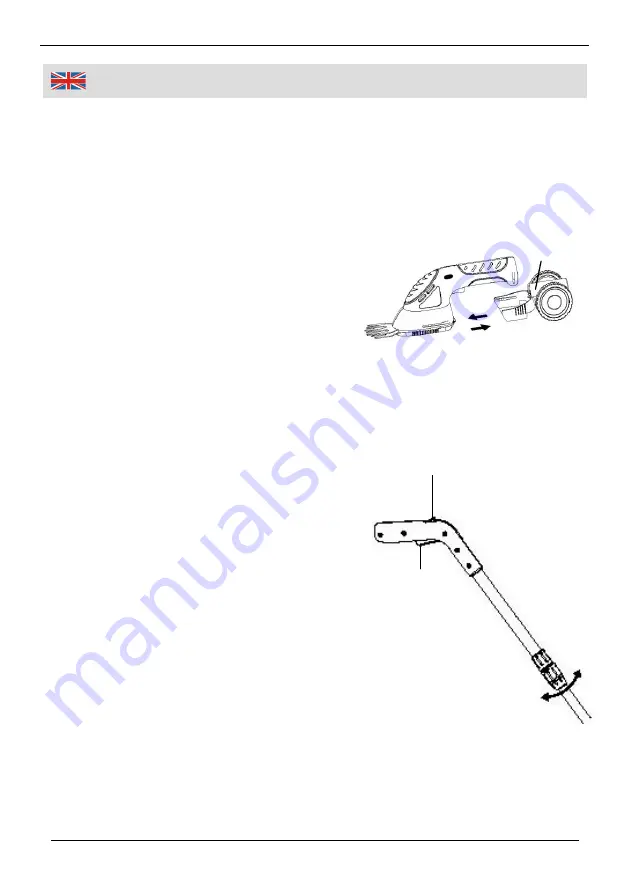
Using the Undercarriage (Optional) 

1.  Press  the  undercarriage  in  the  grass 

and  hedge  shear  until  the  mounting 
locks  audible.  On  both  sides  of  the 
housing you will find two notches. Make 
sure  the  undercarriage  locks  in  these 
notches. 

2.  Use  the  undercarriage  when  trimming  grass  over  the  ground.  Hold  the 

handle of the grass and hedge shear firmly in your hand and do not force 
the grass and hedge shear while trimming. 

3.  To  remove  the  undercarriage,  hold  the  handle  of  the  grass  and  hedge 

shear  firmly  in  one  hand  and  jerky  pull  the  undercarriage  out  of  the  unit 
with the other hand. 

Using the Telescope Tube (Optional) 

1.  To  extend  the  telescope  tube,  turn  the 

screw joint counter clockwise. 

2.  Pull  the  handle  out  of  the  tube  to  the 

desired length. 

3.  For  fastening  the  tube,  turn  the  screw 

joint clockwise. 

4.  Insert  the  telescope  tube  into  the 

provided connection on the undercarriage 
and  adjust  the  desired  height.  The  tele-
scope tube can be mounted on the grass 
and hedge shear into 8 different positions 
at  an  arc  radius  of  360°.  When  inserting 
the telescope tube make sure to push the tube as far  as it will go, so the 
small pin, situated close to the release button (10), completely disappears 
in  the  undercarriage  connection.  The  tube  has  to  lock  audible. 


Содержание 66 33 28

Страница 1: ...Akku Gras und Strauchschere Artikel Nr 66 33 28 Cordless Grass and Hedge Shear Article No 66 33 28 Bedienungsanleitung Instruction Manual...

Страница 2: ...it easier for you to handle the device appropriate ly and help prevent misunderstandings and possible damages or injuries Durch ihr umfangreiches Zubeh r ist diese Gras und Strauchschere universell e...

Страница 3: ...III bersicht Overview 6 2 10 1 9 8 3 5 4 7...

Страница 4: ...eitsschalter Safety Switch 4 EIN Schalter ON Switch 5 Messerabdeckung Blade Cover 6 Grasmesser Grass Shear Blade 7 Strauch Heckenmesser Shrub Hedge Blade 8 Fahrgestell Optional Undercarriage Optional...

Страница 5: ...Optional Page 18 Maintenance and Care Page 19 Technical Data Page 20 Sicherheitshinweise Seite 2 Laden des Akkus Seite 10 Entnehmen und Einsetzen des Messers Seite 10 Einbau des Strauch Heckenmessers...

Страница 6: ...elheit Tragen Sie geeignete Arbeitskleidung Sorgen Sie beim Arbeiten immer f r einen sicheren Stand Vergewissern Sie sich beim Benutzen von Leitern oder Ger sten dass diese stabil sind und nicht kippe...

Страница 7: ...nd 30 C au er Reichweite von Kindern und zu beaufsichtigenden Personen Laden Sie den Akku nur bei Umgebungstemperaturen zwischen 10 C und 40 C Ein geladener Akku kann in einer Umgebungstemperatur zwis...

Страница 8: ...Do not work in the dark Wear suitable clothing Make sure you have a firm foothold when operating the grass and hedge shear When using ladder or scaffold make sure they are stable and cannot topple ove...

Страница 9: ...need of supervision Only charge the battery at an ambient temperature between 10 C and 40 C A charged battery can be used to power the unit under ambient temperature conditions between 0 C and 50 C Do...

Страница 10: ...nts appropri s Assurez vous que vous travaillez toujours sur une base solide assurez vous que lors de l utilisation d chelles ou d chafaudages que celles ci soient stables Soyez prudent lorsque vous c...

Страница 11: ...temp ratures ambiantes comprises entre 10 C et 40 C Une batterie compl tement charg e peut tre utilis e une temp rature ambiante comprise entre 0 C et 50 C Les piles ne doivent pas tre sorties de l a...

Страница 12: ...rasporto la mano sull interruttore ON ed infilare sempre la pellicola protettiva sul coltello quando non si utilizza il dispositi vo Un attento utilizzo del dispositivo riduce il rischio da lesioni da...

Страница 13: ...a pu essere utilizzato per l avvio del dispositivo a temperature tra i 0 C e i 50 C Le batterie non devono essere smontate gettate nel fuoco o messe sotto cortocircuito Se l apparecchio risulta danneg...

Страница 14: ...ras und Strauchschere Die Ladekon trollanzeige 2 leuchtet nach einer Weile rot auf Nach Beendigung des Ladevorganges in ca 5 Stunden leuchtet die Ladekontrollanzeige gr n 2 Ziehen Sie den Netzstecker...

Страница 15: ...sich die Mittellinie der Markierungs rippe exakt unterhalb oder oberhalb des Getrieberades befindet wie in den oberen Abbildungen gezeigt 2 Bewegen Sie das Obermesser bis sich die Mittellinie des Pla...

Страница 16: ...smessers auf die vier Haltestifte am Getriebeschlitten Beachten Sie dass die Nocke des Getrieberades komplett in den Plastikring einschnappt 4 Achtung Bet tigen Sie NICHT den Schalter bevor die Messer...

Страница 17: ...n Hand den Handgriff der Gras und Strauchschere fest und ziehen mit der anderen Hand das Fahrgestell mit einem kr ftigen Ruck heraus Benutzung mit Teleskopstiel Optional 1 Drehen Sie zum Verstellen de...

Страница 18: ...dann den Stiel aus dem Fahrgestell heraus Wartung und Pflege Nehmen Sie f r alle Wartungsarbeiten das Messer ab Reinigen Sie Ihr Ger t gegebenenfalls mit einem feuchten Tuch Benutzen Sie keine chemis...

Страница 19: ...harger with a wall socket and the charging socket of the grass and hedge shear Some time later the charging indicator lamp 2 lights red After charging the battery after nearly 5 hours the charging ind...

Страница 20: ...hat the middle line of the marking rib on the gear wheel is exactly positioned downwards or upwards as shown in the upper figures 2 Move the upper blade of the shrub hedge blade until the middle line...

Страница 21: ...hole 3 Place the four locking holes of the grass blades onto the four locking pins on the gear carriage Make sure that the cam of the gear wheel completely snaps into the plastic ring 4 Warning Do NO...

Страница 22: ...ng 3 To remove the undercarriage hold the handle of the grass and hedge shear firmly in one hand and jerky pull the undercarriage out of the unit with the other hand Using the Telescope Tube Optional...

Страница 23: ...pull the tube out of the undercarriage Maintenance and Care Remove the blades before undertaking any cleaning or maintenance work If necessary use only a moistened cloth to clean the grass and hedge s...

Страница 24: ...Battery Energy Ladedauer Stunden 5 Charging Time Hours Gewicht mit Hecken messer 915 g Weight with hedge blade Schalldruckpegel 78 dB A Sound Pressure Level Schallleistungspegel 90 dB A Sound Power L...

Страница 25: ...offe in Elektro und Elektronikger ten RoHS und deren nderungen festgelegt sind Hagen den 6 Juni 2012 Thomas Klingbeil Qualit tsbeauftragter We the Westfalia Werkzeugcompany Werkzeugstra e 1 D 58093 Ha...

Страница 26: ...d ch Internet www westfalia net Kundenbetreuung Customer Services is Werter Kunde bitte helfen Sie mit Abfall zu vermeiden Sollten Sie sich einmal von diesem Artikel trennen wollen so bedenken Sie bit...

Отзывы: