DATA LIFEGUARD DIAGNOSTICS (DLGDIAG)
DLGDIAG FOR DOS – 10
USER MANUAL
DLGDIAG for DOS
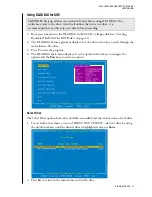
DLGDIAG for DOS is a DOS version of the Data Lifeguard Diagnostics utility that
determines the physical condition of a WD hard drive. If you are having computer problems
that you suspect are hard drive related, you can test your drive with this tool. This diagnostic
utility is designed for WD hard drives larger than 8.4 GB with a model number starting with
“WD.”
Supported Products
Internal Hard Drives
WD SATA
WD EIDE
Creating Bootable DLGDIAG for DOS Disks
Floppy Disk
1. Go to
and
download the Data Lifeguard Diagnostics for DOS
(Floppy) program (DlgDiagvXXXx.exe or DlgDiagvXXXx.zip) to your desktop. Extract
the DlgDiagvXXXx.exe file from DlgDiagvXXXx.zip if you download the Zip file.
2. Double-click the DlgDiagvxxx Diskette Creator icon on your desktop, follow the
instructions in each screen to create your DLGDIAG floppy disk.
You can now boot to your DLGDIAG floppy disk. Make sure the boot order in your system
BIOS is set to boot from the floppy drive first.
CD-ROM
1. Go to
and
download the Data Lifeguard Diagnostics for DOS
(CD) program (DiagXXXxCD.iso or DiagXXXxCD.zip) to your desktop. Extract the
DiagXXXxCD.iso file from DiagXXXxCD.zip if you download the Zip file.
2. Use a CD burning program to burn a CD from the DiagXXXxCD.iso image. Refer to
your CD burning program Help or user manual for details.
You can now boot to your DLGDIAG CD. Make sure the boot order in your system BIOS is
set to boot from the CD-ROM drive first.
Important
: If you have a pop-up blocker installed, you may need to disable it to download
the DLGDIAG software. A 3.5-inch floppy or CD-RW drive is required to create a
bootable DLGDIAG for DOS disk.
3


