
SETTING THE AUDIO LEVEL TO YOUR RIG:
Before using the RIGblaster you must have your radio set up properly for normal SSB
operation. Changing your microphone gain or speech processor settings on your rig after
setting up the RIGblaster will require that you re-adjust the RIGblaster or computer.
To have the best possible signal, you need to understand how your rig is adjusted.
Modern rigs may have several adjustments for transmit audio, including; mic. gain, mic.
equalization and/or transmit shift, speech compression and ALC (automatic level
control). The objective of setting these adjustments is to have clean clear audio and a
minimum amount of splatter or RF bandwidth.
The primary adjustment is your mic. gain. This sets amount of the audio amplification for
the microphone. The speech compressor basically makes loud speech softer and soft
speech louder, reducing the range between soft and loud. If your rig has transmit shift
or equalization of the audio you can also adjust the tone quality of your audio. An ALC
circuit is provided to minimize the possibility of too much audio over driving the rig and
causing flattopping or splatter. You should understand the interaction of these circuits,
and their adjustments. Consider your microphone and personal voice characteristics. To
get the best audio from your station and work the most DX you need to set your radio
carefully. Turning everything up for maximum smoke will NOT make you more
intelligible....you will just be distorted.
The basic idea of adjusting your rig is to not overdrive it, and to achieve best intelligibility.
Do not simply use your power output meter, but in addition use the ALC and speech
compression metering too.
Turn off your speech compressor and watch the ALC meter. Set the mic. gain BELOW
the correct maximum ALC indication on your loud speech. Your particular speech
characteristics and operating habits must to be considered.
Adjust your transmit shift and/or transmit audio equalization (tone control) for the best on
the air reports. You should consider the tone characteristics of your voice, your mic. and
your rig’s audio. Once you have set your tone equalization you may have to re-adjust the
mic. gain.
If you use speech compression do not over do it. You should use a moderate amount.
Remember that you will sound more natural without it and your shack noises will not be
picked up as much. Re-check your ALC indication with the compressor on. You should
ALWAYS be under the maximum correct ALC indication. With compression you should
indicate more ALC activity but not necessarily higher.
Now that you have the rig set up properly for voice you can set the audio drive level from
your computer to your rig.
Do not the change these settings.
Turn off your speech compressor. Set the Windows volume control (double click the
speaker icon in your system tray) and the wave volume as high as needed to drive your
rig properly. This setting may also may be regulated with the RIGblaster's ‘‘audio level’’
Put your software in transmit. Your RIGblaster digital light should be green and your
radio should indicate PTT activation. Audio should be driving your rig and you should be
transmitting. The audio level will probably be much too high. Turn down the wave output,
master volume and RIGblaster audio level as necessary. You must achieve less than full
RF output using your normal mic. setting, with the RF drive set to maximum.
You should be able to achieve a happy balance between controls when all they are all
set properly. Remember that the multiple audio controls are cascaded and all interact.
If any one of the controls turned down too much it will give the appearance of NO
TRANSMIT AUDIO.
If you are using PSK software make sure the transmit audio frequency is between 500
Hz and 2500 Hz. otherwise you will be outside the limits of your radio and you will be
unable to transmit properly.
A helpful way to monitor the transmit audio being fed to the RIGblaster is to listen to it at
the audio output jack with headphones or computer speakers.
7. WORK LOTS OF DX AND HAVE FUN:
You are on the air! Try all the modes, not
just one; experiment!
THIS COMPLETES THE BASIC INSTRUCTION SECTION OF THIS MANUAL......
FOR MORE INFORMATION PLEASE READ FURTHER AND VISIT OUR WEB
SUPPORT PAGE:
http://www.westmountainradio.com/support.htm
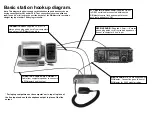
RIGblaster JUMPER INSTALLATION NOTES:
The jumper diagrams and charts in the back of this manual should be checked against
the microphone wiring diagram in your radio’s owners manual. Simply make sure that
mic. audio, mic. ground, PTT, and ptt ground are on the same pins. It is possible to
damage your radio, but only by inadvertently shorting out any DC voltage that may be on
the mic. jack. Pay particular attention to this before turning on your radio.
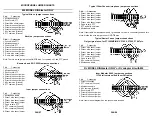
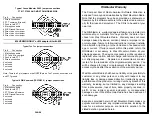
The diagrams only depict the actual appearance of the jumper block in the RIGblaster.
The black rectangles depict where the blue two-pin jumpers go. The black squares with
the wires depict where the black and white wire jumpers go. The circles denote no
jumpers or connections.
Remember that if your stock microphone checks out perfectly, including on the air
reports, you have the jumpers installed correctly and you are done with the jumpers.
After completing the jumper Installation you may put the cover on. Carefully align the rear
panel over the connectors and the control making sure that the side screw holes line up.
Be careful not to put pressure on the switch levers with your thumbs when putting the
cover on. The screws are sheet metal type and must be driven in firmly with a fresh
properly fitting #2 phillips head tip. They will be tight at first and then will go easier, do not
overtighten them when they reach bottom.
PAGE 4
PAGE 3