Weslo Cadence 715 Скачать руководство пользователя страница 6

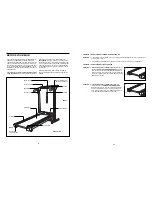
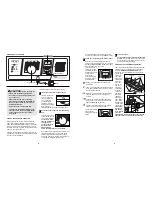
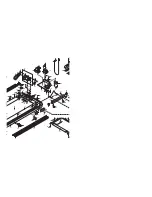
3. Carefully rotate the Console Base (45) to the posi-

tion shown. Secure the Console Base with the two
Console Base Bolts (29), Console Base Washers
(39), and Console Base Nuts (11) as shown.

Refer to the inset drawing. Tighten all four
Console Base Bolts (29) and Console Base Nuts
(11) as tightly as possible. Carefully lift up and
push down on the handrails to make sure that
the Console Base (45) does not move. Regularly
inspect and tighten all four Console Base Bolts
and Console Base Nuts.

4. Attach the Frame Guide (66) and the Frame Guide

Spacer (46) to the left side of the Frame (21) with
four Latch Screws (25). Note: Be careful not to
overtighten the Latch Screws. Make sure that the
thick end of the Frame Guide is at the bottom.

5.  Remove the backing from the Adhesive Clip (2).

Press the Adhesive Clip onto the base of the Upright
(37) in the indicated location. Press the Allen
Wrench (35) into the Adhesive Clip.

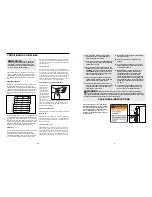
6. The Console (49) requires two "AA" batteries (not

included); alkaline batteries are recommended.

Open the Battery Cover (48) as shown. Press two
batteries into the battery compartment, with the
negative ends of the batteries (marked “–”)
touching the springs. 
Close the Battery Cover.

7. Make sure that all parts are properly tightened

before you use the treadmill. To protect the floor
or carpet from damage, place a mat under the 
treadmill.

6

3

4

5

11

6

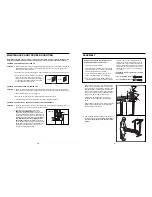
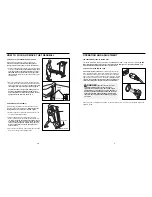
HOW TO LOWER THE TREADMILL FOR USE

1. Hold the upper end of the treadmill with your right hand

as shown. Using your left hand, slide open the storage
latch. Pivot the treadmill until the frame guide and the
foot rail are past the storage latch.

2. Hold the treadmill firmly with both hands, and lower the

treadmill to the floor. To decrease the possibility of
injury, bend your legs and keep your back straight.

Opened

Storage

Latch

Frame

Guide

45

39

11

11

29

29

39

21

35

48

49

Batteries

37

2

66

46

Thick end

25

29

11

29

11

45

Handrails

Содержание Cadence 715

Страница 1: ...ESCRIPTION of the part see the EXPLODED DRAWING and PART LIST attached in the centre of this manual WESLO is a registered trademark of ICON Health Fitness inc USER S MANUAL Model No WETL71590 Serial No Write the serial number in the space above for future reference CAUTION Read all precautions and instruc tions in this manual before using this equipment Save this manual for future reference Serial...

Страница 2: ...E YOU BEGIN on page 4 if the tread mill is not working properly 15 Never start the treadmill whilst you are stand ing on the walking belt Always hold the handrails whilst using the treadmill IMPORTANT PRECAUTIONS WARNING To reduce the risk of burns fire electric shock or injury to persons read the following important precautions and information before operating the treadmill SUGGESTED STRETCHES Th...

Страница 3: ...the left side of the chart ages are rounded off to the nearest ten years Next find the three numbers to the right of your age The three numbers are your rain ing zone The lower two numbers are recommended heart rates for fat burning the higher number is the recommended heart rate for aerobic exercise Fat Burning To burn fat effectively you must exercise at a relatively low intensity level for a su...

Страница 4: ...ls Console Storage Latch Speed Control Key Clip Circuit Breaker Walking Belt Foot Rails FRONT BACK RIGHT SIDE Rear Roller Adjustment Bolt Water Bottle Holder Bottle not included Accessory Tray Roller Guards PROBLEM THE WALKING BELT SLOWS WHEN WALKED ON SOLUTION a If an extension cord is needed use only a 14 gauge general purpose three cord of able of 5 feet 1 5m or less in length b If the walking ...

Страница 5: ...s listed If further assistance is needed please call our Customer Service Department PROBLEM THE POWER DOES NOT TURN ON SOLUTION a Make sure that the power cord is plugged into a properly earthed outlet See HOW TO PLUG IN THE POWER CORD on page 7 If an extension cord is needed use only a 14 gauge cord of five feet 1 5 m or less in length b After the power cord has been plugged in make sure that th...

Страница 6: ...ated location Press the Allen Wrench 35 into the Adhesive Clip 6 The Console 49 requires two AA batteries not included alkaline batteries are recommended Open the Battery Cover 48 as shown Press two batteries into the battery compartment with the negative ends of the batteries marked touching the springs Close the Battery Cover 7 Make sure that all parts are properly tightened before you use the t...

Страница 7: ... may come off To reduce the risk of injury use extreme caution whilst moving the tread mill Do not attempt to move the treadmill over an uneven surface 3 Place one foot on the base and carefully lower the tread mill until it is resting in the storage position Base Leg Front Wheels Storage Latch Frame Guide Closed THE PERFORMANT LUBETM WALKING BELT Your treadmill features a walking belt coated with...

Страница 8: ... and use only a sealable water bottle To stop the walking belt step onto the foot rails and turn the speed control to the RESET position Follow your progress with the monitor modes Note The console can display distance and speed in either kilometres or miles See HOW TO SELECT KILOMETRES AND MILES at the right When the power is turned on the console will automat ically scan through five different m...

Страница 9: ...w 53 1 Wire Harness Key No Qty Description 54 1 Grommet 55 2 Base Leg 56 7 Belly Pan Fastener 57 1 Belly Pan 58 2 Upright Spacer 59 1 Motor Tension Washer 60 1 Left Foot Rail 61 6 Frame Pivot Nut Base Leg Nut 62 2 Belt Guide 63 2 Wire Clip 64 1 Right Foot Rail 65 2 Roller Guard 66 2 Frame Guide 67 2 Foot 68 6 Pivot Washer Base Leg Washer 69 1 Right Endcap 70 1 Rear Roller Adj Bolt 71 4 Roller Adju...

Страница 10: ...40 58 61 62 52 15 12 74 15 40 12 16 18 17 15 14 13 40 8 12 75 15 67 40 69 71 72 40 67 70 71 83 15 15 60 6 21 37 53 61 90 78 79 76 61 55 35 52 73 2 43 65 95 68 68 71 71 81 63 59 88 50 40 40 31 40 31 40 84 88 85 87 89 10 20 52 9 44 40 9 26 23 22 54 27 80 81 13 9 38 25 82 85 12 40 9 92 94 93 91 39 11 29 29 11 39 9 25 66 66 25 46 EXPLODED DRAWING Model No WETL71590 R0499A ...

Страница 11: ...8 68 41 33 34 32 30 40 40 57 64 40 58 61 62 52 15 12 74 15 40 12 16 18 17 15 14 13 40 8 12 75 67 0 6 21 55 71 71 81 63 59 88 31 40 31 40 84 88 85 10 20 52 9 44 40 9 26 23 22 54 27 80 81 13 9 25 82 85 12 40 9 3 11 9 25 66 ...

Отзывы: