background image

Rockbook X500 Series User Manual

58 / 96


Permanent solar radiation 

Permanent exposure of the display to sunlight can cause
overheating and impair the functioning of the product. Please
observe the operating temperature in the technical data.

HINT 


Explosive or burning environment 

You should avoid placing the product near an explosive or burning
environment. If the product is placed too close to an explosive or
burning environment, the product may overheat and malfunction.

HINT 


Installation on the floor

Avoid placing the product on the floor. Other people or yourself
could trip over it.

CAUTION


Risk of injury during overhead installation

If the product is mounted above a work area where people are
working, the bracket may fail.

Use an additional safety rope to secure the product in
case of failure of the bracket.

CAUTION


Danger of short circuit due to defective cables

Defective cables can lead to short circuits and fires.

Before using electrically live cables, check that they are
not damaged.

Содержание Rockbook X500 Series

Страница 1: ...Copyright 2022 by WEROCK All Rights Reserved Rockbook X500 Series User Manual ...

Страница 2: ...er WLAN Funktion Wi Fi 34 Verwendung der Bluetooth Funktion 34 Verwendung des Fingerabdruckscanners 35 Skalierung und Einstellung der Bildschirmauflösung 36 Verwenden der Hot Swap Batteriefunktion 38 Wartung und Instandhaltung 42 Störungsbeseitigung 43 BIOS Setup 45 Anhang 49 Technische Daten 49 Aktualisierungen 50 EN User Manual 50 Read me First 51 Basic Safety Instructions 57 Intended use 60 War...

Страница 3: ...Bluetooth function 81 Using the fingerprint scanner 82 Scaling and setting the screen resolution 82 Using the hot swap battery function 84 Service and maintenance 88 Troubleshooting 89 BIOS Setup 92 Appendix 94 Technical specifications 94 Updates 96 ...

Страница 4: ... von Rockbook X500 in deutscher Sprache Diese Anleitung bezieht sich auf die Modelle Rockbook X540 Rockbook X550 und Rockbook X550 G2 welche nachfolgend immer als Rockbook X500 beschrieben werden wenn ein bestimmter Teil auf alle drei Modelle zutrifft Impressum WEROCK Technologies GmbH Kallhardtstr 20 75173 Pforzheim Deutschland Tel 49 7231 4709405 10 Mail info werocktools com www werocktools com ...

Страница 5: ...raktive Elemente die dieses Handbuch möglicherweise enthält in dieser Fassung nicht zur Verfügung stehen Zielgruppen der Betriebsanleitung Zielgruppe Aufgaben Betreiber Diese Anleitung und mitgeltende Dokumente am Einsatzort der Anlage verfügbar halten auch für spätere Verwendung Mitarbeiter zum Lesen und Beachten dieser Anleitung und der mitgeltenden Dokumente anhalten insbesondere der Sicherheit...

Страница 6: ...zungen führen könnte HINWEIS Situation die zu einem möglichen Sachschaden an dem Produkt führen kann Signalwort Gefahr GEFAHR Art und Quelle der Gefahr Erläuterung zur Art und Quelle der Gefahr Maßnahmen zur Abwendung der Gefahr Signalwort Warnung WARNUNG Art und Quelle der Gefahr Erläuterung zur Art und Quelle der Gefahr Maßnahmen zur Abwendung der Gefahr Signalwort Vorsicht VORSICHT Art und Quel...

Страница 7: ...cherheit bei Allgemeines Gebotssymbol Allgemeines Warnsymbol Allgemeines Verbotssymbol Warnsymbole in der Betriebsanleitung Warnung vor schwebender Last Warnung vor heißer Oberfläche Warnung vor Quetschgefahr Schutzbrille tragen Sicherheitsschuhe tragen Schutzhandschuhe tragen Verbotssymbole in der Betriebsanleitung Betreten der Fläche verboten Zutritt für unbefugte Verboten Verbot für Personen mi...

Страница 8: ...estellt Beispiel für die Darstellung von Voraussetzungen Die Kaffeemaschine ist aufgestellt und angeschlossen Die Kaffeemaschine ist ausgeschaltet Darstellung von Handlungsschritten In fester Abfolge Handlungsanweisungen in fester Reihenfolge werden mit einer laufenden Nummerierung versehen Die Reihenfolge der Arbeitsschritte ist unbedingt einzuhalten Beispiel für eine Handlungsanweisung mit feste...

Страница 9: ...weisung mit Ergebnissen 1 Schalten Sie die Kaffeemaschine am Hauptschalter 1 ein Die Kaffeemaschine wärmt auf solange der Hauptschalter blinkt Leuchtet der Hauptschalter dauerhaft ist die Kaffeemaschine einsatzbereit 2 Stellen Sie ein Gefäß unter den Auslauf 3 Drücken Sie den Hauptschalter 1 erneut Der Kaffee wird zubereitet Die Kaffeeausgabe endet automatisch Weitere Hinweise WEROCK Technologies ...

Страница 10: ...es GmbH erklärt hiermit dass alle unsere Produkte RoHS konform hergestellt werden REACH Konformitätserklärung WEROCK Technologies GmbH ist ein Hersteller von elektronischer Hardware Wir gelten daher als nachgeschalteter Anwender soweit es das REACH Dokument betrifft WEROCK Technologies GmbH ist daher nicht verpflichtet sich bei der Europäischen Agentur für Chemikalien ECHA zu registrieren Die von ...

Страница 11: ...s die Stromversorgung in dem Sie am Stromkabel selber ziehen oder zerren Keine Verbindungen herstellen solange die Stromversorgung eingeschaltet ist Empfindliche elektronische Bauteile können durch plötzliche Überspannungen beschädigt werden Stellen Sie sicher dass die Stromspannung Ihrer Stromquelle korrekt ist bevor Sie das Produkt an die Steckdose anschließen Positionieren Sie das Stromkabel so...

Страница 12: ... führen Überprüfen Sie vor Verwendung von stromführenden Kabeln dass diese nicht beschädigt sind WARNUNG Lebensgefahr durch beschädigten Akku Wenn das Gehäuse sich aufblähen sollte ist der Akku defekt Der Akku könnte anfangen zu brennen oder explodieren Hören Sie sofort auf das Gerät zu benutzen Entfernen Sie den Akku aus dem Gerät und entsorgen diesen bei einer Rücknahmestelle Bringen Sie auf gar...

Страница 13: ...s zu berühren oder vom Produkt zu entfernen Vermeiden Sie die Bedienung des Produkts mit ungeeigneten Bedienstiften Verbiegen Sie nicht das Gerät Benutzen Sie das Produkt erst wieder wenn es durch qualifiziertes Fachpersonal gewechselt wurde Sicherheits und Überwachungseinrichtungen Bestimmungsgemäße Verwendung Das Gerät dient zum Ausführen von Computerprogrammen Es ist nicht für den Gebrauch im p...

Страница 14: ...icheren Entnahme der Batterien oder der Akkumulatoren Vergewissern sie sich ob die Batterie ganz entleert ist Drücken Sie au den Entriegelungsmechanismus und drücken Sie die Batterie nach unten und schieben Sie diese nach rechts zum Entriegelungsmechanismus hin Entnehmen Sie vorsichtig die Batterie oder den Akkumulator ...

Страница 15: ... X550 ist ein robuster Laptop für den professionellen Einsatz bei Rettungsdiensten Außeneinsätzen im Transportgewerbe oder bei Anwendungen in der Energieversorgung Es ist ein ausgezeichneter Begleiter für Alltagshelden Das vollrobuste äußerst widerstandsfähige Notebook wurde speziell für den Outdooreinsatz entwickelt und eignet sich für ganztägige Einsätze an jedem beliebigen Ort Das Rockbook punk...

Страница 16: ...Individualanpassungen aufgrund von Kundenanforderungen finden in diesem Handbuch keine Anwendung WEROCK stellt dem Kunde gegebenenfalls weitere Bedienhinweise zur Verfügung Bedienungs und Anzeigelemente Bedienungs und Anzeigelemente 1 Frontkamera 7 Statusanzeigen von links nach rechts ...

Страница 17: ... 2 Mikrofone 8 Tastatur Dient der Eingabe von Daten in den Computer 3 Display 9 Touchpad ein berührsensibles Zeigegerät 4 Loch zum Zurücksetzen des Computers 10 Anklicktasten links und rechts Zusammen mit 9 funktionierend wie eine Computer Maus 5 Programmierbare Funktionstaste 11 Fingerabdrucksensor für Windows Hello 6 An Aus Taster 12 Lautsprecher Linke Seite 1 Erweiterungsslot für 2 5 HDD Steckp...

Страница 18: ...96 1 RS232 Anschluss 4 USB Anschluss 2 3 5mm Kopfhöreranschluss 5 SD Kartenleser kompatibel mit SDHC Karten Die Kontakte der SD Karte müssen nach oben zur Tastatur hin zeigen 3 USB Anschluss 6 DC Eingang zum Anschluss des Netzteils Unten ...

Страница 19: ...etriebnahme und Verwendung des Produkts im Alltag lesen Sie die folgenden Anweisungen Dieses Kapital gibt Aufschluss u ber die korrekte Montage Anschluss und Verwendung des Produkts Hinweis Gegenstände die nicht in im Lieferumfang aufgeführt sind werden separat verkauft Erster Start Um das Rockbook X500 in Betrieb zu nehmen gehen Sie wie folgt vor 1 Einsetzen der Batterie 2 Verbinden zum Stromnetz...

Страница 20: ...Rockbook X500 Series User Manual 20 96 2 Drücken Sie die Batterie nach unten und schieben Sie diese nach links vom Entriegelungsmechanismus weg bis Sie ein hörbares Einrasten hören ...

Страница 21: ...Rockbook X500 Series User Manual 21 96 3 Die Installation ist abgeschlossen Überprüfen Sie nochmals ob die Batterie fest sitzt ...

Страница 22: ...bindung zum Stromnetz Sobald das Produkt montiert ist verbinden Sie das Produkt mit dem mitgelieferten Netzteil mit einer Steckdose Stellen Sie sicher dass das Kabel fest im Produkt steckt Der Ladevorgang wird durch eine LED auf der Vorderseite des Produkts signalisiert Verbindung zum Stromnetz 1 Verbinden Sie das Wechselstrom Anschlusskabel mit dem Netzteil 2 Öffnen Sie die Klappe zum DC Anschlus...

Страница 23: ...Rockbook X500 Series User Manual 23 96 3 Verbinden Sie das Netzteil mit einer Steckdose ...

Страница 24: ...ries User Manual 24 96 1 Um das Notebook zu öffnen drücken Sie auf die Displayverriegelung und heben den Deckel an während Sie mit der anderen Hand die Unterseite festhalten bis er eine aufrechte Position erreicht hat ...

Страница 25: ...Rockbook X500 Series User Manual 25 96 2 Drücken Sie den An Aus Schalter solange bis die Power LED leuchtet ...

Страница 26: ...önnen einzelne Schritte leicht abweichen Einrichten von Windows 10 Führen Sie die folgenden Schritte aus um den Einrichtungsprozess von Windows abzuschließen 1 Drücken Sie den Netzschalter um den Computer einzuschalten 2 Wählen Sie zunächst Ihr Land Ihre Region Ihre bevorzugte App Sprache Ihr bevorzugtes Tastaturlayout und Ihre Zeitzone und tippen Sie dann auf Next 3 Lesen Sie auf dem Bildschirm H...

Страница 27: ... Klicken Sie im Bildschirm Schnell loslegen auf Express Einstellungen verwenden für die schnellste Einrichtung Wenn Sie weitere Informationen wünschen tippen Sie auf Mehr erfahren oder wenn Sie Ihre eigenen Optionen auswählen möchten klicken Sie auf Einstellungen anpassen 6 Um ein lokales Konto zu erstellen geben Sie Ihren Benutzernamen Ihr Kennwort und den Kennworthinweis in die vorgesehenen Feld...

Страница 28: ...ig Bedienung des Geräts Dieses Kapitel bietet Informationen zur Benutzung des Computers VORSICHT Hautirritationen Setzen Sie Ihre Haut nicht dem Computer aus wenn Sie ihn in einer sehr heißen oder kalten Umgebung betreiben Wenn Sie den Computer bei hohen Temperaturen verwenden kann er unangenehm warm werden Legen Sie den Computer in einem solchen Fall aus Sicherheitsgründen nicht auf Ihren Schoß u...

Страница 29: ... Sie auf das Windows Symbol 2 Klicken Sie anschließen auf das Power Symbol 3 Klicken Sie abschließend auf Herunterfahren Energiesparmodus Schlafmodus Es gibt mehrere Möglichkeiten den Computer in den Energiesparmodus zu versetzen 1 Drücken Sie den An Aus Schalter diese Funktion kann über die Windows Systemeinstellungen verändert werden 2 Schließen Sie den Notebookdeckel 3 Führen Sie dieselbe Proze...

Страница 30: ...ein Cursor Zeigegerät das alle Funktionen einer Zwei Tasten Maus bietet Seine Hauptfunktion besteht darin den Cursor auf dem Bildschirm zu bewegen Sie können auch auf Objekte auf dem Bildschirm zeigen sie auswählen oder ziehen 3 Fn Tasten Drücken Sie die Fn Taste in Kombination mit den Funktionstasten 1 um software spezifische Funktionen auszuführen 7 Rechte Maustaste 4 Windows Taste Drücken Sie d...

Страница 31: ...sten Maus bietet Seine Hauptfunktion besteht darin den Cursor auf dem Bildschirm zu bewegen Sie können auch Elemente oder Objekte auf dem Bildschirm zeigen sie auswählen oder ziehen Funktionen Zeigen Bewegen Sie Ihren Finger auf dem Toucpad um den Cursor auf ein Element oder Objekt auf dem Bildschirm zu richten Klicken Um mit der linken Maustaste zu klicken bewegen Sie den Cursor auf das Element o...

Страница 32: ...as Icon Hardware sicher entfernen und Medium auswerfen 2 Klicken Sie auf die Speicherkarte die sie entfernen möchten 3 Öffnen Sie die Portabdeckung 4 Drücken Sie leicht auf die SD Karte um diese zu entriegeln 5 Danach können Sie die Karte herausziehen Benutzen des Touchscreens Benutzen des Touchscreens Einige Modelle sind mit einem kapazitiven Touchscreen ausgestattet Diese Art von Touchscreen rea...

Страница 33: ...Zoomen mit dem Mausrad unterstützen Drehen Bewege zwei Finger in entgegengesetzte Richtungen oder Einen Finger um einen anderen drehen Verwenden Sie das Drehen zum Verschieben eines Bildes oder ein anderes Elements auf dem Bildschirm in eine kreisförmige Richtung im Uhrzeigersinn oder gegen den Uhrzeigersinn Die Geste funktioniert in Anwendungen die die diese spezielle Geste unterstützen Drücken u...

Страница 34: ...werksymbol unten rechts in der Taskleiste 3 Klicken Sie in der Liste der verfügbaren drahtlosen Netzwerke auf ein Netzwerk und dann auf Verbinden 4 Für einige Netzwerke ist ein Netzwerksicherheitsschlüssel oder eine Passphrase erforderlich Um eine Verbindung mit einem dieser Netzwerke herzustellen fragen Sie Ihren Netzwerkadministrator oder Internetdienstanbieter ISP nach dem Sicherheitsschlüssel ...

Страница 35: ...Der Fingerabdruckscanner sofern Ihr Modell über diese Funktion verfügt bietet einen starken Authentifizierungsmechanismus der auf der Erkennung von Fingerabdrücken basiert Sie können sich bei Windows anmelden und den Sperrbildschirm mit einem registrierten Fingerabdruck anstelle eines Passworts deaktivieren Um eine optimale Leistung zu erzielen sollten sowohl die Scanfläche als auch der Finger sau...

Страница 36: ...e bewirkt ohne dass Sie auf die optimale Auflösungseinstellung von 1920 x 1200 verzichten müssen In diesem Abschnitt wird erklärt wie Sie die integrierte Windows Anzeigeskalierung sowie die Auflösungseinstellung anpassen können Bitte beachten Sie Bevor Sie die Skalierungsoption ändern vergewissern Sie sich dass alle geöffneten Dokumente gespeichert und geschlossen sind und dass alle laufenden Anwe...

Страница 37: ...flösung ändern um die Bildschirmelemente zu vergrößern 1 Tippen Sie auf eine beliebige Stelle des Desktops halten Sie sie 3 Sekunden lang gedrückt und lassen Sie sie los um das Kontextmenü aufzurufen 2 Wählen Sie die Option Anzeigeeinstellungen 3 Klicken Sie bei Bildschirmauflösung auf das Dropdown Menü und wählen Sie die gewünschte Auflösung durch Tippen auf die Skala ...

Страница 38: ...pt Akku auszutauschen Um Hot Swap zu unterstützen befindet sich im Inneren des Notebooks ein Backup Akku der zusammen mit dem Haupt Akku aufgeladen wird Dieser Akku kann nicht entfernt werden und benötigt eine ausreichende Stromversorgung für das Hot Swapping des Haupt Akkus Wenn der Backup Akku vollständig aufgeladen ist kann das Tablet bis zu 30 Minuten Laufzeit für das Hot Swapping des Haupt Ak...

Страница 39: ...Rockbook X500 Series User Manual 39 96 3 Entnehmen Sie vorsichtig die Batterie oder den Akkumulator 4 Setzen Sie nun die neue Batterie in das Batteriefach Richten Sie die Batterie dabei zuerst an dem ...

Страница 40: ...nual 40 96 Entriegelungsmechanismus an und legen dann die Batterie komplett in das Fach 5 Drücken Sie die Batterie nach unten und schieben Sie diese nach links vom Entriegelungsmechanismus weg bis Sie ein hörbares Einrasten hören ...

Страница 41: ...ockbook X500 Series User Manual 41 96 6 Die Installation ist abgeschlossen Überprüfen Sie nochmals ob die Batterie fest sitzt 7 Die neue Batterie ist nun eingesetzt und Sie können Ihre Arbeit fortsetzen ...

Страница 42: ...er Support Für die aktuellsten Informationen über dieses Produkt Dokumentation technische Spezifikationen Systemanforderungen Kompatibilitätsinformationen etc besuchen Sie www werocktools com Dieses Handbuch enthält einfache Hilfestellungen zur Fehlerbehebungen bei vollständigem Defekt oder gravierenden Beschädigungen kontaktieren Sie bitte Ihren Distributor Vertriebsansprechpartner oder den Kunde...

Страница 43: ...enden Sie sich an einen autorisierten Fachhändler um Hilfe zu erhalten Allgemeine Probleme lösen Der auswechselbare Akku wird nicht geladen Die Akkuanzeige blinkt rot Vergewissern Sie sich dass der Netzadapter richtig angeschlossen und der herausnehmbare Akku richtig eingesetzt ist Stellen Sie sicher dass der Akku nicht zu heiß oder kalt ist Lassen Sie dem Akku Zeit auf Raumtemperatur zu kommen We...

Страница 44: ...r jedes Wireless LAN Gerät im Netzwerk gleich ist Starten Sie das Notebook neu Stellen Sie sicher dass die Einstellung der IP Adresse oder der Subnetzmaske korrekt ist Ich kann keine Verbindung zu einem anderen Gerät mit Bluetooth herstellen Vergewissern Sie sich dass bei beiden Geräten Bluetooth eingeschaltet ist Stellen Sie sicher dass der Abstand zwischen den beiden Geräten max 10 Meter beträgt...

Страница 45: ...t nicht automatisch in den Ruhezustand oder den Ruhemodus Wenn Sie eine Verbindung zu einem anderen Computer haben wechselt der Computer nicht in den Ruhezustand oder den Ruhemodus wenn die Verbindung aktiv ist Vergewissern Sie sich dass die Zeitüberschreitung für den Ruhezustand oder den Ruhemodus aktiviert ist Der Computer wechselt nicht sofort in den Ruhezustand oder den Ruhemodus Wenn der Comp...

Страница 46: ...ühren wenn Sie eine Fehlermeldung auf dem Bildschirm sehen die Sie auffordert das BIOS Setup Utility auszuführen Sie die werkseitigen BIOS Standardeinstellungen wiederherstellen möchten Sie einige spezifische Einstellungen entsprechend der Hardware ändern möchten Sie möchten bestimmte Einstellungen ändern um die Systemleistung zu optimieren So führen Sie das BIOS Setup Dienstprogramm aus 1 Klicken...

Страница 47: ...nnen das Benutzerkennwort nur festlegen wenn das Supervisor Kennwort festgelegt wurde Wenn sowohl das Administrator als auch das Benutzerkennwort festgelegt sind können Sie jedes der beiden Kennwörter eingeben um das System zu starten und oder das BIOS Setup aufzurufen Mit dem Benutzerkennwort können Sie jedoch nur die Einstellungen bestimmter Elemente anzeigen ändern Eine Kennworteinstellung wird...

Страница 48: ...enommen haben müssen Sie diese speichern und beenden damit die Änderungen wirksam werden Save Changes and Exit Speichert die von Ihnen vorgenommenen Änderungen und beendet das BIOS Setup Programm Discard Changes and Exit Beendet das BIOS Setup Dienstprogramm ohne die vorgenommenen Änderungen zu speichern Save Changes and Reset Speichert die von Ihnen vorgenommenen Änderungen und startet das Gerät ...

Страница 49: ...is Intel Celeron 3687U 2 x 1 8 GHz Intel Core i5 8250U 4 x 1 6 GHz 3 4 GHz max Intel Core i7 8550U 4 x 1 8 GHz 4 GHz max GPU Intel Iris Xe Graphics Intel HD Grafik 610 Intel UHD Grafik 620 RAM 16 GB DDR3 4 GB DDR3 8 GB DDR3 Speicher 256 512 GB 1 TB oder 2 TB PCIe M 2 SSD zweite Festplatte über SATA Erweiterungsslot 64 bis 512 GB Military Grade M2 SSD zweite Festplat über Erweiterungsslot Unterstüt...

Страница 50: ...e nicht uns zu kontaktieren Handbuchversion Datum Änderungen 1 0 23 12 2020 Initiale Veröffentlichung der Betriebsanleitung 1 1 29 12 2021 Information gemäß 4 Absatz 4 Elektrogesetz 1 2 Erweiterung um die Produktvarianten X540 X550 G2 Korrektur Kapitelüberschrift Benutzung des Speicherkartenslots Anpassen der Handbuchstruktur Neues Kapitel Windows zum ersten Mal einrichten Update Kapitel Ausschalt...

Страница 51: ...sive for you The operating instructions inform and warn you of residual risks against which risk reduction by design and protective measures is not or not fully effective The digital structure of this manual enables permanent adaptation If a specific topic is not or not sufficiently covered please do not hesitate to contact us We will be happy to supplement the document accordingly Please note tha...

Страница 52: ...ormation This pictogram indicates important additional information that contains a warning of a danger Presentation of warnings Security level signal word Significance and consequences of non compliance Warning notice DANGER Imminent danger which leads to serious physical injury or death WARNING Potentially dangerous situation that could lead to serious injury or death CAUTION Potentially dangerou...

Страница 53: ...in the operating instructions The possible symbols in the operating instructions are divided into the categories warning command and prohibition symbols Warning symbols warn of danger points risks and obstacles Mandatory symbols serve to prevent accidents at the workplace Prohibition symbols contribute to more safety General commandment symbol General warning symbol General prohibition symbol Warn...

Страница 54: ... in tabular form below the figure Position numbers or letters are used for the references 1 Sensor 3 Micro USB Connector 2 Start Stop Button 4 Battery status LEDs Presentation of requirements Sind für das Ausführen einer Tätigkeit an der Maschine bestimmte Voraussetzungen zwingend werden diese im Text mit einer Checkbox gekennzeichnet und im Fettdruck dargestellt Beispiel für die Darstellung von V...

Страница 55: ... final results Intermediate results represent procedures that are not carried out by the user and are marked with an arrow Final results indicate the end of the action and are marked with a double arrow Example of an action instruction with results 4 Switch the coffee machine on at the main switch 1 The coffee machine warms up as long as the main switch is flashing If the main switch permanently t...

Страница 56: ...rocktools com RoHS Declaration of Conformity We hereby declare that our products comply with the RoHS Directive 2011 65 EU of the European Parliament and of the Council of 08 06 2011 on the restriction of the use of certain hazardous substances in electrical and electronic equipment The following substances in particular are concerned lead Pb Cadmium Cd Hexavalent chrome Cr Polybrominated biphenyl...

Страница 57: ...ctions Duty of care of the operator Please read these safety instructions carefully Please read this manual before using the product The operation of the products depends on your reading and following the information in this manual Check your work before you start using the product Keep this manual for future reference it is part of the product Observe all warnings and notes on the product If a se...

Страница 58: ... explosive or burning environment the product may overheat and malfunction HINT Installation on the floor Avoid placing the product on the floor Other people or yourself could trip over it CAUTION Risk of injury during overhead installation If the product is mounted above a work area where people are working the bracket may fail Use an additional safety rope to secure the product in case of failur...

Страница 59: ...sks HINT Damage to the touch screen by sharp objects The product s touch screen can be damaged by the use of sharp objects e g screwdrivers knives scissors or other tools The touch screen of the product is only suitable for operation with fingers or special operating aids CAUTION Risk of injury from glass and metal splinters Bending or twisting could break the glass of the display circuit board or...

Страница 60: ...in the goods only in case of intent or gross negligence on the part of WEROCK This exclusion shall not apply to liability for damages resulting from injury to life body or health The provisions of the Product Liability Act shall also remain unaffected by the exclusion of liability Obligation to give notice of defects Customers must report obvious defects immediately in text form otherwise the asse...

Страница 61: ... pollutant collection points you will of course not incur any costs According to 11 BattG owners of used batteries must collect them separately from unsorted municipal waste Used portable batteries are collected exclusively at collection points that are connected to the common take back system or a manufacturer s own take back system There are currently over 200 000 collection points in Germany Yo...

Страница 62: ...Rockbook X500 Series User Manual 62 96 Carefully remove the battery or accumulator ...

Страница 63: ...s transportation or energy supply applications It is an excellent companion for everyday heroes The fully rugged extremely resistant notebook was developed especially for outdoor use and is suitable for all day operations at any location The Rockbook scores with an especially bright screen powerful Intel processor options hot swappable battery as well as extensive security features fall resistance...

Страница 64: ...s charging HDD activity indicator Caps Lock key enabled Indicates the connection status of wireless communication 2 Microphones 8 Keyboard Used to enter data into the computer 3 Display 9 Touchpad a touch sensitive pointing device 4 Programmable function key 10 Click buttons left and right works like a computer mouse together with 9 5 Hole for resetting the computer 11 Fingerprint sensor for Windo...

Страница 65: ...DD slot and other expansion Right side 1 RS232 connector 4 USB connector 2 3 5mm headphone connector 5 SD card reader compatible with SDHC cards The contacts of the SD card must point upwards towards the keyboard 3 USB connector 6 DC input for connecting the power supply unit ...

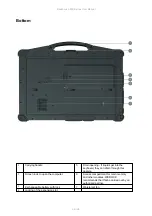
Страница 66: ...t into the keyboard they can drain through this opening 2 Screen lock to open the computer 6 Access compartment for main memory and other modules WEROCK recommends that this be carried out by an authorised partner 3 Exchangeable battery with lock 7 Waterproof fan 4 Locking of the expansion slot ...

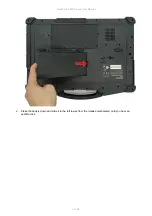
Страница 67: ... could damage the display Hint Before connecting the product to a power outlet make sure that the power cord is not pinched or damaged Also make sure that the power output is within the voltage range of the product First Time operation To put the Rockbook X500 into operation proceed as follows 1 Inserting the battery 2 Connection to power supply 3 Starting the notebook Inserting the battery To ins...

Страница 68: ...Rockbook X500 Series User Manual 68 96 2 Press the battery down and slide it to the left away from the release mechanism until you hear an audible click ...

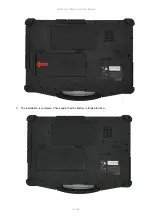
Страница 69: ...Rockbook X500 Series User Manual 69 96 3 The installation is complete Check again that the battery is firmly attached ...

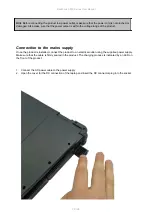
Страница 70: ...roduct Connection to the mains supply Once the product is installed connect the product to an electrical outlet using the supplied power supply Make sure that the cable is firmly seated in the product The charging process is indicated by an LED on the front of the product 1 Connect the AC power cable to the power supply 2 Open the cover for the DC connection of the laptop and insert the DC connect...

Страница 71: ...ries User Manual 71 96 3 Connect the power supply unit to a power outlet 1 To open the notebook press the display lock and lift the lid while holding the bottom with the other hand until it reaches an upright position ...

Страница 72: ...Rockbook X500 Series User Manual 72 96 ...

Страница 73: ...he Product for the first time In the course of software updates or due to different editions individual steps may differ slightly Setting up Windows 10 Follow the steps below to complete the Windows 10 IoT Enterprise setup process 1 Press the power button to turn on the computer 2 First select your country region your preferred app language your preferred keyboard layout and your time zone then ta...

Страница 74: ...l then try to connect to network Tap Skip this step to continue without a wireless connection as you can then set up the network later 5 On the Get going fast screen click Use Express settings for the fastest setup If you would like more information tap Learn more or if you would like to select your own options click Customize settings ...

Страница 75: ...ided and then tap Next 7 The initial setup screens are complete and the desktop is displayed 8 Read any introductory screens describing features of your computer and tap Next upon completing each You are now done with the initial setup process Operating the device This chapter provides information on how to use the computer CAUTION ...

Страница 76: ...r put it into power saving mode or hibernate it Automated power saving settings can also be programmed through Windows Power Settings Turning off the computer To turn off the computer do the following 1 Click on the Windows icon 2 Then click on the Power icon 3 Finally click on Shutdown Power saving mode sleep mode There are several ways to put the computer into power saving mode 1 Press the on of...

Страница 77: ... is a cursor pointing device that provides all the functions of a two button mouse Its main function is to move the cursor around the screen You can also point select or drag objects on the screen 3 Fn keys Press the Fn key in combination with the function keys 1 to perform software specific functions 7 Right mouse button 4 Windows key Press the Windows key to open the Start menu The key has the s...

Страница 78: ...dschirm zu bewegen Sie können auch Elemente oder Objekte auf dem Bildschirm zeigen sie auswählen oder ziehen Functions Point Move your finger on the touchpad to point the cursor at an item or object on the screen Click To left click move the cursor to the element or object on the screen and then lightly tap the touchpad or press the left button To right click move the cursor to the item or object ...

Страница 79: ...els are equipped with a capacitive touchscreen This type of touchscreen responds to objects that have conductive properties such as fingertips and a stylus with a capacitive tip You can navigate the screen without using a keyboard touchpad or mouse The following table shows how to use the touchscreen to obtain corresponding mouse functions CAUTION Do not use pointed objects such as pens or pencils...

Страница 80: ...r counterclockwise The gesture works in applications that support this particular gesture Press and tap Press on the target and tap with a second finger Use press and tap to gain access to the context menu menu Tap with two fingers Tap with two fingers at the same time with the target centered between them The function is defined by applications that support the specific gesture Swipe Perform a qu...

Страница 81: ...nection status icon in the Windows notification area The more bars the icon displays the better the WLAN connection strength Now the WLAN connection is established Test the connection to the network using an Internet browser such as Edge Using the Bluetooth function Bluetooth technology enables wireless communication between devices over short distances without the need for a wired connection Data...

Страница 82: ...o complete the hardware device and security mechanism verification before it starts the fingerprint sensor Enroll a fingerprint 1 Click the Windows icon Settings Accounts Login Options 2 Click Setup on the right side under Fingerprint 3 Follow the on screen instructions to complete the process Scaling and setting the screen resolution The high resolution 1920 x 1080 Full HD display of the rugged t...

Страница 83: ...tings option 3 The Display window will appear Click the drop down option under the Scaling and Layout section and change the scaling option to 150 recommended or any other desired display scaling Changing the screen resolution As an alternative to changing the display scaling setting the user can also change the overall resolution to enlarge the screen elements 1 Tap and hold anywhere on the deskt...

Страница 84: ... and select a different resolution to switch to and start again at step 2 6 You can now use the device with the new resolution setting Using the hot swap battery function The devices support hot swap i e the notebook does not have to be switched off to replace the main battery To support hot swap there is a backup battery inside the notebook that is charged together with the main battery This batt...

Страница 85: ... potential problems caused by over discharging the battery Follow these steps to replace the main battery while the notebook is running 1 Turn on the notebook and check the battery status 2 Press the release mechanism and push the battery down and slide it to the right towards the release mechanism 3 Carefully remove the battery or accumulator ...

Страница 86: ...kbook X500 Series User Manual 86 96 4 Now insert the new battery into the battery compartment First align the battery with the unlocking mechanism and then place the battery completely into the compartment ...

Страница 87: ...ies User Manual 87 96 5 Push the battery down and slide it to the left away from the release mechanism until you hear an audible click 6 The installation is complete Check again to make sure the battery is firmly seated ...

Страница 88: ...ts Modern electronic devices are very sensitive to electrical charging As a safety precaution always use a grounding bracelet Place all electronic components on a static dissipative surface or in a static shielded bag if they are not inside the housing Trennen Sie das Gerät immer von Ihrer Stromversorgung bevor sie es reinigen Benutzen Sie keine Säure Ätzflüssigkeit oder Spraywaschmittel zur Reini...

Страница 89: ...com Mail andere Regionen contact werocktools com www werocktools com Troubleshooting Basic troubleshooting Here are helpful hints to follow before taking further action when a problem occurs Try to figure out which part of the computer is causing the problem Make sure you turn on all peripherals before you turn on the computer If an external device has a problem make sure the cable connections are...

Страница 90: ...operly connected If the device is running on battery power the battery may be dead Charge the battery The quality of the wireless LAN signal is poor The notebook may be out of range Move the notebook closer to the access point or another wireless LAN device that is connected to it Check if there is any interference in your environment such as microwave ovens cordless phones Move the tablet away fr...

Страница 91: ...uchpad is clean I cannot access the LAN network Make sure the LAN cable is properly connected to the RJ 45 port and the network hub Make sure the network configuration is correct Make sure the user name or password is correct Power Management Problems The computer does not automatically enter sleep or hibernation mode If you have a connection to another computer the computer does not enter Hiberna...

Страница 92: ...ary computer skills Some settings may cause the computer to stop working properly When and how to use it You need to run the BIOS Setup utility when You see an error message on the screen prompting you to run the BIOS Setup Utility you want to restore the factory default BIOS settings You want to change some specific settings according to the hardware You want to change some specific settings to o...

Страница 93: ...word has been set If both the administrator and user passwords are set you can enter either password to start the system and or enter BIOS Setup However with the user password you can only view change the settings of certain items A password setting is applied immediately after confirmation To delete a password leave the password blank by pressing the Enter key Set administrator user password Sets...

Страница 94: ... the changes you made Save Changes and Reset Saves the changes you made and restarts the device Discard Changes and Reset Restarts the computer without saving the changes you made Restore Default Loads the factory default values for all items Save as User Defaults Save user default settings Restore User Defaults Load factory defaults for all items Saves Changes Saves the changes you have made Disc...

Страница 95: ... Military Grade M2 SSD second hard d via SATA expansion slot Supported operating systems Windows 10 IoT Enterprise Windows 10 Pro Windows 11 Pro Windows 10 Enterprise Windows 10 Professional im Lieferumfang enthalten Security Windows Hello Login via fingerprint sensor TPM 2 0 AES New Instructions OS Guard Boot Guard MBE VT x VT d VT x with EPT Control Flow Enforcement Technology Kensington AES acc...

Страница 96: ... Manual version Date Changes 1 0 23 12 2020 Initial publication of the operating instructions 1 1 29 12 2021 Information according to 4 paragraph 4 Elektrogesetz 1 2 26 09 2022 Addition of product variants X540 X550 G2 Correction chapter heading Using the memory card slot Adjusting the manual structure New chapter Setting up Windows for the first time Update chapter Turning off the notebook New ch...

Отзывы: