ASSEMBLY & ADJUSTMENTS
WARNING:
To prevent injury from accidental operation, turn OFF and unplug the tool from the power
source before assembling or making any adjustments to the tool.
SELECTING THE GRINDING WHEEL
The grinding wheels included with your angle grinder are suitable for preparing surfaces for welding, grinding
welds, grinding structural steel and grinding stainless steel. Only use the tool and accessories for their intended
purposes. Replacement grinding wheels (Part No. 94475B) can be purchased from wenproducts.com.
When selecting grinding wheels, the following requirements must be met:
• The wheel is suitable for the grinding operation and the material to be ground.
• The wheel’s safe operating speed is higher than or equal to 11,000 RPM.
• The wheel has an outer diameter of 4-1/2 inch and an arbor size of 7/8 inch. The thickness of the wheel cannot
exceed 1/4 inch.
Fig. 4
Fig. 5
GRINDING WHEEL ASSEMBLY
(Fig. 4 & 5)
1. Disconnect the tool from its power supply. Be sure
that the wheel guard (Fig. 2 - 1) has been properly
installed before assembling the grinding disc.
2. Place the inner flange (Fig. 4 - 2) onto the spindle
first so that the grooves align with the spindle nut.
3. Next, slide the grinding wheel (Fig. 4 - 3) onto the
spindle. Make sure the direction arrow (clockwise) on
the wheel matches the arrow on the front housing.
4. Screw the outer flange (Fig. 4 - 4) into place. The
outer flange should fit snugly into the center of the
grinding wheel (Fig. 5).
5. Tighten the outer flange in place using the supplied
lock nut wrench (Fig. 4 - 5) while pressing down the
spindle lock (Fig. 4 - 1) to keep the spindle from rotat-
ing.
NOTE: Always use the supplied outer and inner
flange with the same thread size as that of the spindle.
Replacement outer flanges (94475-001) and inner
flanges (94475-0013) can be purchased from
wenproducts.com
2
3
4
5
1
11
Содержание 94475
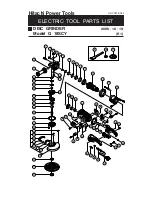
Страница 14: ...EXPLODED VIEW PARTS LIST 14...